Search This Blog

Thursday, January 20, 2011

Tips Tricks and Techniques: Easing a Pressed Curved Edge


You've seen the baby corduroy pants that I've been making for my new nephews, well I've recently been working on a more feminine version of the pants.  In place of the angular front pockets, I've added some sweet rounded pockets.  These rounded pockets are really quite simple to make, so long as you know one simple trick: easing the curved edge.

These particular pockets are stitched directly to the front of the pant, rather than being built in.  With the angular pockets on the boy version, you can easily press the raw edges 3/8" and then stitch them to the front of the pant.

Have you ever tried to press a curved edge?  Not the easiest thing.  You can make it a whole lot easier by using a simple gathering stitch around the base of the curve.


To do this you will want to use a long stitch, with loose tension.  You will start about 1 inch above the turn of the curve, and stitch 1/8" outside of the press line (this will ensure that your gathering stitch is not visible when the pocket is finished). Continue stitching until you have turned the curve, and are about one inch above your curved edge.  Leave you thread ends long, and don't backstitch to start or end your stitch line.

You will not slightly gather your thread.  You will want to pull on either the top or bobbin thread, just enough that the curve begins to turn in.  We are not actually gathering or ruffling the pocket, but merely pulling the threads enough that the raw edge begins to turn inward.


Once I have my stitch line gathered the desired amount, I tie a simple overhand knot with my threads, and trim them.  The knot will keep the gather in place until the pocket is finished.

Now with your iron you will want to press in your raw edges.  Press the entire length of the pocket, and the curved edge.  Your curve should turn smoothly and be ready for attachment.


Now wasn't that easy.  I love using this technique for rounded pockets, but I'm sure that it has many other applications as well.

Thanks for reading, and happy sewing.

Obviously I'm missing a photo of the finished project.  I thought that I had one, but apparently I'm missing it.  I'll try to add it as soon as I am able to get a decent shot.


Wednesday, January 19, 2011

Upcycled Knit Mittens Tutorial


I had a bit of sweater knit left over after my Men's Sweater to Toddler Cardigan refashion.  I am a bit of a fabric scrap hoarder, and had hopes that I could put the remaining bits and pieces to good use. 

I think that I found the perfect project for small scraps of knit: mittens.  It seems that you can never have enough pairs of mittens. Like socks, it seems like they are frequently separated from their other half.  


Read more to learn how to make your own pair of sweater knit mitts.

Tuesday, January 18, 2011

Charisma Dress


I ordered this fabric a couple of months ago. It was supposed to turn into a bag, and there is still a possibility that some of it will, but for now we have a dress.


 The print is from the Charisma line by Gail Kessler for Andover fabrics.  I love the print, and think that it will look lovely on my niece.  For some reason though, this fabric has given me fits.  I have made errors when cutting out every project that I've started with this fabric.

I unintentionally added an extra three inches to the neckline of this dress.  To make up for my mistake, I added a pleat, which would have looked nicer if the print was smaller.

To make the pleat look like it truly belonged there, I covered the top portion of it up with a faux placket.


 I have to say, that I love the way it turned out.  It was quite a happy accident.  I also love the mini pom pom trim that I used to line the dress and bloomers.


You may recognize the pattern from this past project.  Remember that bright sunny dress.  I miss bright sunny days, and warm weather. The pattern is simplicity, but has been discontinued. 

Thanks for all of your interest in my fleece slippers.  I'll try to write up a tutorial within the week.

I'll be linking here.  

Monday, January 17, 2011

Fleece Toddler Slippers


It seems that I always have cold feet.  In the winter I live in knee high socks and slipper socks.  Clark, on the other hand, hates wearing socks if he doesn't have shoes on.

To solve that problem I used up some of the fleece that I had in my fabric stash, and made some nice slippers for Clark's cute little feet.


The slippers are my own design, and still have a few kinks that need to be worked out.  This is version number two, but there are some adjustments that I'd like to make to them.  I've considered making up a printable pattern for you, but unfortunately I don't know how to grade patterns.  If I were to come up with one, it would have to be Clark's size, which happens to be a 7 to 8. Let me know in the comments if you'd be interested in that.


The slippers are fully lined with a velcro closure.  They are sure to keep Clark's toes nice and warm.


The slippers are the same basic design as the baby slippers that I pictures back on Wednesday.


Thanks for reading.  I'll be linking here.


Friday, January 14, 2011

Friday Finds: Throw Pillows

We have a few throw pillows that sit on our love seat in the living room.  Our living room is lived in, and those poor throw pillows have seen better days.  I'm not one to remove throw pillows when we sit on a couch.  I really think that pillows should be functional, but at the same time I love it when they help tie a room together.

I've been scouring all of the darling little Etsy shops, in search of some inspiration.  I thought that I'd share a few of my favorite finds.


Alright, these Scrabble Throw Pillows by Chunky Monkey Luv, are some of my favorites.  The whole
 L-O-V-E theme is very appropriate for Valentine's Day, but I don't think that I'm one that would leave them up all year long.  I do, however, love the idea of having them spell out something. Any suggestions...besides our last name, or f-a-m-i-l-y?  

My husband and I have a bitter scrabble rivalry.  He has a love of words, and I have a love of winning.  He's caused me to become quite the strategic scrabble player.  As you can see, my attachment to these pillows is an emotional one.


This sweet Dandelion Throw Pillow is by MaDahms.  I love how simple it is.  I become overwhelmed with patterned fabrics and excessive detail.  I love this.


The Cute Birdie Throw/Lumbar Pillow is by KainKain.  Once again, I love the simplicity of it.  White linens are so fresh, it's just so sad that it would never stay white in our living room (which is probably why some people move their pillows before being seated). I love the bird.


If you are looking for something a bit more formal or feminine, this white on white pillow cover by MaDahms is perfect.  I love the design of the individual hand sewn flowers, and their placement on the pillow cover.


This Topography Throw Pillow caught my eye.  I think that it's quite interesting. It is by Diffraction Fiber.


Both my husband and my son would be thrilled if I chose to decorate our living room with dinosaurs.  Unfortunately it probably won't happen, but fortunately my son has a room that could use a T-Rex or two.  Sadly for my husband, his room has very little chance of having dinosaur throw pillows.


If you are looking for a bit more throw pillow inspiration, be sure to check out Blogger's Pillow Party, hosted by Stitched In Color.

Thursday, January 13, 2011

Tips, Tricks, and Techniques: The Rolled Hem

As I mentioned yesterday, I have recently spent some time playing with my new Brother overlock machine.  Yesterday I serged a few of my first rolled hems.  A rolled hem is a beautiful thing.  It is such a neat and tidy way to take care of raw edges.  You can easily find the settings for rolled hems in your serger handbook.  It took me a little while to get used to removing needles, and  stitch fingers, but I'm sure that in no time it will be as easy to prepare rolled hem settings as it is to thread a needle on the sewing machine.


I thought that I'd devote todays post to rolled hems and narrow rolled hems.  A rolled hem can be created using a standard sewing machine, but the equipment is a little different, and the end result is a bit more polished.  Both types of sewing machines can create quite impressive results.


A rolled hem is created when the right side of the fabric is rolled back toward the wrong side of the fabric, and stitched in place.  With an overlock machine, the upper and lower looper threads secure the fabric by looping around the rolled edge. The tension on the lower looper thread is greater than that of the upper, causing the fabric to pull toward the wrong side. Often times you will see different variations of rolled hems on shirts, table linens, cloth napkins, bed linens, and sheer fabrics such as skirts and scarves.  There are a number of different applications, but an overlocked rolled hem is particularly useful when finishing off knit and woven fabrics.

Image Source: Modest Maven

One example of a rolled serged hem is on this Sensei Top by Jodell, of Modest Maven.

For tips on serging a rolled hem, read this article from Sew Inspired.

Image Source: Craft Stylish

Wednesday, January 12, 2011

Baby Brothers

In the past six weeks my family has welcomed two new baby brothers.  My sister had an adorable baby boy a week and a half before Christmas.  Just last week my brother and sister-in-law welcomed their third son to the world.

The grandson total is now 5, meaning that we can now officially have a basketball team of boys.  I am so excited about my new nephews.  There is something so special about holding a brand new baby.

We too recently welcomed a brother to our home.  I am thrilled to have my second little guy, this one comes in the form of an overlock server.  I am so EXCITED.
Brother 1034D 3/4 Lay-In Thread Serger

I'd been saving my pennies for a serger of my own.  I received some money  for my birthday, and set it aside.  Unfortunately December brought with it many unexpected expenses....plumbers, root canals, and pending surgeries.  Needless to say the money that I had set aside was used to pay off other bills.

I cried, when some very generous family members gave me my new serger.  It was totally unexpected, but extremely thoughtful. I really feel that I received much more than a new overlock machine.  Their gift really helped me understand how much I am loved, and cared for.  They were aware of the roller coaster ride that we had been on that month, and did something for me that I will not forget. Thank You.

I've used a serger before, but only for the basic overlock stitch.  I've got a lot to learn and explore.  I'm excited to see just what this machine can do.  I'm working on a skirt, and am going to try to figure out a narrow rolled hem, hopefully today.


Welcome baby brothers everywhere.  I'm glad your here.  I'm looking forward to the time that we are going to spend together.


Tuesday, January 11, 2011

Fleece Scarflette Tutorial


I mentioned last week that there were several variations to the fleece neck warmer.  Not only did I end up making Fleece Neck Warmers for just about every guy that we gifted to, but I also came up with a few more feminine versions for the women.


One of the problems with a pull over neck warmer, is that fleece often creates quite a bit of static electricity.  Static and hair styles often don't mix.  To avoid pulling the fleece straight over the head, and having every hair on your head standing on end, I added a simple button closure.


On the scarflettes for the little girls, I added velcro.


There are many possibilities when it comes to making and embellishing these fleece scarflettes.  One other difference between these neck warmers, and the pull over neck warmers, is that these are not quite as tall.  They aren't designed to be pulled over your mouth or chin.

All of the above scarflettes are made with slightly different techniques, so I'm going to show you how to make the one above, and I'll provide a few instructions for making the different variations.


Monday, January 10, 2011

Men's Sweater to Toddler Cardigan Refashion


So you may have seen a button similar to this image on my sidebar.  It is lovely little thing courtesy of A Beautiful Mess.  Rachel and Elsie are starting a weekly segment called Project ReStyle. So what is Project ReStyle?  You can read their full post here,  but to use their own words, it is "Project Restyle is a just-for-fun creative group focused on ReStyling damaged, unwanted or unusable goods into fresh, beautiful pieces." I love restyling pieces, and I have a heap of unwanted goods that need to be turned into something beautiful. 

You can join in on the fun.  While I'm not sure that I'll be doing restyled projects on a weekly basis, I am going to make an effort to work through that pile that I mentioned earlier.


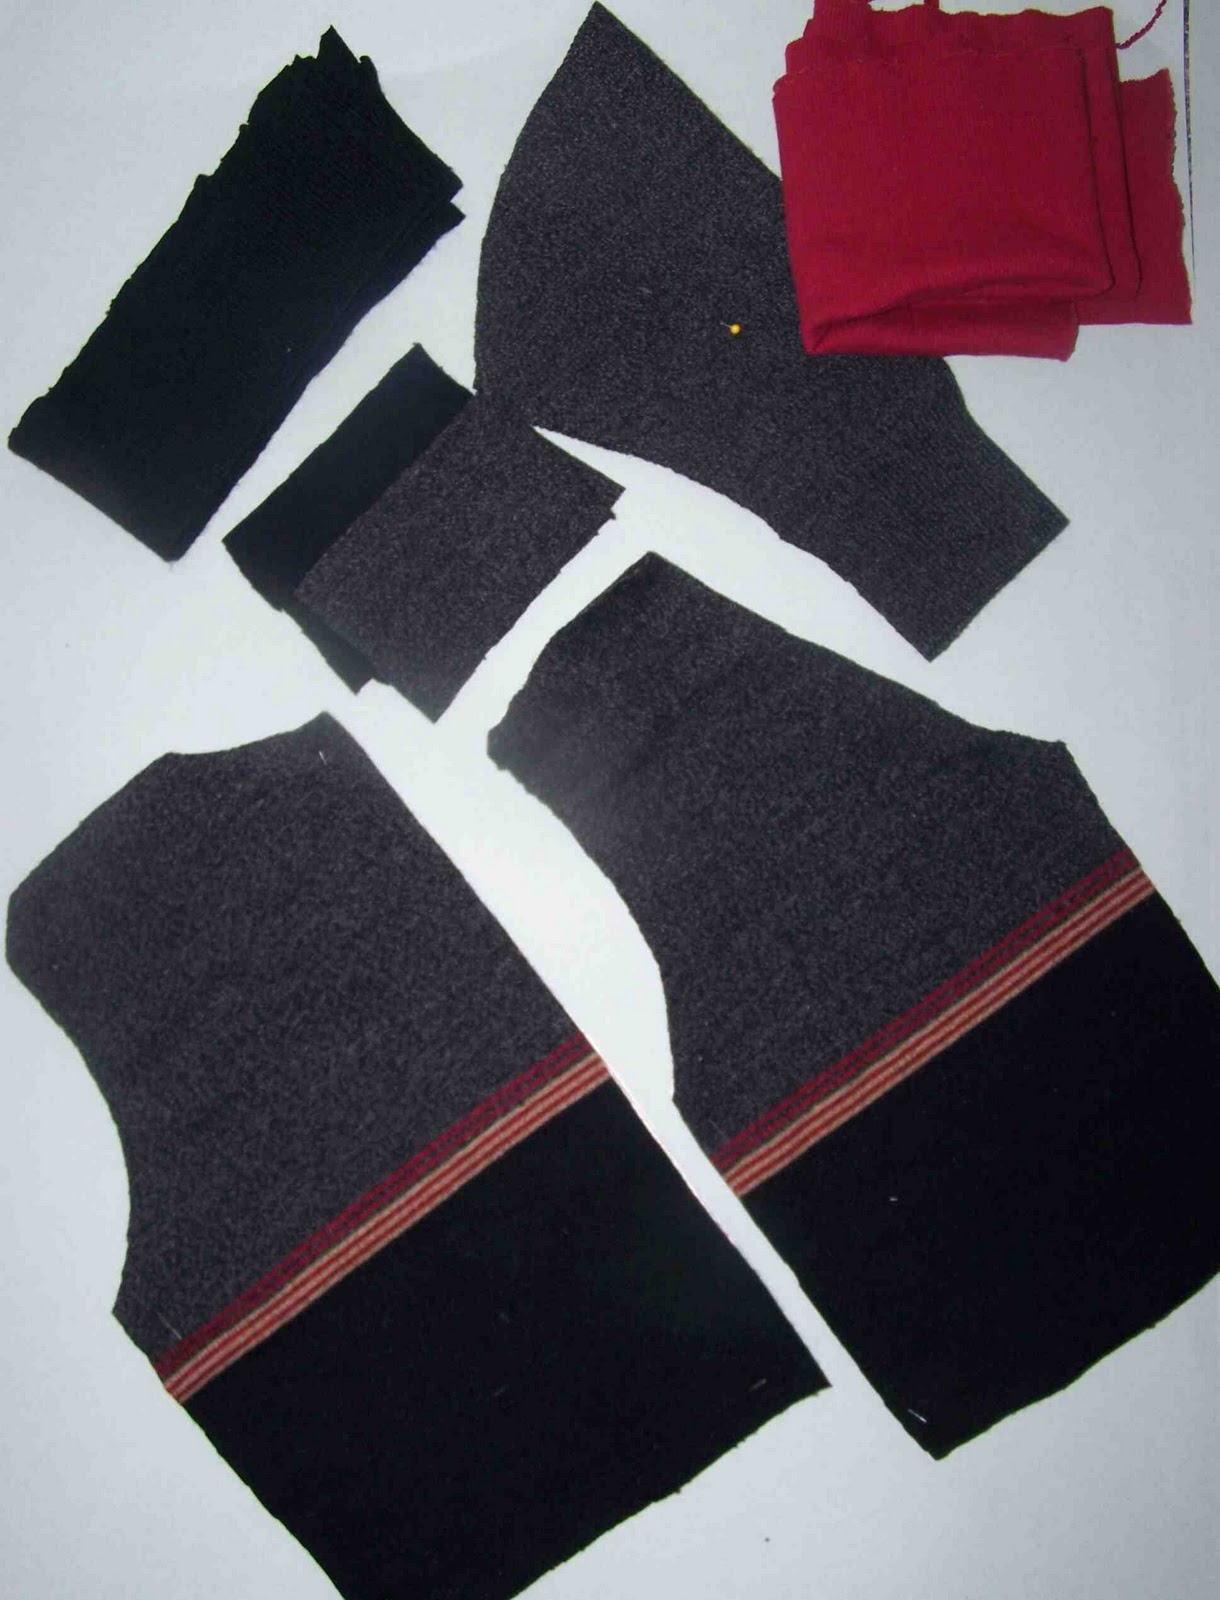
This men's sweater has been sitting in our basement for some time.  My husband doesn't seem to remember it, and I surely didn't want him wearing it, so I decided to turn it into something sweet for my lil' man.


I'm very fond of cardigans, but Clark didn't have any.  I thought that this sweater could make a decent little cardigan for him.


 I used the same pattern that I created for the Argyle Pull Over that I made in the fall.  I simply modified the pattern pieces, and utilized the built in beauties of the sweater.  I cut the sleeves so that the cuffs were put to their intended use.  I also cut off and saved  the original waistband. It was sewn to the bottom of the bodice pieces, once the seams were sewn.


 I didn't have any ribbed sweater knit, so I just used standard  ribbed knit (unfortunately I didn't have any black or charcoal).

The buttons were plucked off of one of my brother's old suits.  The smartest thing that I did with this cardigan was sew the buttons to the ribbed knit.  No button holes.  I seriously almost attempted sewing button holes through 4 layers of ribbing.  I'm sure that I saved myself lots of button hole frustration, and sweater buttoning frustration for that matter.

I sure do love a little boy in a cardigan. I'm pretty pleased with how the sweater turned out.  In my opinion it was a successful refashion, and it didn't cost me a dime.

One of my goals for this year  is to sew my way through my stash of fabric and old clothing.  You need to get after me if I start showing pictures of new fabrics.  I certainly have enough material to keep me busy for the next few months.

I'll be linking here.

Friday, January 7, 2011

Friday Finds: Giia Neckpieces and Accessories


Wien Hex Bib Statement Necklace: Giia
Today I wanted to share one of my new favorite shops, Giia Neckpieces and Accessories.  I stumbled  upon this shop and was quite stunned when I saw the statement pieces of jewelry that were available in their shop.
Octopus Statement Necklace, Photo property of Giia.

I've mentioned before that I'm not big on jewelry, but their pieces are so unique and interesting that I couldn't help but share this shop with you.

Cuore Wave Statement Neckpiece: Giia
The main material used in their pieces is felt.  Yep, you read that right, FELT.  The necklaces and cowls that they create are simply stunning, and incredibly sculptural.

Although these necklaces and accessories are quite different from the typical items that I create, they are sure to inspire.  I am always amazed at the creativity and vision that artisans have. Go visit Giia, and take a trip around the Etsy marketplace for a bit of weekend inspiration.


Do you have any favorite artisan shops that leave you inspired?

Thanks for reading and have a great weekend.

Thursday, January 6, 2011

Apple Picking Vest and Tips Tricks and Techniques

This year my dad made an early request for a Christmas gift.  I explained that he'd like to have a vest with deep pockets that he could wear when picking apples.  I've mentioned before that my parents have a small apple orchard on their property, and having such a vest would definitely speed up the apple picking process.

I made the vest out of a gray denim that I picked up at Joann's.  I used a double fold extra wide bias tape to finish off most of the raw edges.

I made it so that the vest was sewn together on one side, and snapped together on the other.  If I were to make another vest like this, I'd probably have it snap on both sides.

Obviously I wasn't in the mood to iron out the vest for the photo shoot.
The pockets were designed so that they'd remain open.  To create them I added extra material width to the pocket.  I created a pleat at the base of the pocket to account for the added material.  I then applied boning to the top of the pocket which made it free standing (or opening).  I figured that the boning would make for easier apple picking.  I added some reinforcement stitching in the upper corners of the pocket.  Without the reinforcement stitching, the pockets would sag down and empty their contents.  The stitching helps the pockets stay in place, and support their load.


There is a pocket on either side of the vest.  With the one side sewn shut, I am guessing that it is going to be rather difficult to flip the vest around when one side is full.  However, if my parents are picking apples together, my mom can just load her's into the back side of the vest.

Milton, NH Mackenzie Farms
Hopefully it will prove helpful next apple harvest.

Tips, Tricks, and Techniques

Tips, Tricks, and Techniques is a little segment that I plan on starting.  It may happen on a weekly basis, or maybe randomly according to my posts.  It is a segment that I am starting in an effort to become a better sewist.  I feel like I'm learning everyday.  Most of my learning comes through trial and error.  Whenever I start a project that involves techniques that I haven't before attempted, I provide myself the opportunity to learn a bit more.

I would love to share the little bits of sewing knowledge with you.  .  My plan is to occasionally post tutorials on sewing techniques. I'd love to know if there is a specific technique that you'd like me to post on.  I'm open to suggestions. Some examples of techniques that I am referring to would be: sewing darts, creating pleats, sewing French seams, creating a blind hem, applying facings to a garment, ect.   Please let me know if there's a sewing technique that you'd like to explore together.

That being said, with this apple picking vest I worked with boning for the first time.  Boning is a wonderful thing.  It is often used in creating corsets, and fitted gowns.  It can be used to provide stability to everyday garments as well.  I've also seen it used on nursing aprons, which allows for the apron to stay open so that you can sneak a peak at your nursing babe.

I found a great video tutorial online that helped me apply the boning to the vest.  I thought that today I'd share that with you, rather than creating a tutorial of my own.  


Another great reference point is this article from Threads Magazine.


Thanks for reading.  I'll be linking here.