Search This Blog

Showing posts with label tips and tricks. Show all posts

Monday, February 13, 2012

Tips Tricks and Techniques: Knit Appliques

Mom Heart Tattoo 

I love appliques, it is such a quick and easy way to dress up any shirt or onesie. I especially like using knit fabrics for appliques, not only are they soft, but they make appliqueing even easier because they don't fray like a quilters cotton. I thought that today I'd share some of my favorite supplies, stitches, and secrets to creating successful knit appliques.

You can read more below.

Wednesday, January 18, 2012

Sewing Tips and Tricks Round Up

Here are a few clever tips and tricks that I've rounded up on pinterest. What are your favorite sewing tips?


Add tape to the bottom of your presser foot to sew vinyl easily.


Printable bias tape maker.


Keep spools and bobbin thread together with golf tees.


Store ribbon in oatmeal canister.


Add seam allowance to your own patterns.


Make the perfect hem.

Wednesday, December 7, 2011

Tips Tricks and Techniques: Version 2- Reusable Patterns


I've shared ideas before on creating reusable patterns, but I'm really excited about this next idea. I made up some christmas stockings for our new family of four.  I wanted to make sure that I saved the pattern so that I could use it in the future (should our family grow even more). The pattern needed to be durable and easy to store.

I found a scrap piece of clear vinyl that I had laying around from past projects (see: magnetic bibs, paper and plastic card wallets, and wipeable changing pads). The clear vinyl is perfect because you can write on it with permanent marker, you can pin through it, and it folds up nicely.  My favorite part about using the clear vinyl is that you can see through it.  Because it is transparent you can easily transfer an existing pattern to the vinyl. You can also see the fabric beneath, perfect for matching patterns or centering designs.


 I am always jotting notes onto the patterns that I make.  For this one I wrote down the seam allowance along with the year-that way I won't confuse it with any other versions.


I'm still hoping to share a little tutorial for the Christmas stockings. I just need to get my buns in gear.


Wednesday, March 9, 2011

Tips Tricks and Techniques: Make Reusable Pattern Pieces


Do you have a favorite paper pattern or template that you use all of the time?  I have several, but the problem with having favorites, is that they receive quite a bit of wear.

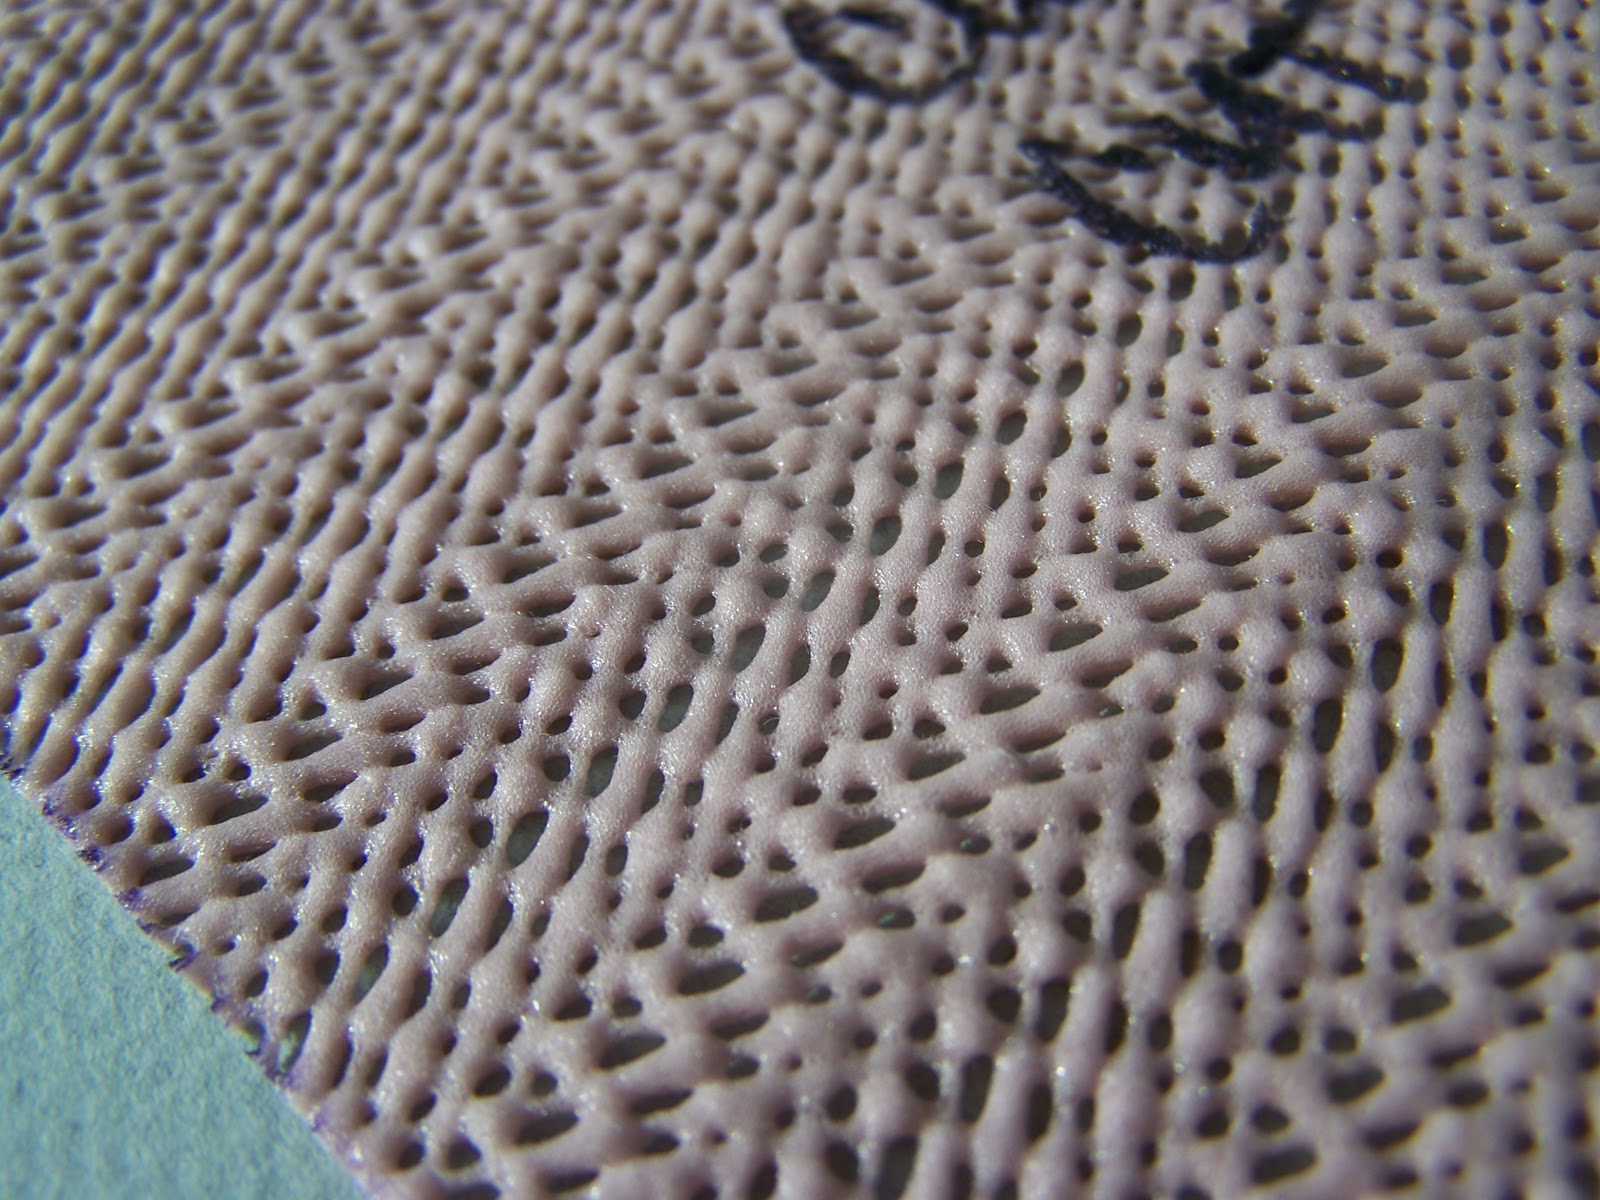
A cousin of mine shared an idea for preserving personal patterns.  This works best for small pattern pieces and templates.  Simply purchase some inexpensive drawer or shelf liner at the dollar store, cut your template to size, and use and reuse it.


The foam/plastic material makes it waterproof.  I do a lot of sewing in my kitchen, and on more than one occasion I've laid down a paper pattern piece on the counter, only to discover that there was a wet spot waiting for me.  

I also love the small holes in this material.  You don't need to worry about damaging your pattern with pins.  


You can also write directly on the material with a magic marker. I've made bib templates, burp cloth templates, baby bootie patterns, and even headband patterns out of the material.


Tuesday, February 22, 2011

Personalized Diaper Changing Pad


You  may remember my Wipeable Diaper Changing Pad, from last summer, if you don't, you can find the link to the tutorial on my side bar.


I really do love these diaper changing pads, and use it whenever I can with Clark (oh how I wish he was potty trained...or at all interested in being potty trained). It wipes clean, and is very convenient for when I'm on the go.  I stuff a partially emptied package of wipes, and a couple of diapers inside the changing pad, and I'm off.

I recently made this personalized changing pad for my niece that is due to arrive in early spring.

My new sewing machine has the ability to stitch a few basic fonts.  The letters aren't very large, but it has been a lot of fun to play around with.

Brother SA114-Non Stick Foot


Now, working with vinyl is not the easiest thing to do. Because this particular project has two sides of vinyl, it becomes even more complicated. Often times the vinyl will stick to either the presser foot, the strike plate, or both.  To make the sewing process go a bit smoother, I like to use a non-stick presser foot.  It allows the vinyl, leather, or other hard to sew material, to slide beneath the presser foot without as much "stick".

To prevent the vinyl from sticking to the strike plate or sewing machine, I like to pull the material, by gently lifting the bottom layer of vinyl away from the sewing machine (rather than pushing the material through the machine with my hand on top of the material).  You can also place a layer of gift wrapping tissue paper under the bottom piece of vinyl.  It will allow the material to move with greater ease as well.
Hope that helps.

Thanks for reading.

Thursday, January 20, 2011

Tips Tricks and Techniques: Easing a Pressed Curved Edge


You've seen the baby corduroy pants that I've been making for my new nephews, well I've recently been working on a more feminine version of the pants.  In place of the angular front pockets, I've added some sweet rounded pockets.  These rounded pockets are really quite simple to make, so long as you know one simple trick: easing the curved edge.

These particular pockets are stitched directly to the front of the pant, rather than being built in.  With the angular pockets on the boy version, you can easily press the raw edges 3/8" and then stitch them to the front of the pant.

Have you ever tried to press a curved edge?  Not the easiest thing.  You can make it a whole lot easier by using a simple gathering stitch around the base of the curve.


To do this you will want to use a long stitch, with loose tension.  You will start about 1 inch above the turn of the curve, and stitch 1/8" outside of the press line (this will ensure that your gathering stitch is not visible when the pocket is finished). Continue stitching until you have turned the curve, and are about one inch above your curved edge.  Leave you thread ends long, and don't backstitch to start or end your stitch line.

You will not slightly gather your thread.  You will want to pull on either the top or bobbin thread, just enough that the curve begins to turn in.  We are not actually gathering or ruffling the pocket, but merely pulling the threads enough that the raw edge begins to turn inward.


Once I have my stitch line gathered the desired amount, I tie a simple overhand knot with my threads, and trim them.  The knot will keep the gather in place until the pocket is finished.

Now with your iron you will want to press in your raw edges.  Press the entire length of the pocket, and the curved edge.  Your curve should turn smoothly and be ready for attachment.


Now wasn't that easy.  I love using this technique for rounded pockets, but I'm sure that it has many other applications as well.

Thanks for reading, and happy sewing.

Obviously I'm missing a photo of the finished project.  I thought that I had one, but apparently I'm missing it.  I'll try to add it as soon as I am able to get a decent shot.


Thursday, January 6, 2011

Apple Picking Vest and Tips Tricks and Techniques

This year my dad made an early request for a Christmas gift.  I explained that he'd like to have a vest with deep pockets that he could wear when picking apples.  I've mentioned before that my parents have a small apple orchard on their property, and having such a vest would definitely speed up the apple picking process.

I made the vest out of a gray denim that I picked up at Joann's.  I used a double fold extra wide bias tape to finish off most of the raw edges.

I made it so that the vest was sewn together on one side, and snapped together on the other.  If I were to make another vest like this, I'd probably have it snap on both sides.

Obviously I wasn't in the mood to iron out the vest for the photo shoot.
The pockets were designed so that they'd remain open.  To create them I added extra material width to the pocket.  I created a pleat at the base of the pocket to account for the added material.  I then applied boning to the top of the pocket which made it free standing (or opening).  I figured that the boning would make for easier apple picking.  I added some reinforcement stitching in the upper corners of the pocket.  Without the reinforcement stitching, the pockets would sag down and empty their contents.  The stitching helps the pockets stay in place, and support their load.


There is a pocket on either side of the vest.  With the one side sewn shut, I am guessing that it is going to be rather difficult to flip the vest around when one side is full.  However, if my parents are picking apples together, my mom can just load her's into the back side of the vest.

Milton, NH Mackenzie Farms
Hopefully it will prove helpful next apple harvest.

Tips, Tricks, and Techniques

Tips, Tricks, and Techniques is a little segment that I plan on starting.  It may happen on a weekly basis, or maybe randomly according to my posts.  It is a segment that I am starting in an effort to become a better sewist.  I feel like I'm learning everyday.  Most of my learning comes through trial and error.  Whenever I start a project that involves techniques that I haven't before attempted, I provide myself the opportunity to learn a bit more.

I would love to share the little bits of sewing knowledge with you.  .  My plan is to occasionally post tutorials on sewing techniques. I'd love to know if there is a specific technique that you'd like me to post on.  I'm open to suggestions. Some examples of techniques that I am referring to would be: sewing darts, creating pleats, sewing French seams, creating a blind hem, applying facings to a garment, ect.   Please let me know if there's a sewing technique that you'd like to explore together.

That being said, with this apple picking vest I worked with boning for the first time.  Boning is a wonderful thing.  It is often used in creating corsets, and fitted gowns.  It can be used to provide stability to everyday garments as well.  I've also seen it used on nursing aprons, which allows for the apron to stay open so that you can sneak a peak at your nursing babe.

I found a great video tutorial online that helped me apply the boning to the vest.  I thought that today I'd share that with you, rather than creating a tutorial of my own.  


Another great reference point is this article from Threads Magazine.


Thanks for reading.  I'll be linking here.



Friday, November 5, 2010

Project Organization: Color Coded Sewing Machine Needles


It seems like it is all I can do to keep my house tidy and clean.  When it comes to keeping my craft supplies and closet clean I am a complete failure.  Over the past few months I have been trying to find little ways to organize my craft life.  One little thing that I did was color code my sewing machine needles.


I know that some brands of machine needles have different colors of bands at the base of the needle shaft (singer), but the particular brand of needles that I use do not.  I decided that it would be rather helpful if I could keep identify what kind of machine needle in my sewing machine when I went to sew.   By doing so I can very quickly identify whether or not I need to switch out my needles (without having to closely examine each point).


To color code my needles I simply collected the nail polish that I had on hand, added a small dab at the base of each needle, and one to the corresponding case.  Now each type of needle (universal, ball point, leather, heavy duty, ect.) has it's own color marking. It would have been  great if I had access to my nail polish collection from 1995, then maybe I could use blue, green, orange, and purple instead of three different shades of reddish pinks. None the less I have found it helpful.

What organization techniques do you use with your craft area and supplies?

I'll be partying here.

Tuesday, August 3, 2010

Tips and Tricks for Sewing Knits-Part 2


Alright if you are just joining in on the fun you might want to hop back to my recent post on selecting and preparing knit fabric.  If you've already gone through the information (or knew it all before hand) then let's get started.

The thing about knits is that they stretch, and they roll, and they pull. My first experience sewing with knit fabric was a bit traumatic, but after doing a bit of research, and applying a few techniques, my projects have improved. If you have the proper equipment, and a basic understanding of what stitches work well with knit fabrics, the whole process of working with knits becomes much easier.

 Equipment:


Ball Point Needles-  I've mentioned this in an earlier post, but there is a sewing machine needle that is made specifically for working with stretch fabrics.  It is a ball point needle, but some of the cases actually say Jersey Knit needles.  You can find them in most fabric stores and craft departments.  Ball point needles come in a variety of sizes and are made by a number of different brands. The size of your needle should be determined by the weight of your material.  Lightweight materials work well with ball point needles sizes 10/70 or 11/75.  Medium weight fabrics work well with 12/80, and heavy weight fabrics are best with either a needle size 12/80 or 14/90.  Size 11/75 is a pretty safe needle to have on hand.

Thread: All purpose thread is suitable for most projects, but polyester, or cotton wrapped polyester thread will also work well.


Shears: A pair of sharp fabric scissors are perfect for cutting your knit fabrics.  A rotary cutter will also work well.  Pinking shears are not ideal for knit fabrics, the pinking has a tendency to fray knits.


Stabilizer: Because knits can be a bit unpredictable, it is nice to have some stabilizing paper or material on hand.  Tissue paper, newsprint, adhesive tape, spray starch, or iron on water soluble stabilizer can all make sewing with knits a bit easier.  


Sewing Machine: Any sewing machine can sew knits, but some are definitely easier to handle.  Newer machines often have some stitches built in specifically for stretch fabrics.  I will discuss the stitches available on my machine, but if you have an older model all is not lost, you can still successfully sew with knits.


Serger:  This is one thing that I'd really love to have.  Sergers are great for finishing raw edges and giving your project a finished look.  Sergers are by no means necessary, but are nice to have on hand.


Stitches: Because knits are by nature stretchy, stretch must be added into a seam as you sew.  If there is not enough stretch in a seam then threads tend to break.  Using the proper stitch for your fabric can prevent future headaches and garment repairs in the future.

 I mentioned in my previous post that I learned a lot reading through my sewing machine manual.  I would highly recommend pulling out your machine's manual (or find it online like I had to) and reading through which specialty stitches are built into your machine.


Once you have done your homework test out all of the built in stitches on a swatch of fabric that you will be using.  Doing so will allow you to find the stitches that will work for your particular project.

If you are making a fitted garment it is always a good idea to baste your seams together before stitching (many of the specialty stitches are a pain to unpick).


Straight stitches- 


 Most machines have a few basic straight stitches suitable for stretch fabrics.  If your machine does not have any of these stitches available you can always go about it the old fashioned way. In order to do so you will need to slightly stretch the fabric both in front of, and behind, the presser foot.  This will allow an even amount of fabric to be fed through the machine. Stretching the fabric will also allow the stitches to be a bit looser once the fabric relaxes, this will prevent thread breakage later on.  I read in one book that it is best to have 9-10 stitches per inch.  You may need to adjust your stitch length to achieve the 9-10 stitches.
Triple Stretch Stitch on Knit Applique


pastedGraphic.pdf2

Triple Stretch Stitch- This is one of those stitches that I had no idea way created for knits.  I love this stitch.  I've used in on velcro, quiet books, bibs, ect.  This stitch combines a forward stitch with a back stitch, followed by another forward stitch.  So just as the name implies it is a triple stitch.  It is machine stitch 2 on my Brother machine.  It takes a bit more time and thread to use this stitch, but it is well worth it.  It is especially nice to use when attaching sleeves or sewing inseams.  you can also use it as a reinforcement stitch on some of your other projects.  I used this stitch on my son's pajamas for most all of the seams.  It seemed to work well, and I love the way it looks on the applique.   I am guessing that the reason it is well suited for knits is because each stitch is reinforced and is less likely to break.


Narrow Zig-Zag Stitch-On band of red fabric

pastedGraphic.pdf3

Narrow Zig-Zag Stitch- This is a great stitch to use for knits that don't curl on the edges.  It is a fast and easy stitch to use.  It is really narrow so it can be used on virtually any seam.  I used it when attaching the red bands on Mr. C's pajama bottoms, and also as a security stitch on the hem of his pajama top. On my machine this is option number 3.  


Overcast Stitches: Knit Fabrics do not fray on the edges, so seams do not have to be finished. That being said, I think that finishing off the edges gives garments a polished look.  Here are a few options if you choose to finish your edges.


Straight with Overedge Stitch


pastedGraphic.pdf


Straight with Overedge Stitch-This is stitch option 8 on my machine.  It combines a straight stitch with a diagonal stitch.  It is a great way to both stitch your sew and finish your seam at the same time.  I haven't had great success with this with my ballpoint needle.  I think that the bulk of the seam is difficult for my machine on the diagonal stitch.  Your machine might not be quite as temperamental as mine, but it is definitely worth a shot.  Oh how I love finished edges.


3 Point Zig-Zag Stitch
pastedGraphic.pdf
Three Poing Zig-Zag Stitch- Option 5, is a great not only for darning, and attaching elastic, but is wonderful for stretch fabrics.  It can be used to overcast and finish your raw edges.   It's a great little stitch.

Serger- Okay, for all of you fortunate enough to have a server hop on over to mirelap for information on the best way to finish your raw edges.  She has a wonderful post about not only finishing knit edges, but also on working with stretch fabrics.


Stabilizing Your Fabric:
Seam stabilized with paper

I mentioned this is an earlier post, but I read this wonderful post by Rae of Made by Rae, about how she'd trick her machine into thinking that it was sewing paper instead of knits.  She'd put a piece of paper cut to the size and shape of her fabric pieces and stitch on top of it.  I tried it, and it works great.  I must warn you that this is a technique that is best suited for straight stitches (don't try it on zig zag or overcasting stitches...you'll regret it).  She mentioned that the thinner the paper the better.  I have tried newsprint, tissue paper, and printer paper.  The tissue paper definitely worked the best.  I found that it was much easier just to put the paper on the bottom of the stack of fabric (rather than on top), that way I could see the fabric that I needed to sew, and I didn't have to cut it to shape.  

Mirela of Mirelap has great suggestions for stabilizing your stretch fabrics. She suggests using a spray starch to give your fabric a bit more rigidity, she also recommends using a water soluble stabilizer (this I've yet to try), another option is using an adhesive tape that runs along your seam, it assists in keeping the fibers of your fabric in place while stitching.  It can also be removed or cut off when you are done.  

Hopefully with a bit more understanding of the nature of knits, and the best suited equipment and stitches, your next knit project will be a success.  Now hop over here to see how Mr. C's pajamas turned out.