Search This Blog

Showing posts with label baby boy. Show all posts

Wednesday, July 17, 2013

Baby Boy Nursery


This week I made some time to work on the baby's nursery.  The space is small, and it will only be a temporary space, so I didn't want to spend a lot of money decorating it.  The decorations also needed to be temporary, so no painting was involved. I tossed around a lot of different ideas, and finally settled on paper airplanes.  Sweet, simple, and easy to work with. I actually woke up one morning thinking of a paper airplane mobile made out of fabric.  I don't know if that project will ever see the light of day, but it served as a jumping off point.  You can find more of my paper airplane inspiration on my nursery board on pinterest.

A few months back I picked up a killer deal on some indoor vinyl from Pick Your Plum, and it has been waiting in my craft closet for the perfect project.  These little paper airplane decals were super easy to make, even without any sort of craft cutter to speak of.  I designed the airplanes, and then printed out a template.  I then transferred the image to the paper backing side of the vinyl, and used an x-acto knife to cut them out.  The white pieces were cut out first, and then spaced slightly apart on darker pieces. The dash marks are all the same width and length, and I just made up the design as I went.

It was a fun, inexpensive, and easy way to update the space. At least now I feel like some effort has been made to prepare our home for this little guy.

The I Am A Child of God printable I found on Pinterest, but you can access it on Mommy Mormon Blogs if you are interested.  It is available in several colors.  This shade of blue just happened to match my vinyl and the blue stripe in the striped crocheted afghan.

Read more about the refinished bassinet.

Apologies for the low lit photo....the room is in the basement.


Tuesday, May 14, 2013

Boy Faves: Nurseries

I don't ever spend a lot of money decorating a nursery, but I love gathering inspiration, and picking a few favorite ideas to incorporate into the baby's space.  Baby boy nurseries don't have to be crammed with cars, dump trucks, basketballs, or camo.  You can easily make a nice space that will grow with the baby.

Do you have a favorite baby boy color combination or theme?  I'd love to hear your ideas, I haven't decided on anything yet.

(Don't mind the captions under the pins, I'm lazy about changing the original caption)

Here are a few of my favorites:

Nice and Neutral


Black and White


Bright and Bold


Getting Graphic


Tuesday, April 30, 2013

Boy Faves: Fabric

I'll be honest.  I thought that once I found out the gender of our baby, that I'd be filled with ideas of projects that I wanted to work on.  I'm sure if it had been a girl, that I'd be sewing away full force.  It's a boy.  We are thrilled, and we will love him, but with two boys already, the needs for this baby are minimal.  There are a lot of things that I'd love to sew for him, but really, what we needed to get for him was a bigger car, and another bed.  Burp clothes, blankets, and clothing are taken care of.

But, I am still determined to sew for this little guy. There is something special about sewing for baby.  Boys can be hard to sew for.  There aren't as many options when it comes to clothing and color choices.  So, I thought that I'd start a little Boy Faves series, both to inspire me, and share with you some great boy related options that are available.

Today I thought we'd talk fabrics.  Fabrics are inspiring. Although designers can neglect the baby boy, there are some really great fabrics available.  If I needed to make blankets, or car seat covers, I'd be all over these, but I am trying to exercise a bit of self control.

Patterns

I love using geometric and repeating patterns for boys. There are a number of different options available, but these are a few of my favorites. One of the reasons that I love them so much is that I think they can grow up with a baby.  No need to immediately replace the bedding when they start walking.


Prints
I tend to lean more toward patterns than illustrative prints, which is funny seeing that I have a background in illustration, but I love the graphic nature of a repeating pattern. That being said, here are a few more pictorial prints that I love. Jay-Cyn is one of my favorite designers, which explains why the majority of the prints are his. Camp Sur and Camp Modern have won me over, and are my favorites.  How great is that wood grain print? Note: I've pinned a lot of his samplers to share examples of the great fabrics available in the individual lines.  


There you have it. A few more options for sewing with boys. Stripes, plaids, and even polka dots. What are your favorite boy related fabrics? Do you have a boy theme that you really love? I'm kind of over race cars and robots.

Sunday, February 12, 2012

The "I'll be in my study" Sweater Vest


So I told you that I'd work on some boy based projects.  Well, I have.  Unfortunately I don't have a tutorial to share with you.  I have step by step photos and notes, but I am not confident enough in my process to share them with you yet.  Hopefully I'll attempt the project again, because I love the little sweater vest, but no promises.  I really have a short attention span for projects, so if you really want a tutorial let me know....otherwise it might not happen.


Anywho....I made a little sweater vest for Miles.  The cranberry colored knit was from an old sweater that I'd stashed in the refashion pile.  I love the color, especially paired with the charcoal ribbed knit, and the green buttons.

It has a small faux pocket on one side of the vest that was made from the ribbed knit of the original sweater.
Look at him sitting up so nice and tall (it lasted about 5 seconds )

When I look at the little vest I envision Miles sitting in a wing backed leather chair, reading a book. . .so that's why it's the "I'll be in my study" vest.


So, let me know if this is a boy project that interests you.  I have another boy themed project lined up for this week, and it includes a tutorial and templates-Woot Woot!

Thanks to those of you who took the time to answer the questions on my poll.  I'll be adding a couple of new questions to the side bar, just to get to know you even better.  May I say that I'm excited that so many of you own sergers (nearly 40% of those that answered).  I feel bad posting tutorials that require serging, because I lived without one for so long.  I'm still going to try to provide instructions and adaptations for those of you that don't have one, but I might not shy away from exploring some serging techniques.

Also, it seems that most of you fall somewhere between the advanced beginner and intermediate sewing levels.  Sometimes I feel like I'm explaining steps in my tutorials that are common knowledge.  I don't want to insult your intelligence, but I do want to make sure that even the beginners can feel confident in tackling some fun projects.

Thanks for reading!


Sunday, December 4, 2011

Sunday Best


In the summer I made some tie and vest onesies for my nephews to wear at my brother's wedding reception.  I made a sample onesie to try out the pattern and ensure that the sizing was correct, lucky Miles gets to wear it now. I thought that I'd show you a photo of the Tie and Vest Onesie on little Miles, he sure looked sharp.

I have a tutorial to share with you later this week, and a new tip and trick that I can't wait to tell you about.


Monday, October 24, 2011

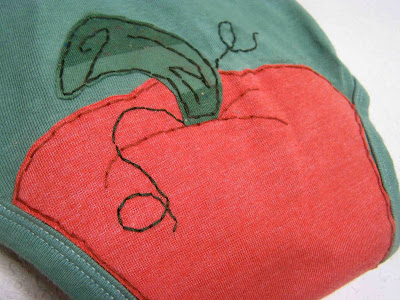
Top-toberfest: Lil' Pumpkin Appliqued Onesie Template


I thought that I'd share a Harvest/Halloween applique with you today.  I call it the "There's a pumpkin on my bumkin applique".  There are very few times in life when it's okay to have pictures or words plastered on your bottom, but the baby stage is one (if not the only) acceptable stage. Having boys, I don't get to indulge in ruffled bottom tights and bloomers, so an appliqued onesie will have to work.


It's a simple little applique that I designed.  I'll share the file with you so long as you respect that it is for personal use only.  The template is designed to fit a pre-washed Carter's 0-3 month onesie.  You can feel free to adjust it to different sizes.


My applique is done with some scrap knit fabric that I have had stashed away, heat and bond fusible adhesive,  some embroidery thread, and lightweight fusible interfacing.


Begin by applying the heat and bond to the wrong side of the fabric.  


Next transfer the image to the front side of the fabric using pattern marking/transfer paper. Cut out your pieces.


Adhere the applique pieces to the onesie.  I had the small pumpkin in the front, and the large pumpkin on the behind.  It should fit right in line with the seams and snaps on the onesie.


 I used my embroidery thread to do some hand stitching.  I feel that it adds some visual interest to the applique.  You could do some machine stitching around the images if you prefer.  If you are using a fabric that frays (knits generally won't) you will want to ensure that you either satin stitch (tight zig zag) around the image, or apply some sort of fray check or fray block to the raw edges.


Once I was done with the applique and hand stitching I used some fusible interfacing to secure the embroidery threads, and prevent the thread from irritating babies chest.


That's it.


A fun little applique for the season.

You can find the template here.  Once again, the template is for personal use only. Please link up the tops that you've been working on this year in the Top-toberfest link party.  


Sunday, August 28, 2011

Sewing For Baby: Lightweight Knit Swaddle Blanket


Here's another sewing project for baby.  This one was extremely quick, and easy.  I don't know if you've ever seen the Aden and Anais swaddle blankets, but they are super soft and lightweight gauze material.  My sister received some at her last baby shower, and uses them all of the time when nursing.  They are light enough that the baby gets plenty of fresh air when snuggled up close to mama.  While I'd love some myself, they aren't in the budget at the moment.  Fortunately, I came up with an alternative.  I've had this extremely thin and light knit fabric in my stash for some time now.  I've used it in the past for baby tights, but hadn't found a suitable project for the remaining fabric that I had on hand. When sorting through my stash a few weeks back I realized that this would be the perfect material for a lightweight blanket.


 I cut a 42" square piece of material.  Set my serger settings for a scarf edge finish, and serged all four sides.  It was honestly such a fast project, and I can't wait to wrap my baby up in it.

The scarf edge finish is almost like a rolled hem, and it created a nice lettuce leaf effect on the lightweight knit.


When I purchased the fabric I found it for a dollar a yard, so this blanket cost me a little over a dollar to make. Huge savings compared to the Aden and Anais blankets-Woohoo! Now I'll go spend the savings on a box of diapers...urgggg.


I thought that I'd show you a quick pick of the finished nursery area.  It is part of our bedroom that sits in our basement.  We are fortunate to have a daylight window, along with a dividing wall.  The wall that the crib is up against separates our bed from his. We have just enough privacy, but I won't have to run upstairs for those mid-night feedings.

Wednesday, August 24, 2011

Nursery Decor: I am a Child of God, and Love You Printables


I recently created a few printable for a collage frame that we had hanging in the area of our baby's nursery. The frame was previously filled with our wedding photos, but I thought that it would only be appropriate to switch them out with something new.


I created these simple printables in Photoshop Elements. The love you print was inspired by a print that I saw on Pinterest.  The I am a child of God print is based on a children's song from church.  The files are designed for 5x7 prints.  You can find my files below.  They are free for your personal use.

I Am A Child Of God 5x7

I Love You 5x7

I Love You 8x10

Enjoy! Once our little one arrives we'll have to switch out that last wedding photo with a baby picture.

Monday, August 22, 2011

Nursery Decor: Embroidered Monogram


When I first started thinking of what I'd like to do in our nursery space, I knew that I wanted to have a large initial hung on the wall.  I'd planned on a large wooden letter, but I wasn't able to find anything in the scale or style that I'd wanted.  In the back of my mind was the thought that if I were to spend money on preparing for the baby, it should be on diapers and not decor.  So using what I had on hand, I came up with this simple embroidered initial for the space.


I used some gray duck cloth for the background, and then used several strands of green and navy embroidery thread to stitch the initial.  I used a simple chain stitch, and it actually came together quite quickly.  I would have liked to fill in the entire shape, but I didn't have enough thread on hand.


The decorations in this room are quite simple, but it is a temporary space at the end of our bedroom, and I didn't want to spend a fortune decorating.  I also didn't want to make any permanent changes to the room.


Nursery Decor: Paint Chip Mobile


I've been trying to spend a little bit of time (and very little money) on decorating our baby's "nursery".  One thing that I never made for Clark was a mobile, and I thought it would be a nice touch for the space he'll be occupying.

I've seen paint chip mobiles online, and thought that it would be an easy and inexpensive option. Most of the mobiles that I've looked at have circles in varying sizes and colors.  I chose to do that very thing.  The one change that I made to many that I've seen, is that I strung the double sided circles so that they were parallel to the floor, rather than perpendicular.


To make the mobile I used several scrapbook dies to cut out varying sizes of circles.  I had several different shades of blue, green, and gray.  I then glued the circles together with a glue stick and let them dry.  The structure of the mobile is two embroidery hoops that are attached with fishing line.  The smaller of the two hoops hangs down a couple of inches lower than the larger of the two.   I then strung the paint chip discs onto embroidery thread, and tied a knot beneath each disc.  I intentionally pierced the discs in different places when stringing them.  Offsetting the disc causes the discs to tilt at different angles, and I kind of liked the effect.


It was a pretty simple project, the most time consuming part was cutting out the circles.  I spent next to nothing on it, although I must admit that I wish I'd purchased some scrapbook paper rather than using paint chips, I feel a bit guilty about depleting the stores supply. I picked up the embroidery hoops at a local thrift store for twenty five cents a piece, and I had the embroidery thread on hand.

So there it is, the first piece of decor for our little one's nursery. I've got more to show you later this week.

Thanks for reading.


Monday, August 8, 2011

Well Dressed Man Onesies and Shorts

The practice onesie that I'll be hanging on to for my little guy.

 My brother was married last month, and I decided to take on the responsibility of making some little outfits for  two of my sweet nephews.  I found some men's dress shirts on clearance at Old Navy, and thought that they would make some darling, and lightweight,  little wedding outfits.


The tops have an appliqued tie, and a vest that is attached at the side seams of the onesie.  I ended up using interfacing on both of the vest pieces to provide it with a bit more structure.


The shorts were designed by me, and made to match.  They feature a faux fly, and some decorative tabs on both the side of the short pant, and on the back pocket.  The vests and shorts have several yellow buttons to pull the whole outfit together.

I love that the men's dress shirt's provided a lightweight material for the shorts.  Who wants to make a little baby suffer in the summer heat?  I was able to squeeze both outfits out of the two shirts, but I did have to be very careful when laying out my pattern pieces.


I don't have a tutorial or pattern prepared, but maybe in the future. I was really pleased with the fit of the shorts, and the overall appearance of the outfit, but these little cuties could make anything look good.


Thursday, August 4, 2011

For the Baby: No Hablo Onesie


I've made a couple of embellished onesies for the baking bun. I saw this idea several months ago, and had to replicate it for the little one (unfortunately I don't remember where I first saw it).  I freezer paper stenciled the saying onto the front.  Super simple. 

Friday, February 18, 2011

Friday Finds: Wooden Toys for Boys


Two of my favorite blogs (Made, and Made by Rae), are celebrating boys this month.  If I get my buns in gear I might try to turn out a few boy themed sewing projects.  While we wait to see if that happens, I thought that I'd join in the celebration by sharing some of my favorite toys for boys from Etsy.


These aren't just any toys, but wooden toys.  I love wooden toys and buy them for Clark whenever I can.  I love having wooden pull toys, wooden train tracks, and of course wooden blocks.  These Etsy finds go beyond building blocks (though you can find those too) and are fantastic choices for encouraging pretend play.


organic SKITTLES - 10 pin retro wooden bowling developmental set

Personalized Camera - natural wooden imagination toy with name


 Natural Colorful Wooden FISH PLAY SET, Great Pretend Play

 t-rex wooden dinosaur toy

Small Bring along waldorf kitchen

Wooden Tool Box FREE SHIPPING

Aren't those lovely.  One day I'm going to buy myself some power tools and learn  to do some woodworking.  Until then I'm going to drool over these lovely toys.  Perfect for the little boys (or girls) in your life.