Search This Blog

Showing posts with label baby. Show all posts

Friday, June 13, 2014

A Summer Blessing Outfit


My sweet nephew was blessed this month.  I have yet to meet him, as he lives far away, but I can't wait to kiss his sweet little cheeks.

His good mom asked me if I'd make him a blessing outfit, and I couldn't say no.  Sewing/crafting is one of my love languages, so to be able to make something special for him on his special day, was a great way to show him and his parents my love and support.


I ended up sewing a simple white satin vest with a pocket square, and a matching bow tie.  The satin shorts are so sweet.  If a baby has thigh rolls, I whole heartedly believe that they should be shown off.


The little newsboy cap didn't turn out as perfect as I'd liked, but was still a sweet touch for the little gentleman, and a bonnet alternative for such a grown up blessing outfit.

Tuesday, February 18, 2014

The Bapron


I now have a six month old.  A solid food starting six month old.  He's an eager eater, though his dietary sensitivity has me approaching the whole situation with a bit of caution.  Having had to eliminate so many foods from my diet, I can only imagine that we are going to have some issues introducing certain foods down the line.  For now, apples and rice cereal haven't been too much of a problem.  One problem that inevitably presents itself when introducing solids is the mess.  Babies are messy, they knock the spoon with their eager helping hands, and pretty soon rice cereal is splattered all over them (and you).


When I first saw Jess's Bapron pattern, I knew it needed to be added to my collection.  It's one of those adorable and practical patterns.  A bib that covers the whole baby, without looking like you've draped them in a towel.

I decided that I'd need to make several.  So, I went through my stash of fabric, and sewed up several using the materials I had on hand.  It was a great stash buster, the perfect project for those small pieces of fabric that you can't part with.


This red rocket was left over from Clark's quilt...


and this vintage Three Little Kitten fabric was left from a receiving blanket I made for Gus. 


 So soft, so cute, and going to get so much use.


In addition to Gus' baprons, I knew I needed to make a larger version for my little artist Miles.  He loves to draw, color, and paint.  So, I added about five inches to the bottom of the largest pattern, and adjusted the pattern to be a more full coverage smock.


I added a pocket....


 ... and used up some prepackaged bias tape remnants.  

Now this fabric is three things that I really don't like:  
1) Poor Quality
2) Licensed characters
3) Primary colors (there are exceptions to this, but in general I don't love them).

So why would I purchase the fabric?  Well you see, I have this cute curly headed two year old that knows how to melt my heart.  He doesn't speak much, so when he asks for something, I feel like I need to reward him.  I suppose that when I'm sewing for others I should try to make it more about them, than it is about me. 

You can find Jess's Bapron pattern here, and while I'm sure you're already familiar with her site, she blogs here at Craftiness Is Not Optional.


Friday, February 7, 2014

Free Pattern and Tutorial: Baby Dribble Bib Bandana


Accessories for little boys are limited, and after three boys, I am feeling the need to accessorize. Pair that with the fact that he's constantly dribbling down his chin, and this is a perfectly satisfying quick sew.


You've probably seen bandana dribble bibs before, but I happen to think mine are the cutest (yep, I said it).  These little bandanas cowl at the neck, and have a fun closure that looks like it's tied.  So adorable. No matter which way the bandana shifts, it still looks cute.


Want to make some?  I've got a tutorial and free pattern for you today! Don't want to make your own?  I just listed a second set of baby bandana bibs in my etsy shop, get them while you can.

Materials
1/3 yard exterior fabric (I used a soft cotton flannel from Riley Blake's Sasparilla line)
1/3 yard lining (I used a sweatshirt fleece, but a knit, terry cloth, or flannel would all work)
Coordinating thread
Seam Ripper
Iron
Button Hole presser foot (optional)
Printable Bandana bib pattern (Personal/Non-commercial use only)

Cut out your pattern pieces, and tape together matching up triangles.

Fold your fabric in half, and align the pattern with the fold to cut out your bandana pieces.  Repeat with lining fabric.


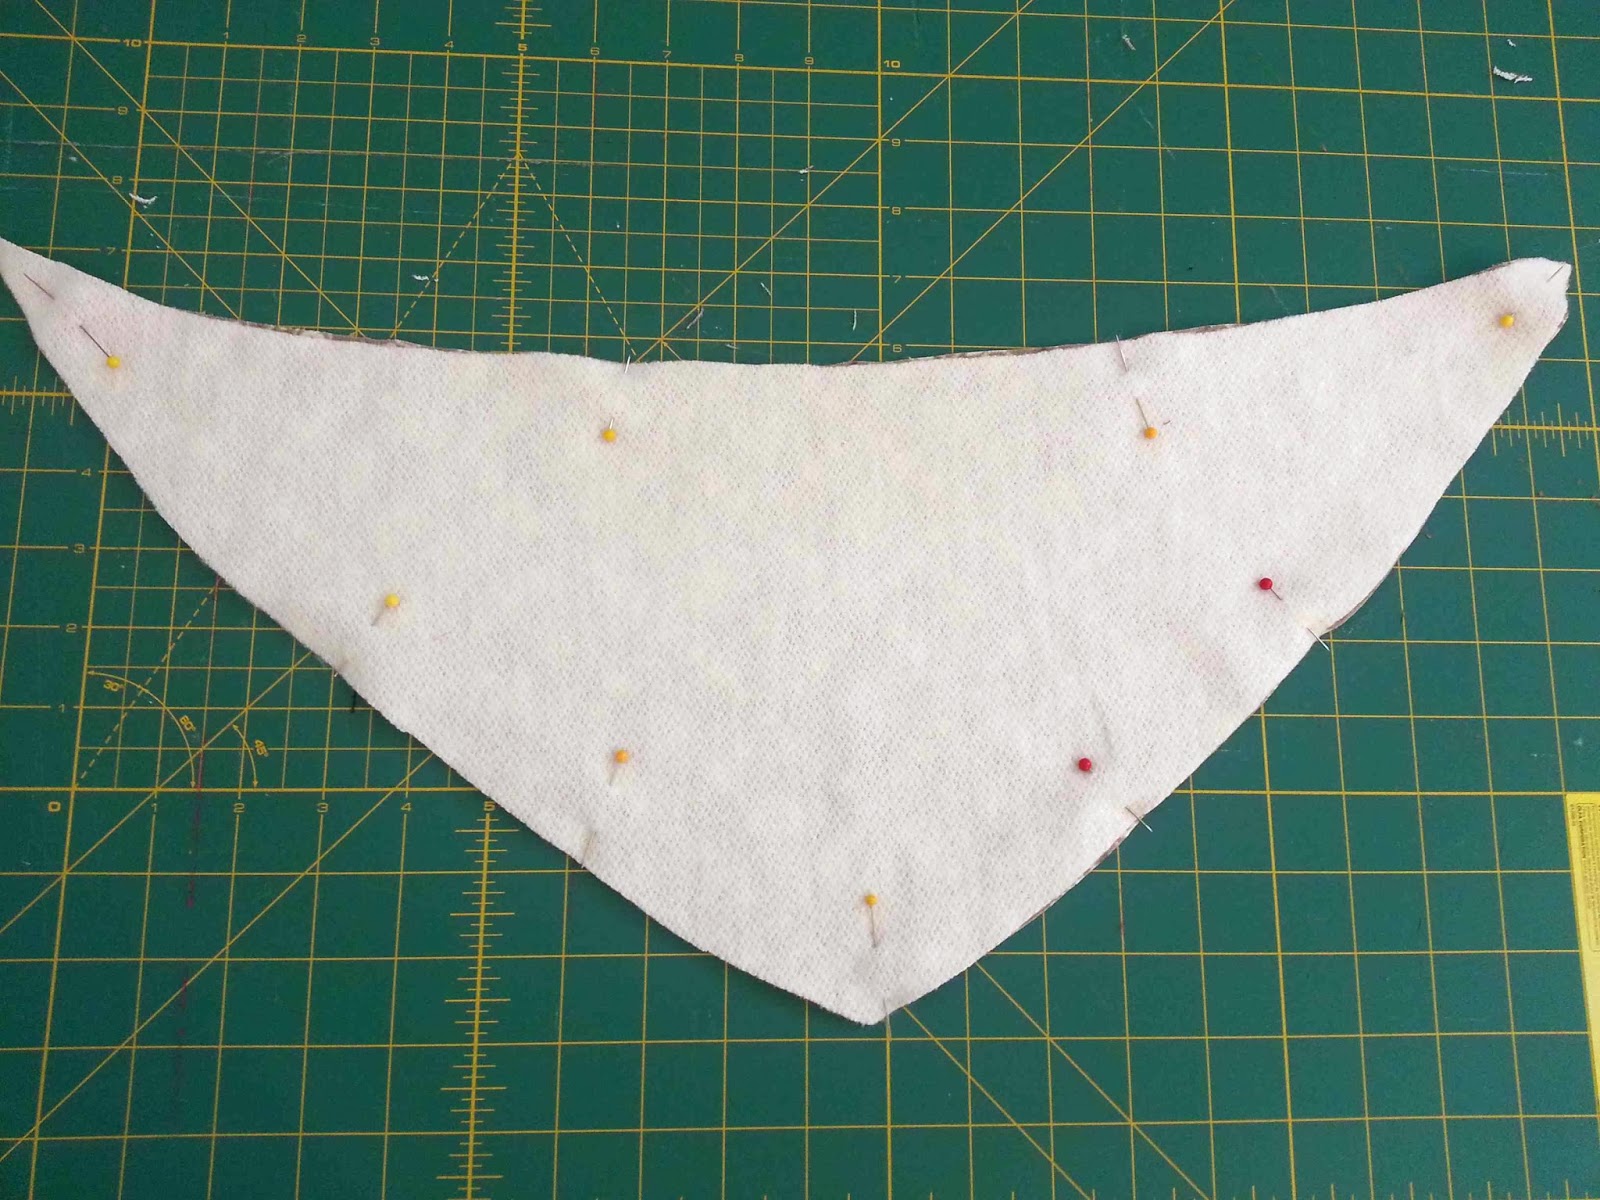
Place your exterior and lining pieces right sides together, and pin in place.  Mark the area to be left open (see pattern) with  a marking pencil, or different colored pins.


Sew around your bandana, starting and stopping your seams according to the pattern markings. The pattern allows for 3/8" seam allowance.  You should be left with an un-sewn area for turning your bandana right side out.

Clip the three corners of your bandana, making sure not to clip through your seam line.  This will reduce the seam allowance bulk, and make for sharper points on the finished bandana.


Reach into the un-sewn portion of the bandana, and pull the material right side out.  Make sure that your points are nice and sharp at the corners.


Press with a hot iron, making sure that the open edges of the bandana are turned inward.


Topstitch around your bandana, 1/4" from the edge. This should secure your un-sewn area.


On one tie end of the bandana, fold the tie in half.  Measure four inches from the tip of the tie and mark.


 Adjust your button holing foot to allow for a 5/8" button.  Attach the button hole foot to your machine, and adjust machine settings. (Read more about sewing button holes)


 Line up your button hole foot with the 4" mark, sew your button hole.


Ah, a thing of beauty.


Use your seam ripper to open up the button hole.


Your finished bandana should look like this.  The tie end opposite the button hole will be pulled through the button hole to secure the bandana.

So cute, right?  If you're button hole is too large, the tie could slip too far, and make the bandana too tight.


 Tie around your favorite little cow poke, and catch those rascally dribbles.  They'll keep your dear ones dry, and make them absolutely irresistible.

Buy your own set of red and grey bandana bibs in my etsy shop (SOLD OUT).  Check out my Dribble Bib-danas for sale in my Etsy shop!

Thursday, February 6, 2014

Refashion: Sweater to Leggings and Slouchy Beanie


Are you wondering what happened with Kid's Clothes Week?  How did I manage to go on and on about how I was going to participate, and then only post a few little items?  Well, I didn't finish as much as I'd hoped to, but I did manage to do more than I've posted.  We had a death in the family, and family time trumped KCW, as it should.  I still have a couple of things to share with you today, and a half finished pair of pants that might not ever see completion.


First up, another sweater refashion. This time it was my husband's old sweater. It never fit him right, and was starting to show signs of wear.  So rather than throwing out the sweater, I took advantage of the sweater knit material, and made a slouchy beanie for Gus, and a pair of cozy little leggings.


The beanie was made using Max California's free pattern.  The pattern is for a toddler, but my baby has a MASSIVE head.  I used the waistband of the sweater to serve as the cuff of the beanie. Super easy.


The leggings were made using a pair of existing pants as a guide.  Also a very simple project. 


 I cut the pant legs out of the sleeve pieces, and the cuffs of the sleeve serve as a fold up cuff for the pants.


 Super fast, simple, and free projects.  

Thursday, January 30, 2014

Kid's Clothes Week: Shawl Collar Pull Over


I'm a bit behind on blogging about my Kid's Clothes Week creations, but I'm slowly trucking along.  
Day 3 I whipped up this creamy sweatshirt fleece pullover for Gus.  I love the shawl collar, and that it is so easy to pull over his big head.


He loves it too.  


I added a little vintage applique patch to the bottom corner.  It was my grandmother's.


The collar is made out of a soft baby ribbed knit.  It is oh so soft. The pattern is self drafted.

Monday, January 27, 2014

KCW: Day 1- Sugar Skull Onesie


It's Kids Clothes Week.  I am excited, but somehow feel like I am already behind.  My first project was a heat transfer onesie for my youngest.  

I broke down and bought a Silhouette Cameo for myself for Christmas.  I've been a bit intimidated by it, but really drawn to the heat transfer material.  So one of my first projects was a shirt for August.  I love Sugar Skulls, and fell in love with this particular image available through the Silhouette store.  


After downloading the image, it was as easy as adjusting the scale of the image to fit the bodysuit, and adding a bit of text to the bottom.

I love how it turned out, and Gus isn't complaining.

Wednesday, January 15, 2014

Flannel and Minky Remnant Projects


After sewing up flannel receiving blankets, and minky and flannel pillowcases, I was left with several pieces of adorable remnant material.  I love minky and flannel, and had to put them to good use right away.  The softness of the flannel and minky make them ideal materials for any baby related project.  Burp rags and taggie cuddle squares won out this time.


  Because I had coordinating fabrics, I was able to make some cute burp rag sets to give out as gifts. I've sewn several different styles of burp rags, but a simple rounded rectangle is my favorite.  The straight edges make it easy to turn right side out, and then topstitch down. I don't remember the exact dimensions of these, but I'm thinking that they were around 9"x14", that makes it large enough to lay down and use as a changing mat if you're in a crunch.  


Another favorite scrap related baby project is the sensory cuddle square.  This allows you to use up all of those small pieces of ribbon that you couldn't toss, and gives baby something soft to hold onto.


I like to make my taggies squares, but you could even through a few pieces of ribbon onto the ends of your burp rags. You can make these any size.  I made two 12 inch squares and a 10" square as well.  You can always sandwich in a piece of crinkly plastic, but for some reason the thought of laundering the plastic deters me.


Wednesday, December 18, 2013

Go To Baby Gift: Mitered Corner Receiving Blanket


I've posted about Mitered Corner Receiving Blankets before, but I love them.  They are cute, and fairly quick to make.  My two year old still carries one of his around with him.


Some friends of ours just recently welcomed twin boys to their family.  Since we live far apart, and we can't be there in person to snuggle those little babies, a soft flannel blanket from us will have to do.

I've been eyeing this Riley Blake flannel for quite some time. The Sasparilla line is absolutely adorable.


Such sweet prints.


 I also made one up with the orange main print from the Boy Crazy line.  Two different blankets for two different boys.

Lets hope they love them as much as we do. Tied up with some red and white baker's twine from Pick Your Plum, and these blankets make adorable gifts.

You can find a great tutorial for a mitered corner, or self bound baby blanket.

Thursday, October 24, 2013

August 2 Months

There are still a few more days to enter the Monster N-tunes headphone giveaway.  Don't miss out on the chance to win a pair of these great headphones.


I'm alive, in case you were wondering.  I know that things have slowed way down in the past year, and while I can't promise that things are going to change, I can tell you that I have been very busy sewing up a Halloween storm/craft fair storm lately.

Meanwhile, this little guy turned two months old.  I can't believe that it has been two months already.  He's been such a great addition to our family.  He's a big little guy, at nearly 16 pounds.  It makes me sad to see him outgrow his clothes so quickly, but it is so fun to see him change.


We've been giving him Baby Gaia Probiotics for a few weeks now, and have some seen some improvement.  His digestive system is still working out some kinks, but he seems to be quite a bit more comfortable than he was.  At his two month check up I talking to his doctor about breastfeeding vs. formula feeding with his sensitivity issues.  He informed me that 90% of sensitive babies do better with breastmilk than formula, and that he'd recommend sticking with breastfeeding, and so that is what we will do.  I'm still hoping to reintroduce some foods into my diet.  Even if I can't get away with chocolate, a bit more variety would be welcome.