Search This Blog

Showing posts with label t-shirt. Show all posts

Monday, January 27, 2014

KCW: Day 1- Sugar Skull Onesie


It's Kids Clothes Week.  I am excited, but somehow feel like I am already behind.  My first project was a heat transfer onesie for my youngest.  

I broke down and bought a Silhouette Cameo for myself for Christmas.  I've been a bit intimidated by it, but really drawn to the heat transfer material.  So one of my first projects was a shirt for August.  I love Sugar Skulls, and fell in love with this particular image available through the Silhouette store.  


After downloading the image, it was as easy as adjusting the scale of the image to fit the bodysuit, and adding a bit of text to the bottom.

I love how it turned out, and Gus isn't complaining.

Tuesday, November 27, 2012

Personalized T-Shirt and Cape

I hope that you've all enjoyed the past week, wether or not you were stuffing your face with holiday foods.  Things are going well around here.  In the time since my last craft fair I've been able to spend a little time catching up on projects. (I signed up for another fair this weekend, so the catching up didn't last long).

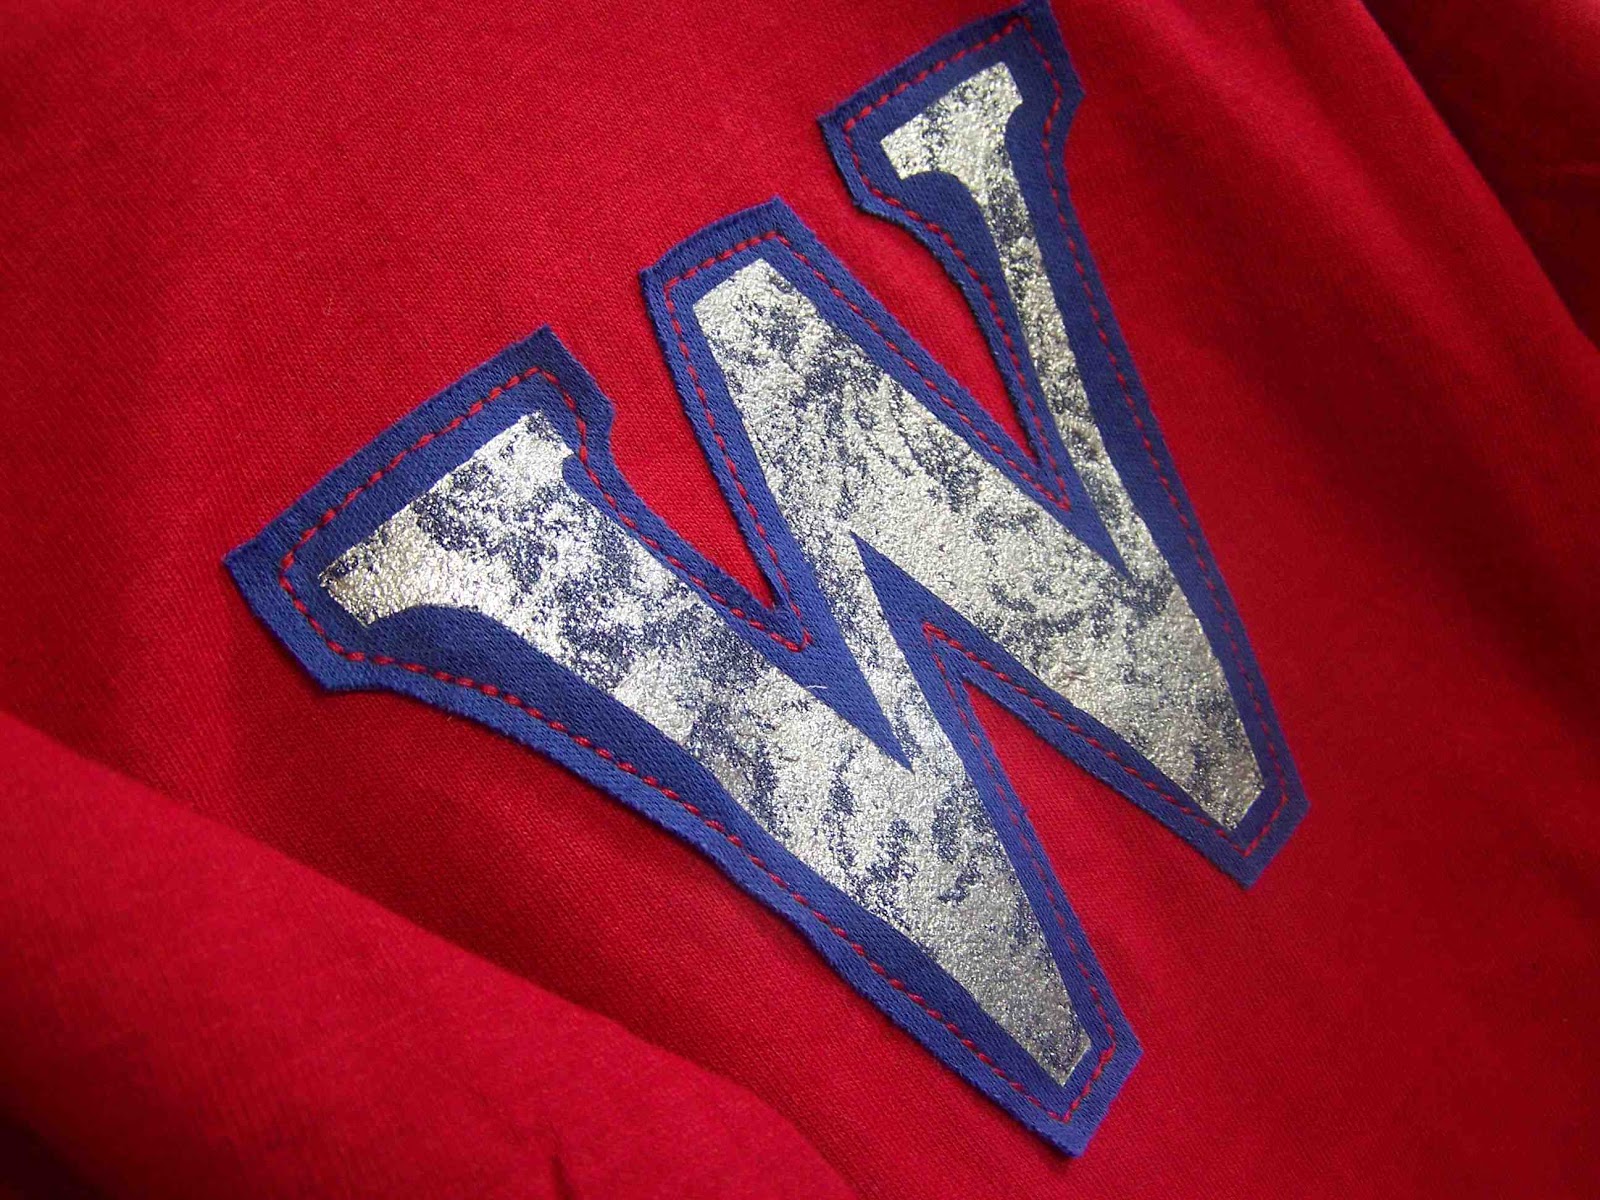
My cousin asked me to make a custom t-shirt for her youngest son.  Apparently, the only thing that he has on his Christmas list is a shirt with him first initial on it.  Isn't that awesome?  Clark's list grows daily, and I fear he'll be horribly disappointed on Christmas day, Wylie however, will probably be perfectly content with him awesome new "W" shirt.


I bought a basic long sleeve shirt at Wal-Mart, and turned to my trusty x-acto knife and freezer paper to make a stencil.  I stenciled a basic serif "W" onto some blue interlock knit.  Once the paint was dry I adhered wonder under to the wrong side of the knit, Trimmed the blue knit to leave a small border around the stencil, and appliqued the letter to the shirt.  Pretty simple.


I used my Super Hero Cape pattern to make him a matching cape.  Initially I wanted to design something more elaborate, but my cousin insisted that all he wanted was a W.  I actually love how both pieces turned out.  I think that the metallic paint, and shiny knit, do a great job of creating a bit more visual interest.

So, I'm totally fine with boys wearing metallics.  Am I alone in this?  Do you think it's okay?

Should you want to make a similar project, here are a few helpful tutorials to help you along the way:

Appliqueing with Knits
Sewing Straight Lines
Freezer Paper Stenciling
Super Hero Cape Pattern

Friday, October 26, 2012

Shark Attack T-shirt with Template


I'm going all out with my boys tops this year aren't I.  Graphic tees all over the place, not a placket in sight.

I realize that not everyone loves sharks, or wants a shark shirt, but my little guy happens to love them.  When I say love, I mean he's a bit obsessed.  We started calling him Clark the Shark a while ago, and now he thinks that he is a shark.  The other day he told me "Mom, when I die I want Heavenly Father to make me into a shark".  I told him he'd have to talk to Heavenly Father about that, so he went on the back porch and said a little prayer to ask Heavenly Father to turn him into a shark.

He also request fish for nearly every meal, including breakfast, "because that's what shark's eat".


Should you have a shark lover in your house, you can find my pdf pattern here. Download it for personal use.


Materials:
I <3 Sharks Template
t-shirt
freezer paper
fabric paint
x-acto knife
iron
foam stencil brush
sewable fusible web
felt
*knit fabric same color as felt, if desired

Sewing materials


Friday, October 28, 2011

Top-Toberfest: A Shirt for Thunder by guest contributor Janine

 A Shirt For Thunder
Today I'm thrilled to have a guest contributor for Top-toberfest: Janine.  Janine is a work at home mom that loves to craft.  I'm so appreciative that she was willing to share her talents, and these great boys tops with us today.  She uses a variety of techniques, including: freezer paper stenciling, hand stitching, bleach, hand painting, and bubble wrap, to create some custom tops for her son Thunder.


My son’s name is Thunder Jason and I thought it would be neat to have fun with it and make him an original shirt. I find that boy’s clothing seems to be all the same and if you find something with words, pictures, etc it’s usually too over-the-top for me. I’m not a huge fan of  all the cartoony pictures and cheesy sayings.

I bought a plain, grey shirt from WalMart. First I washed it in case of shrinkage, then I sprayed some bleach on it. I would have used a bleach pen and done a more ’tatoo’ looking design, but I couldn’t find bleach pens anywhere in my town. After washing the bleach out and drying it I made a freezer paper stencil like this. I followed Cheri’s instructions and used red Tulip fabric paint as recommended by her, painting in the stencil with a small paintbrush. I made a large "T" lightning bolt and the small letters spell 'Thunder J.' When the paint dried I painted some bubble wrap and stamped it randomly on the shirt.


 And finally I did some embroidery. I made some tiny lightning bolts, ‘x’s on the wrist, collar, and bottom hemlines and embroidered “Made By Mama” on the shoulder.


   I’m SO happy with how it turned out! I‘ve also included pictures of 2 other shirts I made.


 The red shirt says, “You’ve been…Thunderstruck” and was made using the same freezer paper stencilling and bubble wrap technique.


   The blue one says, “THUNDERIFIC SO TERRIFIC!” and was made by hand painting with fabric paint and a paint brush. Hope you enjoy it as much as I do! Be careful, freezer paper stencilling is very addictive :)


Thanks so much Janine.  The tops turned out great, and I'm sure that your son loves them. I especially love the hand stitched details that you added, they really add something special.


  Want to share your custom tees or tops with us?  Link up all of your shirt related projects in our Top-toberfest link party. I'll be featuring some of my favorites from the party come November.

Thursday, October 27, 2011

Top-toberfest: The Dahlia Top with Lorene of I am Just Lu

I'm thrilled to welcome of Top-toberfest guest blogger today.  Lorene, of I am Just Lu, is going to share a fun reverse appliqued top.  I love her choice of colors, and the best part of this top is that it was made using two tops that she already had in her drawers-Wahoo.  Be sure to hop on over to her blog for the full tutorial.  While you are there check out all of her other fun projects, informative articles, and tasty kitchen creations.  She's as well rounded and talented as they come. 

Hello Leafy Treetop Spot fans! I am Lorene, or Lu, and I blog over at just Lu about crafting and whatever else comes up in the course of being mommy to two adorable little ones and wife to an elementary school teacher.

Right now, we're just finishing up a year-long series about Becoming the Housewife MacGyver, for which Tricia has been my honored guest! We've had a lot of fun, and I hope you'll come see what we've been learning.
I am just Lu
 I love Toptoberfest so I am so thrilled to be participating this year as Tricia's guest. Without further ado, I now present to you...


The Dahlia Top is a reverse-applique design using two knit fabrics, both old tshirts in this case. That might sound (or look) complicated, but it's really more a matter of patience than talent. Trust me -- there's not a particular abundance of patience around my house (especially that's left over for crafts... I figure my children need my patience more than my other creations ;), but there is definitely more patience than artistic or sewing talent. :)
This top was inspired by this top on Etsy. I am a big fan of buying and supporting handmade, but I knew that I could put together a similar top in colors that I really loved for a tiny fraction of the cost. Of the three tops I've made, two of them were free, using only old tshirts that I wasn't wearing anymore. You can't beat free!
So, come stop by my place for the full tutorial and template -- and you can use the template for so much more than just a top! The same flower would look great on a skirt or a bag or anyplace else that you can think to put it, with any type of fabric -- or even paint! I've provided the template in several different sizes, or you can resize it to fit your projects needs. 
See the full tutorial for the Dahlia top here on just Lu.


 Thanks so much Lu for sharing your darling top with us. I can't wait to try out this technique.

Thursday, October 20, 2011

Top-toberfest: Crocheted Lace Embellished Top


Source: modcloth.com via Tricia on Pinterest


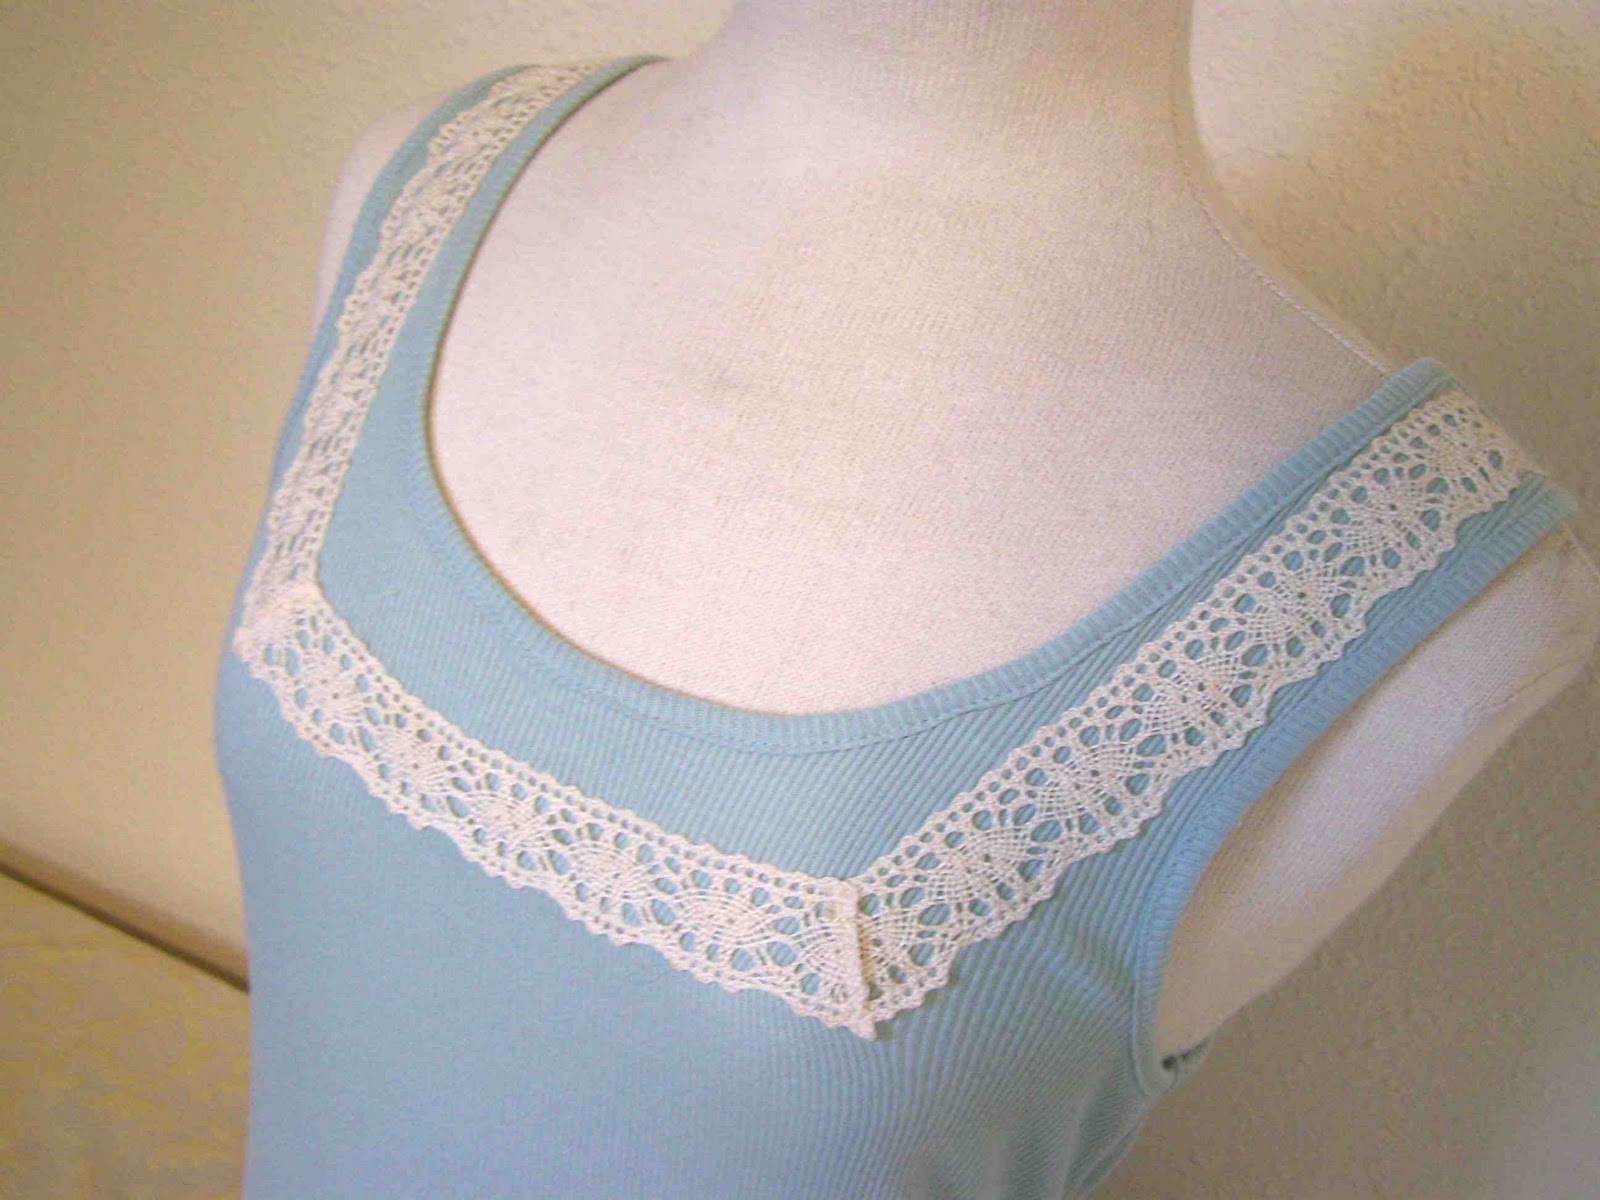
I love all of the lace embellished tops that I've seen around lately.  Lace is so feminine, and dresses up any outfit.  I picked up a plain tank that was on clearance at Wal-mart, and purchased some crocheted lace at a little local gem of a fabric store.  The lace was only a dollar a yard! While I'm not one to sport a tank on its own, I love to layer them under cardigans or over a longer sleeved shirt.


Want to embellish your own tee or tank?  You can find the full tutorial below.

Monday, October 17, 2011

Top-Toberfest: Embellished T-shirt for Boys


Yep, that's right.  It's Top-toberfest time.  Hopefully some of you are as excited for it as I am.  I am really excited to share some of the tops that I've been working on, along with some amazing projects from some guest contributors.   We have several very talented ladies that were willing to help me out with the series, and share their talents with us.  I hope that as their guest posts come up you'll take the time to tell them how much you enjoy their work, after all, positive feedback is always encouraging.

For Day One of this year's Top-toberfest I thought that I'd share a little t-shirt revamp that I worked on for Clark.  I picked up a basic pocketed t-shirt at Children's Place for $1.99 on sale-Wahoo! Unfortunately it was short sleeved and plain, but fortunately we can change that.


When I was trying to decide what to do to dress it up, I had several different techniques running through my head...should I stencil it, use embroidery thread on it, distress it, bleach it, etc.  In the end I stuck to one basic process that gave it a whole new look.  With the help of some scrap knit fabric, some heat and bond iron on adhesive, and my sewing machine; I added some details to the pockets and the sleeves.

Sunday, April 24, 2011

The Amazing Spiderman Shirt


Thsssss....You've been webbed, by The Amazing Spiderman...okay just by Clark, but webbed just the same.

Before our trip, I set out to make Clark a short sleeved shirt for the warmer weather.  Sadly, I didn't get the shirt finished before our trip, but it's all finished now.


I mentioned earlier that I prefer subtle references to licensed characters when it comes to clothing.  I'll give in when it comes to pajamas, but if my child is going to be wearing clothing in public, I'd prefer that he not be a walking advertisement. So rather than coming out and slapping "Spiderman" on his shirt in red and blue, we referenced a lesser used name for him, added a small version of an older logo, and tried to mimic the type face and design of the lettering after some of the more vintage titles. Clark and I are both pretty pleased with the results.

I used a freezer paper stencil to transfer the images to the shirt.


I used a brick red knit for an accent color, but stuck to gray, black, and charcoal for the shirt. 

The pattern was made using an existing article of clothing as a guide.  It was my first five pattern piece t-shirt that I've made, and I quite like it.  Both the front and the back of the t-shirt have two separate pieces.


The sleeves and the bottom of the shirt are hemmed with a blind hem stitch.  I am still trying to figure out the best way to get the blind hem to lay completely flat when it is pressed out.  I'm guessing that I probably need to play with the tension on my server.  Any recommendations?


Clark really likes the blind hem detail, he thinks that they look like railroad tracks.


This poor boy has been sick with a stomach bug for a week straight.  He's a trooper and rarely complains, but I am ready to get out of the house.  Hopefully he'll be feeling better soon, I don't know how much more either one of us can handle.  I'm just relieved that I'm through the worst of my morning sickness-it would have been awful if this bug struck three weeks ago.

Thanks for reading.


Friday, February 11, 2011

Ruffled Baby Skirt from Old T-shirts


Despite the fact that my sewing machine is out of order, I managed to get a bit of sewing done.  Don't worry, I didn't do any hand sewing.  I decided to try out the gathering foot on my serger, and I must tell you that I'm quite impressed (not with my skills, but with the machine).


 I started out with two old t-shirts that I'd thrown in a dye bath a while back.  I wasn't particularly fond of the t-shirts so dying them was a great option.

I'm no master at the ruffling/gathering foot and stitch, but it was rather easy, and the skirt was definitely a quick sew.  I made the skirt to be size 3-6 months. There isn't any elastic in the waist.  The knit material provides a bit of stretch, so fitting the waist band to the size of the  baby's waist should work quite nicely.


I used the hem of the t-shirt for the hem of the skirt.  I love it when half of the work has already been done for me.

To create the waistband I folded the fabric over, and serged the raw edge of the waistband to the seam of the top gathered tier, and the bottom of the waistband. I lost nearly all of the gather that existed prior to serging down the waistband, but I'm not too disappointed. After all, I didn't put in a whole lot of time or money.


I also created this little infant headband to coordinate with the skirt.  I simple served two layers of fabric together on either side, and attached a small knit flower to the top. Easy Peasy.

I'm still trying to decide what to applique or freezer paper stencil to the front of the onesie.  Any suggestions?

Thanks so much for reading, and being patient as I wait for the return of my machine (and my energy).  Clark had surgery earlier this week, he's doing well, but it took it's toll on his mama.


Thursday, September 2, 2010

How To Make A Jersey Necklace From A T-shirt

Repurposed T-shirt Necklace/Scarf


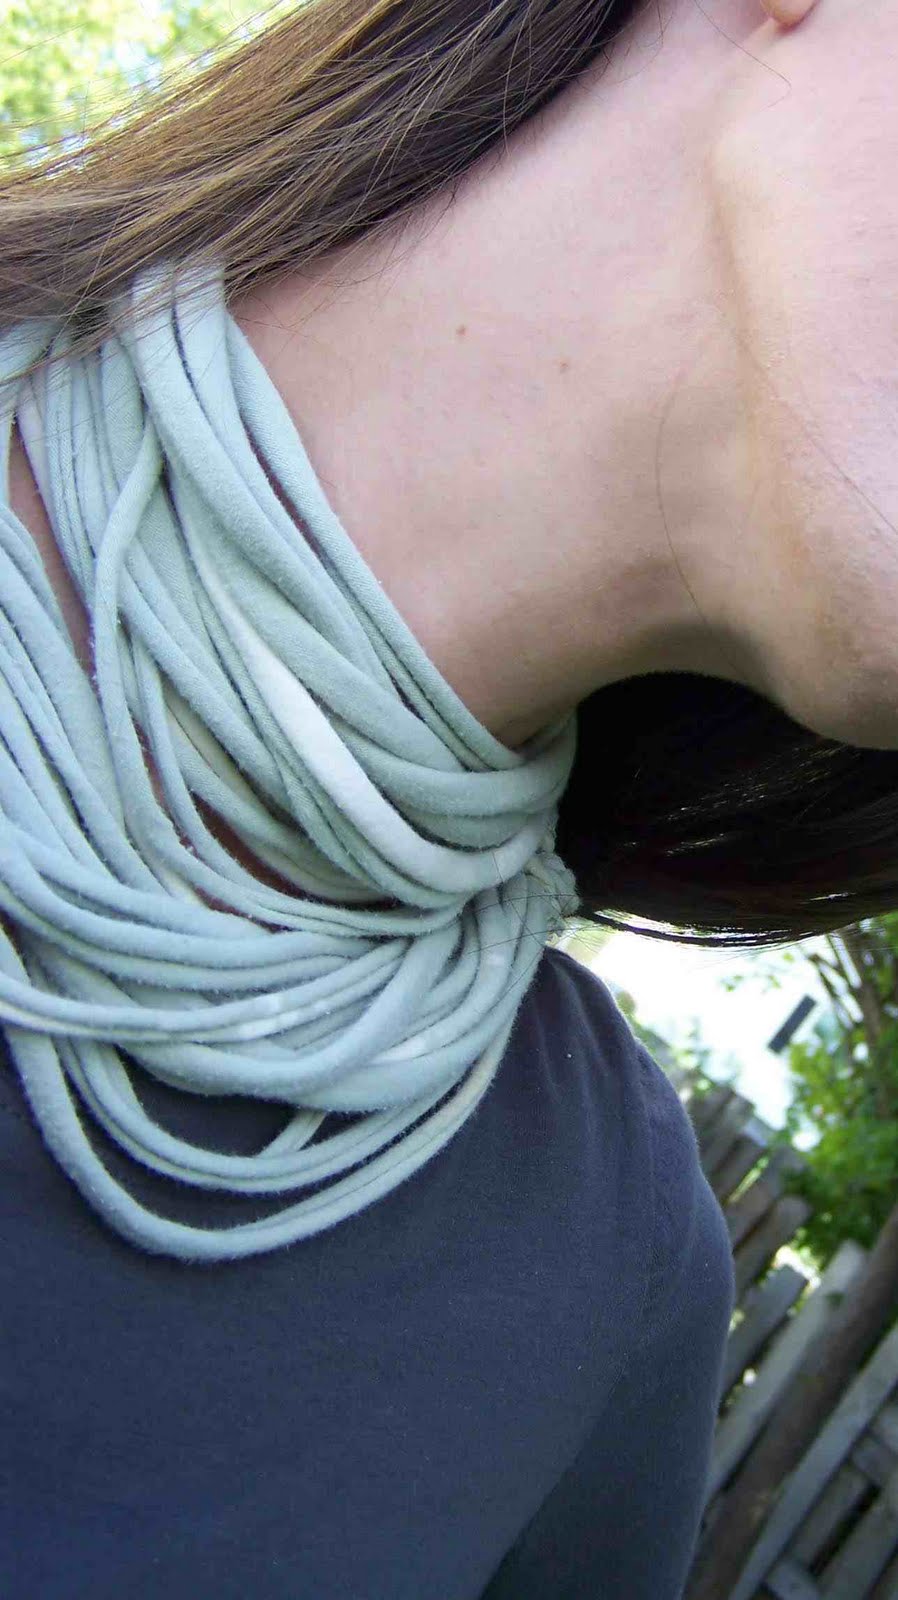
Well we are three days into September and I am working hard to put my stash to work.  Today I'm going to show you how to make a simple scarf/necklush from an old T-shirt.  Now I know that there are more beautiful jersey scarves out there, but I was amazed at how simple this was.  It is such a quick project and can certainly be dressed up.  The rest of my stash pile of old t-shirts might very well become jersey necklaces.

I think that this is my first step in preparing for fall.  This super soft knit fabric is sure to keep my neck warm.


Want to make one for yourself?  It is super simple.  Click Read More for the full tutorial.

Wednesday, August 25, 2010

Lazy Saturday T-shirt


This is one of those projects that I would call "less successful".  I had really high hopes that it would turn out great.  I don't hate it, but I love it in a different way than I had anticipated.  

I wanted to try out shirring.  I've seen it everywhere, and even have a shirt that uses shirring in the way I had intended this shirt to look.  I have a brother sewing machine and had heard that brothers are a bit more difficult to work with when using this technique.  I didn't have instant success, and my first attempt was by no means perfect, but it wasn't an utter disaster either. Hooray!


I made the pattern for the shirt using an existing pattern.  I cropped the sleeve length and factored in seam allowance.  I made measurements on the existing shirt that I own of how far the shirring was from the neckline, the distance between the shirred rows, and the length of the shirred rows.  They ended up being as follows: 6 1/4" down from the neckline, rows 1/2" apart, and 9" long rows.  I was pleased with the length of the rows, and with the spacing, but they should have been at least 1" further down from the neckline.  If I use this technique again I will space them at least 7 1/4" down.


Because I used this lightweight heather gray fabric, it instantly dressed down the shirt.  I wanted to girl it up a bit so I added some decorative trim to the ribbing.  The trim did not have a stretch to it so it was important to make sure that the trim, once attached, would still slip easily off and on my arms, and over my neck.  


So the reasons that I love this shirt.  Well it is super comfortable.  It covers me in all of the places that I want to be covered, and I can be as active as I want in it.  When I wear it I feel like I should go and play some softball, probably because when I was a girl my softball pants were the same type of gray. This is my new lazy Saturday shirt because it is perfect for doing what you have to do, but I'm not going to be embarrassed when I have to answer the door.  It might also be my favorite pajama shirt, because it is so comfortable that I'd wear it to bed everyday if I could.


I love that the shirt shows that I'm a girl, without clinging in every place possible.  I am pretty sure that I could wear this shirt if I were 6 or 7 months pregnant (which I'm not by the way), but I could if I were. 


What do you think?  Do you have any shirring suggestions?


Check out these great link parties before you go.