Search This Blog

Showing posts with label repurposed. Show all posts

Friday, February 11, 2011

Ruffled Baby Skirt from Old T-shirts


Despite the fact that my sewing machine is out of order, I managed to get a bit of sewing done.  Don't worry, I didn't do any hand sewing.  I decided to try out the gathering foot on my serger, and I must tell you that I'm quite impressed (not with my skills, but with the machine).


 I started out with two old t-shirts that I'd thrown in a dye bath a while back.  I wasn't particularly fond of the t-shirts so dying them was a great option.

I'm no master at the ruffling/gathering foot and stitch, but it was rather easy, and the skirt was definitely a quick sew.  I made the skirt to be size 3-6 months. There isn't any elastic in the waist.  The knit material provides a bit of stretch, so fitting the waist band to the size of the  baby's waist should work quite nicely.


I used the hem of the t-shirt for the hem of the skirt.  I love it when half of the work has already been done for me.

To create the waistband I folded the fabric over, and serged the raw edge of the waistband to the seam of the top gathered tier, and the bottom of the waistband. I lost nearly all of the gather that existed prior to serging down the waistband, but I'm not too disappointed. After all, I didn't put in a whole lot of time or money.


I also created this little infant headband to coordinate with the skirt.  I simple served two layers of fabric together on either side, and attached a small knit flower to the top. Easy Peasy.

I'm still trying to decide what to applique or freezer paper stencil to the front of the onesie.  Any suggestions?

Thanks so much for reading, and being patient as I wait for the return of my machine (and my energy).  Clark had surgery earlier this week, he's doing well, but it took it's toll on his mama.


Sunday, October 17, 2010

Men's to Women's Dress Shirt Refashion


Welcome to Top-toberfest: Day One.  To kick off the celebration I thought that I'd share a tutorial for my recent refashion of a men's dress shirt.  I picked this shirt up at Old Navy a few months ago for ninety-seven cents.  I have been holding onto it hoping to turn it into something great.  I must admit that I am quite pleased with the transformation.

Image Source: Gap Online

While browsing through Gap online I found a few cute tops for inspiration.  These particular shirts don't button all of the way down, but I don't mind that mine does one bit.  I had intended on adding a ruffle, but decided to hold off for a little while.  I kind of like the clean simplicity of the pleats, but looking at these images does make me want to frouf it up a bit.  The neckline and sleeve are hybrids between the two shirts.  All in all I love how my shirt turned out.

The refashioning was a bit involved, but not too complicated.  I ended up removing the collar, adding some back and front pleats, altering the sleeves, and taking in the sides.  I kept the original hem and placket on the shirt.

For the tutorial read more below. To link up your tops in the Top-toberfest Show and Tell click here.

Monday, September 6, 2010

~M~'s Shirred Flutter Sleeve Top


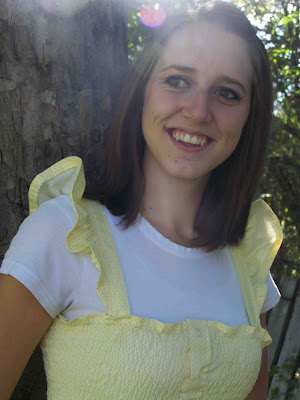
You may remember this yellow button up shirt that I have had stashed away.  It was a men's shirt that I found at Old Navy in the clearance section, only 97 cents.  I finally pulled it out of my stash and put it to good use.  I wasn't sure what I wanted to do with it.  I had thought that I might make a shirt like this with it, but I soon found Disney's tutorial for her shirred shared dress/top, and knew that  I had to make it.  I of course tried to make it my own with a little flutter sleeve.  

I don't have a little girl so I thought that I'd make the top for myself, but the Medium shirt I had on hand just wasn't long enough for my torso, but I knew that it would be adorable on my lil' sister-in-law Emily. She's such a lovely girl, and I was so excited when she agreed to not only take the shirt off my hands, but be my model.  

This was my second attempt at shirring and I think that it went a bit better than the first.  I love how sweet and innocent the top is.  


If you want to make this top for yourself you can visit Ruffles and Stuff for a full tutorial on how to make the bodice.  If you are interested in making the gathered  flutter sleeve then read more below.

Thursday, September 2, 2010

How To Make A Jersey Necklace From A T-shirt

Repurposed T-shirt Necklace/Scarf


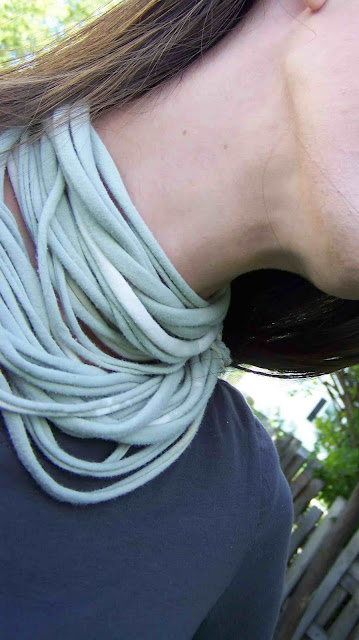
Well we are three days into September and I am working hard to put my stash to work.  Today I'm going to show you how to make a simple scarf/necklush from an old T-shirt.  Now I know that there are more beautiful jersey scarves out there, but I was amazed at how simple this was.  It is such a quick project and can certainly be dressed up.  The rest of my stash pile of old t-shirts might very well become jersey necklaces.

I think that this is my first step in preparing for fall.  This super soft knit fabric is sure to keep my neck warm.


Want to make one for yourself?  It is super simple.  Click Read More for the full tutorial.

Wednesday, July 21, 2010

Chunky Braided Bracelet Tutorial


Yesterday in my post I mentioned that I really loved the bracelet that I was wearing with my "Warhol Top", well today I am going to show you just how to make it.  I had hoped to make a video on top of some step by step photos, but I had a migraine yesterday and it kind of killed that idea.  Hopefully the photos will do.  The bracelets are super simple to make, but maybe not so simple to explain.  I'll do my best.


After making my Yoga pants and my Warhol Top I was left with several half-shirts and strips of fabric.  I couldn't bring myself to throw them away so I held onto them knowing that I could make something wonderful out of them (originally I figured a headband-shocking I know), and I did-these simple braided bracelets.  I have been assisting our girl's camp director in  making friendship bracelets for our upcoming girl's camp-so it was fresh on my mind.  I sat down and was chatting with my husband and fiddling around with a scrap of knit fabric from my yoga paints when this little dandy emerged. Now let's dive right in.

Cut your fabric:  For the white bracelet that you will see I used three strips of 1"wide (this can be increased or decreased to vary the width of bracelet) fabric that was cut 69" long if you have small wrists your pieces of fabric could be shorter, but I'd try to have pieces that are at least 55" in length.

Fold your fabric in half lengthwise.  You are going to find the center of your strips of fabric and you will tie a knot about an inch down from the center of your strips of fabric.  This loop that is created by the knot is going to be the loop for your button closure. You will no have 6 strands of equal length fabric.

For the tutorial I've used Red, Yellow, and blue fabrics so you can clearly see which strands I am using-don't worry I will not be wearing this bracelet.


Braiding Step 1: Divide your 6 strands of fabric into three sections.  You will have a middle section that will act as the center of your braid (blue) and two strands on each side that you will use to form your knots.  Take the two strands on the left hand side (red) of your bracelet and create a loop by placing your strands across (on top) of your center strands (blue).  It should look somewhat like a number 9.


Braiding Step 2: Take the two strands of fabric on the right hand side(yellow) and place them on top of the tail end of your (red) left hand strands.  Now move your right hand strands (yellow) under the center strand and through the loop that you created with your left hand (red) strand. Pull both the right and left hand strands tight to create your first knot.


Braiding Step 3: Step 3 and 4 are going to be the opposite of one and two. We will start by taking our right hand strand (red) and crossing it's tail end over the top of the center strand, creating a loop on the right hand side of our center strands.  It should look like a letter P.


Braiding Step 4: Take your left hand strands and place them on top of the tail end of the right hand strands and move them under the center strands and up through the loop on the right hand side.  Pull tight.  You've just created the four basic steps for the bracelet.


Repeat braiding steps 1-4 until desired bracelet length is reached.


When your bracelet is the correct length you will want to tie a simple knot to the end, pull it tight, and trim the ends of your strings.

Now that we have our bracelet braided we are going to attach a covered button.  This is a super simple process, and I don't mean to insult anyone's intelligence, but I thought I'd show some basic steps to remove any fears that might be out there.  To cover a button this is what we need to do.

Gather your materials.  You can buy a kit at any craft store or craft department.  This kit cost just over a dollar for 4 buttons.  You will need your kit which includes the needed tools, and a scrap of fabric that is slightly larger than your button.


Place the scrap of fabric in the indentation of the white button covering tool. Place the domed shell of your button directly on top of the scrap of fabric.


Tuck in the edges of your fabric so that they are all pointed toward the center of the button. Place the back of the button on top of the fabric and front of the button.  Make sure that you can't see any raw edges of your fabric.


Take your blue push tool and place it on top of the backside of the button.  Firmly press down and secure your button.


That's it-you have a beautifully covered button.

Now it is time to attach the button.  I use a doubled thread and tie the button directly onto the knotted end of the bracelet (not the loop end).  Don't worry I am not going to show you how to sew on a button.  Do secure the button several times so that it doesn't pull loose.


You now have a beautiful braided bracelet, and better still you used up your scraps of knit (and no sewing required).

You can make variations to this bracelet by alternating colors of looping fabric, or using multiple colors as in the example (but please don't use yellow and red).

By the Way-I'm planning a post on how to sew with knit fabrics, if you have any helpful tips that I should share please let me know.


Monday, July 12, 2010

How To Make a Jacob's Ladder Out of Paint Swatches


My husband and I have quite a large collection of paint swatches.  I acquired quite a large stash when we were engaged and I was choosing our wedding colors.  I added to the collection when we bought our home and chose wall colors.  I wouldn't say that I am a pack rat, but I do have a difficult time throwing away things that I know that I can repurpose.  Just the other day I was going through the paint swatches with my son as we were talking about colors.  I love these Dutch boy swatches because they have small openings in the side.  I'd ask him to find something that was a specific color and we'd place the paint swatch window on different objects until we found something that was the same color.  While we were doing this activity I decided that it would be fun to make a Jacob's ladder out of them.  They are just the right size and shape.  I'd made a Jacob's ladder once before and had really enjoyed the project.  I thought that you might want to make one with your family as well.

This project can be made with using mostly scrap materials.  You will need paper of some sort, this could be family photos, paint swatches, magazine pages, scrap book paper, coloring book pages, ect.  You will also need some board to adhere your paper to.  You can use book board, illustration board, wood boards cut to size, but I used some old mat board that I had on hand. You will also need glue of some type (PVA or a tacky craft glue), tape, and three strands or ribbon.

If you want to give this project a try you can find my instructions here.  If you have questions let me know. As I was writing up the instructions I realized that I failed to take a couple of pictures...so if there is any confusion I'd be happy to answer any questions.


I thought that this Jacob's ladder project was a fun way to introduce my son to colors.  When I showed it to my husband he said...oh cute you put warm colors on one side and cool colors on the other side (I've taught him so much).

Wednesday, June 30, 2010

Toddler Size Bucket Hat From Swim Trunks


Not too long ago my brother gave me a pair of his old swim trunks.  He knows that I love to repurpose fabric and thought that it might make for an interesting project.  I'll be honest, it took me quite a while to decide what to make from them.  Originally I had thought that I'd make a drawstring wet sack for wet swim suits, but I wasn't quite sure.  After our weekend campout I knew that I needed to make a bucket hat for my little boy.  The sun can be so harsh so this seemed like the perfect project.

I don't know about the rest of you, but I'd never made a hat before.  I searched online and found this great free pattern from Sew Much Ado.  Her toddler hats are adorable, and the pattern was super simple to follow.  The hat that she has designed is reversible and can be worn with the brim turned up or down, making it a very versatile hat.  She used contrasting fabrics, but I chose to stick with my repurposed swim trunk material on the inside and outside.  The fact that used swim trunk material will be great when Clark goes swimming in kiddie pool in the backyard, or if we head to the beach.


I really love the way that the hat turned out.  My son has a rather large noggin, but this hat fits perfectly.  It didn't take me long to make either.  I got it all sewed up during Sesame Street (you may all feel free to now cast judgment on my parenting skills).


The swim trunks had a pocket on the back which I added to the hat, it makes a fun little detail.  If you are looking for a  fun and simple pattern, or a great way to reuse some old swim trunks, this  is a great project.  (The hat really lies better than it looks in most of the pictures, my model wasn't very willing to model). I have a feeling that Clark will soon own several bucket hats, this pattern is going to be addictive.  Thanks Abby for being so generous and sharing your pattern with us.

Tuesday, May 11, 2010

Repurposed Neck Tie Organizer/Hanger


I don't know if this ever happens to anyone else, but I get so sick of picking up my husbands belts and ties off of the closet floor. It seems that anytime clothing is shuffled around in the closet the belts and ties are knocked loose and slip to the floor. Granted we don't have the best organizational system in place, but it is none the less a bit of a bother.

As I was packing boxes for our last move I was ready to throw out several of the hangers that Clark's onesies came on. They are odd little hangers, and these particular onesies came in a set of five. I never hung the onesies back up on the hanger, but I have a really difficult time throwing things out (thanks to my mom). Anyway, as I was ready to toss them I thought that maybe I could use them to organize my husbands ties. It was probably one of my most brilliant ideas yet. We have been using these hangers to organize his ties for almost 8 months now. The ties slip nicely under the curved ends, and never leave a mark on the tie. Each hanger can fit 10 ties. Oh what a dream. Rarely if ever do I have to pick his ties up off the floor. I often have to hang up his ties, but that is a completely different issue. I also use one of these silly little hangers to hang up cotton camisoles. Now if only I could figure out an inexpensive solution for the belts.