


You may remember this yellow button up shirt that I have had stashed away. It was a men's shirt that I found at Old Navy in the clearance section, only 97 cents. I finally pulled it out of my stash and put it to good use. I wasn't sure what I wanted to do with it. I had thought that I might make a shirt like this with it, but I soon found Disney's tutorial for her shirred shared dress/top, and knew that I had to make it. I of course tried to make it my own with a little flutter sleeve.
I don't have a little girl so I thought that I'd make the top for myself, but the Medium shirt I had on hand just wasn't long enough for my torso, but I knew that it would be adorable on my lil' sister-in-law Emily. She's such a lovely girl, and I was so excited when she agreed to not only take the shirt off my hands, but be my model.
This was my second attempt at shirring and I think that it went a bit better than the first. I love how sweet and innocent the top is.

If you want to make this top for yourself you can visit Ruffles and Stuff for a full tutorial on how to make the bodice. If you are interested in making the gathered flutter sleeve then read more below.

The materials: See Upper Left Picture
1 men's button up shirt. I used a medium (which ended up being long enough for an XS-S woman's shirt)
Elastic Thread
Coordinating Thread
Fray Block or Serger
Scissors or Rotary Cutter
Straight Edge
Step 1: Upper Left Picture
Cut shirt into pieces. First cut shirt into two pieces by cutting right below the bottom of the sleeves. Next cut off the sleeves just outside the arm/sleeve seems. Your sleeve seams should still be attached to the sleeve. Set aside the remaining collar piece (and add it to your stash for an upcoming project).
Next we will be making the straps for the flutter sleeve. I wanted to make the project as simple as possible, and to use any existing pieces that I could. Turn your sleeves inside out (upper right), and cut the sleeve hem off of the shirt. You can angle the scissors so that the unfinished edge of the shirt is hidden beneath the existing folded hem.(lower left)
Cut the loops of the sleeve hem apart just below the seam. (lower right)

Now onto the flutter sleeve. Rather than sketching out the shape for the flutter sleeve, I simply used the natural arc (see arrow upper left) of the sleeve seam, and worked from it. Take your two remaining pieces of the sleeves and get ready to mark them.
This is what I did. With the sleeves still connected by the bottom seam, measure three inches in from the arced side of the sleeve, on the fold of the fabric. This is going to be the widest part of your flutter sleeve. (see upper right).
Next measure 1/2" in from the raw edge of the sleeve seam and mark (see lower left).
Use a straight edge as a guide to connect the two marks, and cut the sleeve (lower right).
Cut open the bottom seam on the narrow end of your sleeves.
***Options***For a smaller sleeve you could reduce the 3" measurement. Another way to measure this would be to cut your sleeves open first and then measure 1/2" in from either open side. You could make a straight cut between your two marks. I' not exactly sure what the width of the sleeve would be, but you'd end up with a straight edge. Mind was to a bit of an angle, but was not problematic at all when attaching to the strap.

Now we are going to prepare the flutter sleeve. First you will want to trim the edges of the existing seam. You will want to cut just to the seam lines. (upper right).
Turn in the existing seam and press flat. Use the natural arc of the seam and this should be relatively simple. Pin in place. (bottom left)
Sew down the turned in seam, sewing 1/4" from the turned edge. (bottom right)

Gathering the flutter sleeve. To gather the sleeve you will want to elongate the stitch length on your machine. I bump mine up to 5 and reduce the tension to 1. Stitch 1/4 inch away from the raw (straight) side of your sleeve. Leave the threads long and DO NOT back stitch to begin or end this row. (upper left).
Gather the sleeve by pulling the top threads on either end. Make the gather uniform across the sleeve. (upper right).
Pin the ends of the gathered sleeve to your stap. I attached mine about 1/2-1" from the bottom of the strap. Pin both sides. (bottom right).
With ends pinned, adjust the gather of the sleeve so that the gather is evenly dispersed, and so that your flutter sleeve length is the same as your strap length. Pin in place. (bottom right).
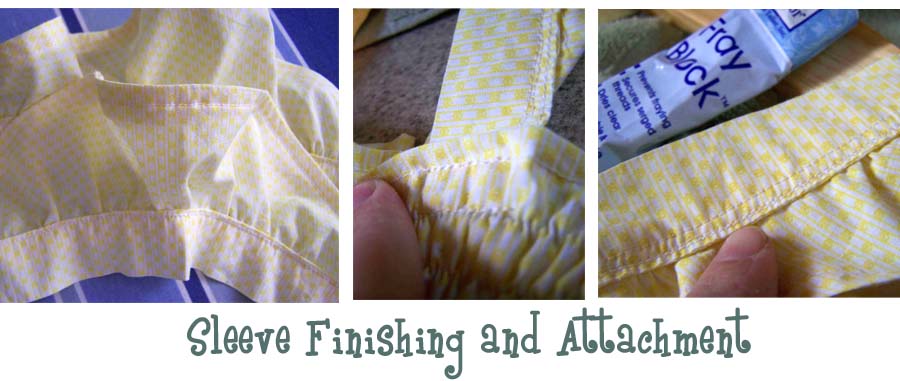
Stitch 1/8" away from the inside edge of the strap. (left) Stitch 1/4" in from that row. This will hold down the seam allowance. If you have a serger you can serge this unfinished edge. If not, fray block. I applied fray block to the raw edges of all of my pieces (the turned in seam allowance on the outside of the flutter sleeve, the inside edge of the strap, and the seam allowance where the sleeve and strap connect). (see right).
Next attach the strap/sleeves to the front of your top. I used a triple stretch stitch to anchor these down. I stitched in three places The top seam of the shirt, and the first and second shirred rows. (see middle image).


Try on your top and determine placement for the back straps. If you need more length you can add a wide piece of elastic covered with the original fabric to lengthen out the straps. (sorry no pictures). Sew your straps to the back of the top triple stitching at shirred rows and top bodice seam.
If you choose to turn this project into a little girl's dress you shouldn't need to lengthen the straps at all.
That's it and that's all. You're done. Isn't it sweet.

Thank's ~M~ for helping me out. I think that you look great.
Thanks for Stopping by!

14 comments:
That is so cute! I am going to have to learn and practice that technique!
Darling! I almost bought the same shirt to refashion but it was nine times more than you paid for it. Anyway, I love the addition of the flutter sleeves and your shirring looks great!
NOW THAT IS CREATIVE! love it, so darling!
Such a great idea, I've seen plenty of mens shirts transformed, but I think this one tops them all! Good job!!
That is very cute! Thanks for sharing.
Awesome! I love button-down shirt redos. Looks great.
Great idea! it turned out really pretty x
Love it! I want to do some shirred-top curtains...off to check out that TUT.
♥hugs♥
Nice Job - this is so cute - great redo of the shirt
That's got a great Dorothy- Wizard of Oz look to it. :-) It's adorable. Thanks so much for the tutorial!!
those flutter sleeves are so cute, and i must say i have never tried shirring. pretty sure my old machine would be baffled and confused by the stretchy thread... but it looks like so much fun!!!
That is sooo cute! I love the flutter sleeve. Sooo pretty!
Okay, I'm jealous. I wish I was that good with a sewing machine! That is beautiful - classy!
Felicity @ Simple Elegance
its vry nice:) thank u for sharing:)im gonna try this:)
Post a Comment