Search This Blog

Showing posts with label toddler clothing. Show all posts

Sunday, April 24, 2011

The Amazing Spiderman Shirt


Thsssss....You've been webbed, by The Amazing Spiderman...okay just by Clark, but webbed just the same.

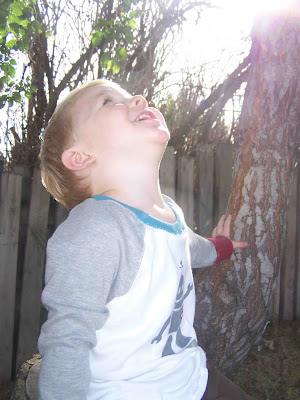
Before our trip, I set out to make Clark a short sleeved shirt for the warmer weather.  Sadly, I didn't get the shirt finished before our trip, but it's all finished now.


I mentioned earlier that I prefer subtle references to licensed characters when it comes to clothing.  I'll give in when it comes to pajamas, but if my child is going to be wearing clothing in public, I'd prefer that he not be a walking advertisement. So rather than coming out and slapping "Spiderman" on his shirt in red and blue, we referenced a lesser used name for him, added a small version of an older logo, and tried to mimic the type face and design of the lettering after some of the more vintage titles. Clark and I are both pretty pleased with the results.

I used a freezer paper stencil to transfer the images to the shirt.


I used a brick red knit for an accent color, but stuck to gray, black, and charcoal for the shirt. 

The pattern was made using an existing article of clothing as a guide.  It was my first five pattern piece t-shirt that I've made, and I quite like it.  Both the front and the back of the t-shirt have two separate pieces.


The sleeves and the bottom of the shirt are hemmed with a blind hem stitch.  I am still trying to figure out the best way to get the blind hem to lay completely flat when it is pressed out.  I'm guessing that I probably need to play with the tension on my server.  Any recommendations?


Clark really likes the blind hem detail, he thinks that they look like railroad tracks.


This poor boy has been sick with a stomach bug for a week straight.  He's a trooper and rarely complains, but I am ready to get out of the house.  Hopefully he'll be feeling better soon, I don't know how much more either one of us can handle.  I'm just relieved that I'm through the worst of my morning sickness-it would have been awful if this bug struck three weeks ago.

Thanks for reading.


Monday, January 24, 2011

Fleece Toddler Slippers Tutorial and Pattern: Size 7/8

Without Tabs

Thanks for being patient as I've put this pattern together.  The pattern, I'm sure, is less than perfect, but hopefully it will be helpful as you make some warm slippers for your favorite little feet.

First things first.  You will want to go and print off the pattern pieces.  You can download the pattern here, this is an updated file so hopefully you won't have any problems with it. You will want to make sure that you print the pattern pieces without scaling the images.  There is a one inch test square on each pattern paper, check it to ensure that it is scaled properly. (Slipper size 10/11 here, slippers size 5/6 here-See original pattern for pattern marking key).

With Tabs

                                    
On the pattern  you will notice a dashed line that runs along the slipper upper "tongue".  I decided to try out the slippers without the tongue/tab, because I thought that it might make the slippers a bit more gender neutral.  If you decide to make the slippers with the tongue, follow the basic instructions below, following the shape of the shoe as you stitch.  If you choose to sew the slippers without the tab, simply clip off the extra tab when cutting out your pattern pieces.

Find the full tutorial below.

Monday, January 17, 2011

Fleece Toddler Slippers


It seems that I always have cold feet.  In the winter I live in knee high socks and slipper socks.  Clark, on the other hand, hates wearing socks if he doesn't have shoes on.

To solve that problem I used up some of the fleece that I had in my fabric stash, and made some nice slippers for Clark's cute little feet.


The slippers are my own design, and still have a few kinks that need to be worked out.  This is version number two, but there are some adjustments that I'd like to make to them.  I've considered making up a printable pattern for you, but unfortunately I don't know how to grade patterns.  If I were to come up with one, it would have to be Clark's size, which happens to be a 7 to 8. Let me know in the comments if you'd be interested in that.


The slippers are fully lined with a velcro closure.  They are sure to keep Clark's toes nice and warm.


The slippers are the same basic design as the baby slippers that I pictures back on Wednesday.


Thanks for reading.  I'll be linking here.


Thursday, December 2, 2010

Hip For The Holidays:For the Little Lady


Today I'd like to introduce you to the project that prompted this holiday apparel series, but unfortunately she doesn't have a name.  I found this remnant piece of patterned corduroy at Joann's a few months back.  I liked the print, but it felt overly winter like to me.  I almost didn't pick it up, but I am quite pleased that I did.  I love what it became.


  The pink, gray, and white floral medallions remind me of snowflakes, and I think that they are very appropriate for the holiday season. I have a little niece that will be celebrating her second birthday in a couple of weeks. I hope that this little jumper will help her celebrate her birthday, and the Christmas season in style (without being painted red and green).   


I used Simplicity pattern 2574 for the jumper.  This is a croquis kit pattern, allowing you to design the jumper you want by selecting your own skirt, bodice,  yoke, and embellishment details. It kind of reminds me of those fashion plates that I played with as a little girl....does anyone know what I'm talking about?  They were little plastic plates with different costume elements.  You'd select a skirt, a top, and a model, and then place a piece of paper on top of the plates and create a rubbing of your fashion creation. They were fantastic, and so are these croquis kit patterns.  Sorry I got a bit side tracked.  


The pattern also comes with a shrug pattern.  They have featured shrugs in faux fur on the pattern package, but I opted for corduroy.  Faux fur could be a nice choice for a holiday outfit though.  I just wanted this dress to be versatile, and to be worn frequently.

I know that this dress is a bit on the casual side when it comes to holiday apparel, but there is a lot more that goes on during the holidays than just photo shoots, church meetings, and skirt twirling.  I think that it is nice if a little girl can feel all dolled up while she runs around. I chose to make a simple pair of knit leggings to be worn under the jumper, after all it is winter here in Idaho.


For a great tutorial on making simple knit leggings visit Dana of Made. I'll also be turning those pink leather bows into either hair clips or a head band.  I like that they will repeat the bows from the dress.

Do you have any holiday apparel or accessory projects that you want to show off?  Link them up to the Hip for the Holidays Link Party. If you think that it is about time for some adult holiday apparel, hang in there, it's coming.
I'll be linking up here.

Monday, November 8, 2010

Toddler's Fleece Dress Coat: Simplicity 2526

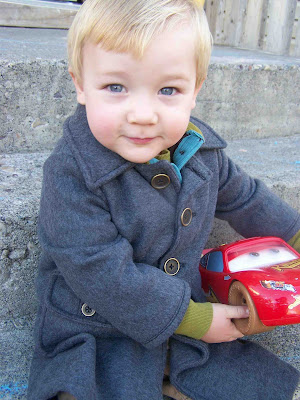
I recently finished up a fleece dress coat for Clark.  I don't think that I  could be happier about the results.  I found the pattern on sale, and the fleece was a remnant that I got for 75% off.  The biggest expense was the buttons (which explains the comment from this post).

I feared a bit that the fleece would make the coat look cheap and flimsy, but the dark charcoal gray could almost pass for wool.  Clark loves wearing his jacket, and ended up wearing it all through church yesterday.  He had no desire to take it off.


I wanted to add a bit more detail to the pockets.  I added a couple of buttons to the flaps, and did some detail stitching.  I really love the results.


The pattern was user friendly, and the sizing was pretty true.  I ended up making him a size 2, which is what he measured, and it fits just as I'd like.

I was able to finish the jacket in just one afternoon. If you are interested in the pattern, it is Simplicity 2526. There are three additional jacket patterns, two hats, and a pants pattern included in the pack.  I made the boys hat as well, but was unable to take any good photos.  My only complaint would be that I couldn't find any measurement references for the hat sizing.  I ended up making the largest hat size (because of Clark's huge head), but it ended up being quite large.

I'm linking up here today.


Sunday, October 31, 2010

Argyle Pull Over

The weather is cooling off and so is our home.   Consequently we spend much of our winters bundled in sweaters and long sleeved shirts.  Many of Clark's sweaters from last year no longer fit him, so I decided that it was time to pull out the sewing machine (not that it is ever really put away).  I was a bit disappointed because I didn't have any sweatshirt fleece on hand, but I am really pleased with the way this top turned out.  I used a solid brown interlock knit, and lined the pull over with the same material which really made it significantly warmer (and allowed me to hide some raw edges between the two layers).

I created the pattern for this top using one of Clark's zip up hoodies.  I simply traced the zipped up bodice pieces along with the sleeves and added seam allowances.  I ended up cutting a slit in the front bodice piece to accommodate the button flap.


 I used a 2/3rds rule for measurement when adding the arm cuffs and waistband, and I am pleased with how they both turned out.  I wasn't sure how much smaller I should cut the ribbed knit for the collar (given that the collar wouldn't be fully closed.  I think that I ended up shortening the  diameter by about  25%.  The ribbed knit along the button flap is cut to the actual length.


I added a little argyle design inspired by this top.  I attached the diamond shapes with fusible pellon, stitched around the shape edges with my machine, and then added the handstitching with embroidery floss. I had planned on putting a large brown button in the center of the main diamond, but Clark decided to hide it from me, so we will have to wait on that.

The pocket on the front reminds me of a pair of little briefs....I might have to rethink the pocket design.

It was a fun little project that was done in a day.  I love one day projects.  I seem to be a bit of an impatient crafter (which explains my issues with knitting, and my fear of quilting).

I'll be linking here today. Thanks so much for reading!

Friday, October 22, 2010

Top-Toberfest Day Five: 'Bot Top


Today I'm sharing this raglan sleeve robot shirt that I made for Clark.  He loves this shirt and lovingly refers to it as his "bot".  I'm sure that it is a lot of fun to dress up little girls in ruffles and lace, but there is something about robots and dinosaurs that warms my heart. I love my little man, and am so pleased that he loves this top.

I had found a free downloadable image of a robot.  I was pretty excited and I showed it to my husband.  I was sure that he'd be pleased that I was going to make a robot related shirt for his boy, but to my surprise, he seemed less than enthused.  As it turns out he was not impressed with the image itself.  He said to me "You can do way better than that", so I set to work and sketched out this quick little robot.  I think that he's pretty cute.

I also made this little BEEP word block.  I placed it on the back of the top, and love the way it turned out.  I transferred the image to the shirt using a freezer paper stencil.  The gray paint is a mix of a white and Night Sky Pearl soft body textile paint from Tulip.  The gray paint had the slightest bit of glitter in the mix, but I think that a bit of sparkle is fitting for a robot.


I added some embroidery floss stitching around the heart, head, and the word block.  I think that it adds a bit of dimension to the top and ties in the colors of the shirt itself.

Because I ended up liking this robot so much I thought that I'd share it with you.  You can access the printable version here.  It is available for personal use only.  I hope that you enjoy it.  I have two little nephews on the way and am planning on making some little robot onesies to welcome them to the world. You could use this image for an applique or a stencil, whatever you need it for.


Thanks so much for stopping by and taking the time to read.  I enjoy your comments and feedback so much.

I'm partying here today.  Don't forget to link up your top related projects to the Top-toberfest show and tell.


Monday, October 4, 2010

DIY Adjustable Waistband For Pants

It seems like for a large portion of my childhood I had to wear my pants with a 2 inch pucker at the back of my waist.  I'd try to disguise it with a larger belt and a longer shirt, but it was always very difficult to hide.  The alternative to having a 2 inch pucker in my waistband was having high water pants that were two inches too short.  I definitely preferred having the 2 inch pucker to the 2 inch deficit in leg length.  I wish that when I was a little girl there were adjustable waistbands in pants like they make now days.  


It seems that my almost two year old son is doomed to have the same leg to waist disproportion.  I recently found an inexpensive, but pretty cute, pair of pants at Wal-Mart.  I of course did not try them on him (would anyone really bother trying clothes on a toddler?). I also failed to see if they had an adjustable waistband. When we got the pants home I was quite pleased with the fit.  As we went throughout our day I realized that we had a major problem.  My active little boy was wearing his pants beneath his cheeks most of the night.  I decided that it was time to solve the problem by creating what every available pair of children's pants should have....an adjustable waistband. It didn't take long, and it has completely resolved the droopy drawers issue (while avoiding the 2 inch pucker).  


Click "Read More" below for a full tutorial on how to add an adjustable waistband to any pair of pants.


Friday, September 17, 2010

Upcycled Hats from T-shirts


Cheri's Upcycled T-shirt hats seem to be spreading through blogland like wildfire.  Her versions are so cute and I absolutely love all of the little details that she added. When I saw her post I knew that I had to try it out.


So here is my attempt at making the upcycled t-shirt hat.  I think that it turned out fairly well. I wanted to make it to go along with his new raglan sleeve shirt.  I didn't zig zag all of the edges like Cheri, and I don't miss it all that much. I used knit ribbing instead of t-shirt "tape".  It seemed to adjust to the curves well.


I was really pleased that Clark left his hat on as long as he did.  Normally they are ripped off and thrown to the ground in three seconds flat.  Yesterday he wore it the entire time we were in the post office.


After making Clark's hat I started wishing that I had one of my very own.  So I repurposed a couple of shirts and made one for myself.  I used this covered button tutorial from No Big Dill.  For my hat I cut down on the length of the ear flaps (I could have cut them down much more).  My hat strips were about 21" long and the domed piece was 4 1/2" tall, and the middle section was about 21/2" tall.  Visit Cheri at I am Momma Hear Me Roar for her full tutorial.

Check out these great link parties.

Thursday, September 16, 2010

Gearing Up For Fall: Raglan Shirt with Bulldog Applique


Mr. C and I are getting ready for a nice fall vacation next week.  It has me paranoid that while we are gone the seasons are going to change and we will be stranded wearing our summer clothing in very fall like weather.  I decided to make Mr. C a long sleeve shirt from a couple of existing shirts (cream and navy) and some remaining knit yardage  that I had on hand. You'll recognize the moss green trim and warm brown knit from my handstitched top and cap sleeve tutorial.


I ended up making the pattern from an existing shirt.  I added a bit of extra length in the arms and torso to accommodate for growth.  For more information on making a pattern from an existing clothing article see here, for information on piecing together a raglan shirt see here.

The image is a free image from Ottobre.  I love the bulldog, and Clark helped pick it out.  I used a cut away technique for the applique and topstitched around the edges (that was the most painful part).

The thing that I love about Raglan shirts is that they are great for growing into.  You don't look quite so dopey if the shirt is a bit large, because you don't have a shoulder/sleeve seam hanging down around your elbows. I love making clothes for kids.  Hopefully Clark allows me to so for him for a few more years.


I added a few messy stitches with embroidery floss along the cuffs and the applique. Clark was such a sweet boy for our little photo shoot, he didn't sit still long, but look at all of those smiles he gave me.  He's a bit under the weather today, so I am missing those smiles.

I'm linking up here today.