Search This Blog

Showing posts with label fleece. Show all posts

Thursday, January 26, 2012

Fleece Scarflette Tutorial


We have had a relatively mild winter so far, and I've been very happy that I haven't had to bundle up quite as much as usual.  This week, we did receive enough accumulation to send Clark out to make snow angels, and push his dump truck through the snow.  I typically don't love spending long periods of time in the winter weather, but after spending a few days cooped up at the sewing machine, I had to get out.  I was reminded of how much I enjoy my fleece scarflette that I made last year. It provides you with the coverage you need, and stays in place as you walk/run/etc.

I decided that I'd re-post my original tutorial for those of you who may have missed it.  It's a great remnant project, and is a quick beginners project.


One of the problems with a pull over neck warmer, is that fleece often creates quite a bit of static electricity.  Static and hair styles often don't mix.  To avoid pulling the fleece straight over the head, and having every hair on your head standing on end, I added a simple button closure.


There are many possibilities when it comes to making and embellishing these fleece scarflettes.  One other difference between these neck warmers, and the pull over neck warmers, is that these are not quite as tall.  They aren't designed to be pulled over your mouth or chin.
All of the above scarflettes are made with slightly different techniques, so I'm going to show you how to make the one above, and I'll provide a few instructions for making the different variations.


Monday, August 29, 2011

Sewing For Baby: Burp Clothes


Every new baby needs a burp cloth at some time or another.  While not all babies seem to have quite the same projection, burp clothes are a nice thing for any new mother to have on hand.

I used some of the scraps of material that I had on hand from the mitered corner receiving blankets, and some minky from the car seat canopy and cuddle square, to make a few quick burp clothes.  I made two different styles of burp clothes.  The two shown above are based on a free pattern from Cloud 9 fabrics, you can find the pattern and tutorial here

They are flannel on the front, and cuddle fabric on the back.


I also used up some fleece and flannel to make some serged edged burp clothes.  Both styles of burp clothes come together really quickly, and would make a nice, practical, and inexpensive gift for any new mom and baby. The great thing about the fleece backed burp clothes is that it provides a moisture barrier, that way nothing seeps through the flannel and onto your shirt. You can find the tutorial for the fleece and flannel burp clothes here.

Thanks for reading, and for all of your kind comments on our "nursery".


Sunday, June 26, 2011

New Friends: Turtle Softies


Ashley from Make It and Love It, recently posted a free (for personal use) pattern and tutorial for these adorable Turtle Softies.  I couldn't help but make up a couple for my boys.


Baby Numero Dos, will have a softie to match his car seat canopy. I used the aqua minky for the underside of the turtle, and the pieces of the shell.


 Clark told me that he wanted to have a green turtle, after going through my fabric scrap pile, we ended up with a green and brown turtle.  The underside of the turtle is brown fleece, the legs and head are brown flannel, and the shell is made up of quilter's cotton.  This little softie is a great project to use up smaller sized fabric scraps.  I don't know why I find so much satisfaction in using up fabric scraps, but I do.  So not only can you use up scraps with this project, but it comes together very quickly, and is perfect for a boy or girl.

You can find Ashley's original post here.

Wednesday, May 11, 2011

Reusable Flannel and Fleece Nursing Pads

The one nice thing about not knowing whether we are expecting a boy or a girl, is that I can spend some time making some of the more practical items for mama and baby.


I found this great tutorial on Passionate Homemaking and used it as my guide. I loved the idea of using fleece for the wrong side of the nursing pad.  The fleece creates a moisture barrier to prevent leaks.  Rather than using three layers of flannel for each nursing pad, I sandwiched one layer of thin cotton batting between the layer of flannel and fleece. Hopefully they will be plenty absorbent.


While nursing pads might seem a bit too personal to gift at a baby shower, I'm sure that they'd be a very appreciated gift to any new nursing mom.

This was a great scrap project, I used the left over bits of flannel, fleece, and batting that I had on hand.  I love making my way through a scrap pile.

Monday, January 17, 2011

Fleece Toddler Slippers


It seems that I always have cold feet.  In the winter I live in knee high socks and slipper socks.  Clark, on the other hand, hates wearing socks if he doesn't have shoes on.

To solve that problem I used up some of the fleece that I had in my fabric stash, and made some nice slippers for Clark's cute little feet.


The slippers are my own design, and still have a few kinks that need to be worked out.  This is version number two, but there are some adjustments that I'd like to make to them.  I've considered making up a printable pattern for you, but unfortunately I don't know how to grade patterns.  If I were to come up with one, it would have to be Clark's size, which happens to be a 7 to 8. Let me know in the comments if you'd be interested in that.


The slippers are fully lined with a velcro closure.  They are sure to keep Clark's toes nice and warm.


The slippers are the same basic design as the baby slippers that I pictures back on Wednesday.


Thanks for reading.  I'll be linking here.


Tuesday, January 11, 2011

Fleece Scarflette Tutorial


I mentioned last week that there were several variations to the fleece neck warmer.  Not only did I end up making Fleece Neck Warmers for just about every guy that we gifted to, but I also came up with a few more feminine versions for the women.


One of the problems with a pull over neck warmer, is that fleece often creates quite a bit of static electricity.  Static and hair styles often don't mix.  To avoid pulling the fleece straight over the head, and having every hair on your head standing on end, I added a simple button closure.


On the scarflettes for the little girls, I added velcro.


There are many possibilities when it comes to making and embellishing these fleece scarflettes.  One other difference between these neck warmers, and the pull over neck warmers, is that these are not quite as tall.  They aren't designed to be pulled over your mouth or chin.

All of the above scarflettes are made with slightly different techniques, so I'm going to show you how to make the one above, and I'll provide a few instructions for making the different variations.


Wednesday, January 5, 2011

Lined Fleece Hat


Yesterday I promised a tutorial for the lined fleece hat that accompanies the fleece neck warmer.  Here it is.  It is fairly easy and fast to make. Now, this hat is almost 100% inspired by Cheri's upcycled t-shirt hats.  I modified her pattern to adjust the ear flaps, and line the hat. I'm not going to give you a full tutorial on the hat itself, but will show all of the adjustments that were made to end up with this. I'll refer you to her tutorial for the basic construction of the hat.

 This is obviously a different hat than the green and brown hat pictured yesterday.  Hopefully it will prove how versatile this hat is. This cream on cream hat was made for the little girl that I babysit during the week.  I love the flowers and the sequins.


 Rather than put a pom pom on the top of the hat, I opted for another flower.  I think that it is a nice touch.

Here's a quick shot of the hat that I made for Clark.

Now onto the tutorial.

Monday, November 8, 2010

Toddler's Fleece Dress Coat: Simplicity 2526

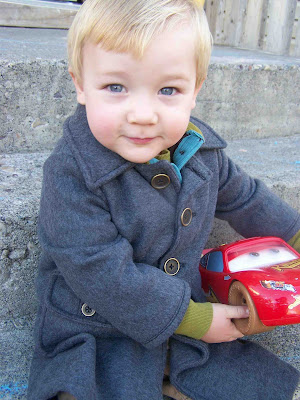
I recently finished up a fleece dress coat for Clark.  I don't think that I  could be happier about the results.  I found the pattern on sale, and the fleece was a remnant that I got for 75% off.  The biggest expense was the buttons (which explains the comment from this post).

I feared a bit that the fleece would make the coat look cheap and flimsy, but the dark charcoal gray could almost pass for wool.  Clark loves wearing his jacket, and ended up wearing it all through church yesterday.  He had no desire to take it off.


I wanted to add a bit more detail to the pockets.  I added a couple of buttons to the flaps, and did some detail stitching.  I really love the results.


The pattern was user friendly, and the sizing was pretty true.  I ended up making him a size 2, which is what he measured, and it fits just as I'd like.

I was able to finish the jacket in just one afternoon. If you are interested in the pattern, it is Simplicity 2526. There are three additional jacket patterns, two hats, and a pants pattern included in the pack.  I made the boys hat as well, but was unable to take any good photos.  My only complaint would be that I couldn't find any measurement references for the hat sizing.  I ended up making the largest hat size (because of Clark's huge head), but it ended up being quite large.

I'm linking up here today.