Search This Blog

Showing posts with label free pattern. Show all posts

Friday, February 7, 2014

Free Pattern and Tutorial: Baby Dribble Bib Bandana


Accessories for little boys are limited, and after three boys, I am feeling the need to accessorize. Pair that with the fact that he's constantly dribbling down his chin, and this is a perfectly satisfying quick sew.


You've probably seen bandana dribble bibs before, but I happen to think mine are the cutest (yep, I said it).  These little bandanas cowl at the neck, and have a fun closure that looks like it's tied.  So adorable. No matter which way the bandana shifts, it still looks cute.


Want to make some?  I've got a tutorial and free pattern for you today! Don't want to make your own?  I just listed a second set of baby bandana bibs in my etsy shop, get them while you can.

Materials
1/3 yard exterior fabric (I used a soft cotton flannel from Riley Blake's Sasparilla line)
1/3 yard lining (I used a sweatshirt fleece, but a knit, terry cloth, or flannel would all work)
Coordinating thread
Seam Ripper
Iron
Button Hole presser foot (optional)
Printable Bandana bib pattern (Personal/Non-commercial use only)

Cut out your pattern pieces, and tape together matching up triangles.

Fold your fabric in half, and align the pattern with the fold to cut out your bandana pieces.  Repeat with lining fabric.
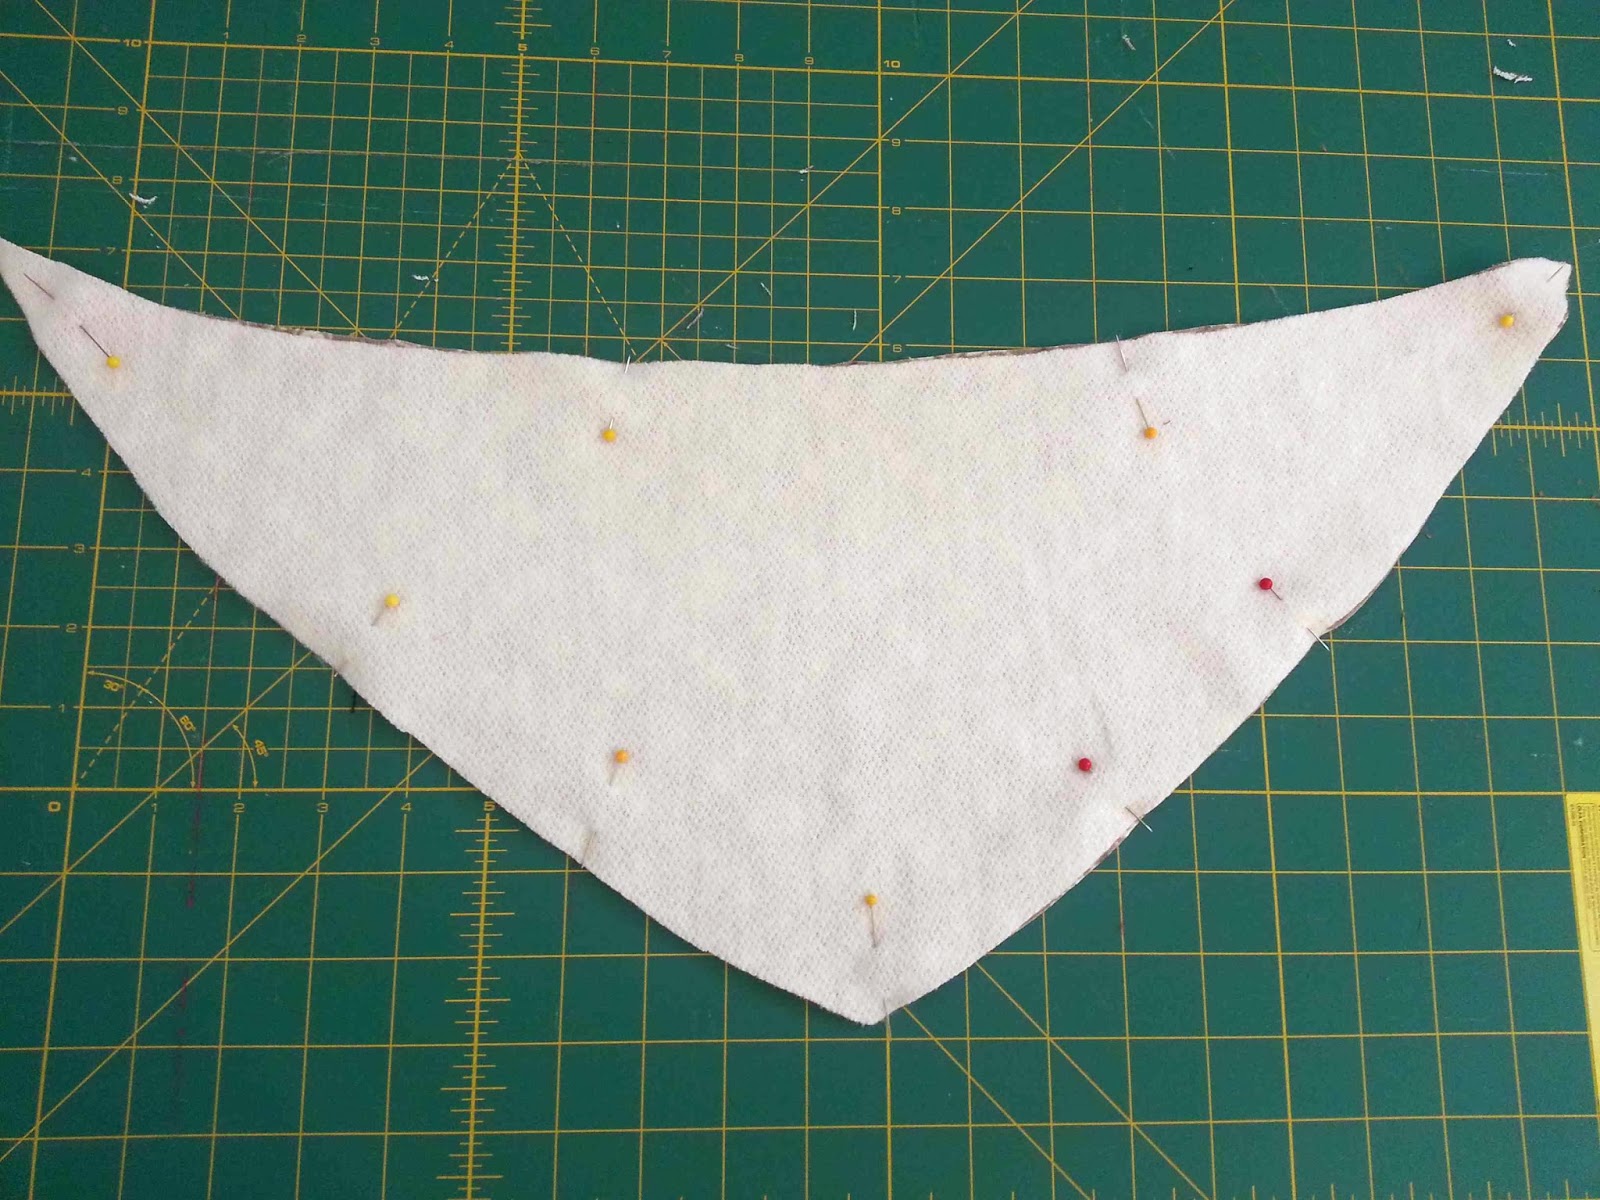

Place your exterior and lining pieces right sides together, and pin in place.  Mark the area to be left open (see pattern) with  a marking pencil, or different colored pins.


Sew around your bandana, starting and stopping your seams according to the pattern markings. The pattern allows for 3/8" seam allowance.  You should be left with an un-sewn area for turning your bandana right side out.

Clip the three corners of your bandana, making sure not to clip through your seam line.  This will reduce the seam allowance bulk, and make for sharper points on the finished bandana.


Reach into the un-sewn portion of the bandana, and pull the material right side out.  Make sure that your points are nice and sharp at the corners.


Press with a hot iron, making sure that the open edges of the bandana are turned inward.


Topstitch around your bandana, 1/4" from the edge. This should secure your un-sewn area.


On one tie end of the bandana, fold the tie in half.  Measure four inches from the tip of the tie and mark.


 Adjust your button holing foot to allow for a 5/8" button.  Attach the button hole foot to your machine, and adjust machine settings. (Read more about sewing button holes)


 Line up your button hole foot with the 4" mark, sew your button hole.


Ah, a thing of beauty.


Use your seam ripper to open up the button hole.


Your finished bandana should look like this.  The tie end opposite the button hole will be pulled through the button hole to secure the bandana.

So cute, right?  If you're button hole is too large, the tie could slip too far, and make the bandana too tight.


 Tie around your favorite little cow poke, and catch those rascally dribbles.  They'll keep your dear ones dry, and make them absolutely irresistible.

Buy your own set of red and grey bandana bibs in my etsy shop (SOLD OUT).  Check out my Dribble Bib-danas for sale in my Etsy shop!

Friday, November 8, 2013

Free Pattern Friday: Crocheted Elf Hat


I've shared projects from this pattern before, but I just love it, and had to share it again.  We recently took a little family road trip, and on the way I was able to make up this cute crocheted elf hat for my Sister In Law.  She is a photographer in North Dakota (Jessica Marshall Photography), and I thought an adorable elf hat would be a great addition to her prop collection.

I love the way it turned out!

You can see my first project in action as a prop for my friend Kandice McDermott Photography.  They make the cutest props.

Hop on over to Oodles 4 Noodles for the free pattern.  It's a great little project.  I love the pom pom, and the faux ribbing at the base of the hat.  Nothing but sweet.

Friday, June 28, 2013

Free Pattern Friday: Crocheted Crowns

Follow this blog with Blog Lovin'

Follow with Feedly


Another free pattern for you to try out this fine Friday.  This free crochet crown pattern is by Kim of Little Rays of Sunshine. It is such a simple pattern, and works up quickly.  It is the perfect project to use up that last little bit of yarn. It would make an adorable photo prop, dress up accessory, or birthday celebration piece.


I love her version with the rhinestones, but didn't have any on hand.  Some hand sewn pearl beads would have to work. Obviously, mine aren't refined as hers, but hey, I'm just learning.


Friday, June 21, 2013

Free Pattern Friday: Crocheted Apple Hat by Micah Makes

Follow my blog with Bloglovin


I love a free pattern, and an easy one at that.  I've been in a bit of a crocheting mood, so I couldn't resist trying out the adorable Crocheted Apple Hat Pattern by Micah Makes.  


It worked up so quickly, and the addition of a simple stem, and leaf really make this hat.  I think it will make an adorable photo prop for a little babe.

You can find the free crochet apple hat pattern on Micah's website, along with several other free patterns.

Tuesday, June 4, 2013

Upcycled Chambray Baby "Toms"


Next up from the clothes pile, is a chambray shirt.  It never fit my husband properly, so it hung in the closet most of the time.  But, it has now become part of four different articles of clothing for my boys.  


 I made up these chambray baby "Toms" using Homemade Toasts' printable pattern.  The basic printable pattern isn't scaled, so you'll have to do that on your own, or purchase her sized pattern.

I love how these little kicks turned out.  The elastic, double rowed stitching, and little tags.  So cute.  Hopefully my little guy can fit in them.  My boys tend to have long feet.


FYI: I didn't scale the pattern at all, and figure that it is probably close to a size one unscaled.  I did have an issue with the uppers not meeting up in size when attaching them to the sole.  It was probably due to a cutting error.  It was a simple fix though, simply overlap the back heel over the toe piece a little more.  If you have this problem, pin the toe piece to the sole, and then adjust the position of the heel before attempting to attach the two.  It will help you find proper position, and eliminate seam ripping.

Also, I didn't ever rip the seam of the toe piece. I inserted the tags prior to sewing the seam, and slipped the elastic in the side.

Tomorrow I'll show you the rest of the goodies made from the chambray shirt.

Monday, March 25, 2013

Tutorial: DIY Felt Easter Baskets


Felt Easter Baskets

Can you believe it?  I have an actual tutorial for you, and it only took me a week and a half to put it together.  Oh, what has happened to me?  

I started thinking about Easter a couple of weeks ago, and realized that we don't have Easter baskets.  Clark's first Easter I filled a mixing bowl full of Easter grass.  I'm cheap.  This year I was thinking of running to the dollar store and buying some cheap-o baskets.  The boys would have been perfectly content, but then I realized that I could make some much cuter baskets using the materials that I had on hand.  $0 out of pocket is better than $2 out of pocket.  We are on our way to being rich here.  Little by little.

Tuesday, November 20, 2012

Fleece Slippers, New Sizes


By far, one of my most popular posts has been my fleece slipper pattern and tutorial.  In the past I've only had it available in one size, toddler 7/8.  Let me just say, that grading a pattern takes time, and quite a bit of it.  Just like the rest of you, I'm busy.  Busy with kids, holidays, work, etc.  I haven't had the time, or energy, to make a full graded pattern, and if I did, you better believe that I wouldn't be sharing it for free :).

I've had several readers ask for different sizes, and several say that they have had success making them in different sizes.  So, first, I'm going to share what my readers have told me. Many have said that they are able to resize the pattern by changing the scale in your printer settings.  Generally when you go to print a document, a print window will open, and provide you with the option to print the image smaller or larger.  For example, if you needed the pattern slightly smaller, you could switch the settings to 95%.

I see a few problems with adjusting the pattern this way.  First off, feet don't often grow in length and width at equal rates. Often feet will grow longer, and even slim down as toddlers turn into kids.  I had planned on writing up a tutorial about adjusting patterns this way last year, but after attempting to scale down the pattern to fit my infant boy, I realized it just wasn't going to work.  I could adjust the pattern in length just fine, but it shortened the back of the heel far too much, they would not stay on his feet.  So, if you need to adjust the pattern a size up or down, you will probably have really good luck doing it this way, but adjusting it too much up or down, and you'll run into a few problems.  (plus, babies don't have defined enough heels for the shoes to stay on well.  Add elastic if you are making them for a babe).

If you are wondering how much you need to adjust the pattern, I'm not going to do the math for you.  I will however give you a couple of pointers.

1- Measure your child's foot
2-Take the foot measurement and add 1/8-1/4" for wiggle room.
3-Add the seam allowance times two.  This way you'll know how long the pre-sewn sole needs to be.

Knowing the size of the pre-sewn sole, and the size of the printed pattern piece sole, you can figure out the percentage for pattern adjustment.

So, hopefully that will help a bit.

Buttons, French knots, and some vinyl shark teeth (sole).  CHOMP CHOMP.

Clark's feet have grown a bit in the last two years, so I needed to re-scale my pattern for his new shark slippers.  I drafted the pattern anew.  His feet are now a 10/11.  Hooray, I'm sharing my 10/11 pattern with you.

Miles' feet are HUGE, for a lil' guy.  He's sporting 5/6. Hooray, I'm sharing the 5/6 pattern with you also.  You can find the 7/8 original pattern here.  See original 7/8 pattern for pattern marking key.

Hope this helps keep all those little toesies warm this winter.

Tuesday, October 23, 2012

Lapped Front Infant Hoodie: Tutorial and Pattern


Last year during Top-toberfest I had a newborn baby.  I made him the sweetest little sweatshirt, made up a pattern, and then it never found it's way into the series.  So, one year later, I'm finally sharing it with you.  Unfortunately a few of the tutorial photos were deleted from my computer, so I'll do the best to fill in the gaps.

I loved this sweatshirt for a newborn.  The lapped front, allows you to pull the sweatshirt off an on with ease.  No zippers, no buttons, no snaps.  Easy on, easy off, and a relatively happy baby (what baby really loves having their clothes changed).

This sweatshirt pattern is gender neutral-hooray.  I made a really basic sweatshirt with the materials that I had on hand, but you could really dress it up with pockets, buttons, trims, etc.

Monday, October 15, 2012

Top-toberfest: Easy As Pie Tank


Top-toberfest is here, and we are going to start it off with a super simple (ungraded) free pattern. With the arrival of Fall, you may be wondering why I'd be sharing a tank  pattern, but tanks are great any time of year.  I love layering them under cardigans, and the burnt orange seems seasonally appropriate to me. This particular tank is also great tucked into a pencil skirt. It's made out of a lightweight sheer polyester, and blouses nicely.  With side bust darts, it has shape at the top, and has a slight flair at the bottom (perfect for disguising a stubborn post baby bump).


It also has a slight racerback cut in the back.

This free pattern is size small.  I realize that not everyone wears a small, and I apologize, but I don't have the pattern drafting/grading skills to adjust it.  However, this free Sorbetto Top pattern from Colletterie similar, as well as the Wiksten Tank pattern for purchase.


Materials:

1 1/4 yard lightweight material
Coordinating thread
Sewing supplies
"Sharp" sewing machine needle for lightweight fabric
*rolled hem foot, optional

-If you don't have an overcast serger, you may wish to use french seams on the shirt to encase raw edges.  You can find a tutorial here. You will need to adjust the seam allowance on the pattern to do so.

Step 1: Print of pattern.  Assemble pages according to diagram on pattern.  Make sure that pages are printed to scale.

Step 2: Cut out one tank front piece on fold.  Transfer bust dart markings to fabric

Step 3: Cut out one tank back piece on fold.


Step 4: With the remaining fabric, cut several 2 inch strips of fabric on the bias.  Connect ends to form a long bias strip. Create double fold bias tape by meeting the edges of the fabric in the center, pressing, and then meeting up the folded edges and pressing again. For more information on creating bias tape see this tutorial.

*I used a 1 inch bias strip, creating very small double fold bias tape.  Next time I'd bump it up to 2 inches.


Ahhh....bias tape.


Step 5: Sew the bust dart.  Find the markings from the pattern, there should be two on each of the outside edges of the front piece, and one a few inches in. Pins are used to indicate marking points.


Match up the two markings on the outer edges of the fabric.  Pin in place.


Starting on the outside edge, sew in toward the inner marking. Rather than back stitching when you reach the inner marking, leave threads long, and tie off ends.  Doing so will eliminate puckering. Press dart down.

*You will only be sewing one seam (on each side).  The dart with pull the fabric in a small amount to allow for a better fit at the bust.  


Step 6: Place front and back pieces with right sides together, matching up side seams.  Stitch together. 1/4 inch seam allowances are included in this pattern. 
  

Step 7: Match up shoulder straps, stitch together.  Press seam to one side.


Step 8: Hem the bottom of the tank.  To do so, press the bottom edge of the fabric up 1/4", and then another 1/4" to encase the raw edges.  A rolled hem presser foot can also be used for this step.


Step 9: Attach bias tape to both arm scythes, and neck.  This is the trickiest part of the whole pattern, but it is doable.  I'll show how.


Start by opening up your bias tape.  Match up the raw edge of the bias tape with the raw edge of the garment (right side out).  Leaving a 2 inch tail, begin attaching the bias tape about 1 inch away from the side, or shoulder seam.  Stitch along the outside press line of the bias tape, all of the way around the opening, until you are about two inches away from the starting seam.  Leave a tail at least two inches long

You'll now have two tails of your bias tape. Pull the bias tape so that it is tight, and matches up at the seam.  Pin in place.  Stitch the two tails of the bias tape together (not to the garment).  The seam should Press the seam open.


The bias tape should now be just the right length for the remaining section of the garment.  Finish stitching the bias tape across the remaining couple of inches.


Next, fold the bias tape back to it's pressed position.  You will want the bias tape to fold over the raw edges, and extend beyond the first stitching line of the bias tape. Stitch the bias tape down, about 1/8" away from the seam, this will secure the bias tape, and catch all layers of material.  Repeat the process for both arm openings and the neckline.


All done.  Easy as pie right?  When it comes to sewing with sheers, this is a great starter project.  With only two pattern pieces, and a simple bust dart, it's not too intimidating.

Tips for sewing with light weight materials:

-Use a Sharp needle, it will help prevent threads  from pulling.
-Reduce the amount of pressure on your presser foot by using your sewing machine's adjustment dial.  Doing so will allow the fabric to feed through the machine with greater ease.
-Use pattern weights and a rotary cutter to cut out your material.  The material won't shift as much during the cutting process. Don't have pattern weight?  I like to use tuna fish cans, they are heavy enough, and have a low enough profile that they don't get in the way.


*PS- I was going to have my husband take some pictures of me sporting the tank today, but instead we spent the day in the hospital having his appendix removed.  My mannequin photos will have to suffice.


Monday, July 23, 2012

Bow Tie/Headband Pattern and Tutorial


I recently guest posted over at Mama Says Sew, as part of her Just Sew Series.  I shared a simple little sewing project for an elastic bow tie/headband.  It's a really quick project and is fun to boot.


I thought I'd share the link for the printable pattern and tutorial here on my blog as well, just in case you missed it.