Search This Blog

Showing posts with label ribbon. Show all posts

Wednesday, January 15, 2014

Flannel and Minky Remnant Projects


After sewing up flannel receiving blankets, and minky and flannel pillowcases, I was left with several pieces of adorable remnant material.  I love minky and flannel, and had to put them to good use right away.  The softness of the flannel and minky make them ideal materials for any baby related project.  Burp rags and taggie cuddle squares won out this time.


  Because I had coordinating fabrics, I was able to make some cute burp rag sets to give out as gifts. I've sewn several different styles of burp rags, but a simple rounded rectangle is my favorite.  The straight edges make it easy to turn right side out, and then topstitch down. I don't remember the exact dimensions of these, but I'm thinking that they were around 9"x14", that makes it large enough to lay down and use as a changing mat if you're in a crunch.  


Another favorite scrap related baby project is the sensory cuddle square.  This allows you to use up all of those small pieces of ribbon that you couldn't toss, and gives baby something soft to hold onto.


I like to make my taggies squares, but you could even through a few pieces of ribbon onto the ends of your burp rags. You can make these any size.  I made two 12 inch squares and a 10" square as well.  You can always sandwich in a piece of crinkly plastic, but for some reason the thought of laundering the plastic deters me.


Monday, May 28, 2012

Simple Suspenders-The Perfect Lil' Boy Accessory


I sewed up some simple ribbon suspenders recently.  You can find a tutorial for boys suspenders on the cotton and curls blog.  She used elastic for the suspenders, but ours are just made out of ribbon.


 I added a bit of contrast stitching on Miles';  I wish that I'd added it to Clark's as well.


I think that suspenders and bow ties are a fantastic pair.  They help break up the torso, and add a bit of visual balance.


 And with the lack of boys accessories out there, why not make some up.  They are simple and quick to make, and are really fun for photo shoots in the back yard.


If you missed my boys bow tie tutorial and pattern, you can find the original post here.

Thanks for reading, happy sewing, and a happy Memorial Day also!

Thursday, March 15, 2012

Shamrock Ribbon Applique Shirt

Source
Alright, this is not my project, but it was inspired by one of my past projects. I had high hopes of getting around to making some St. Patricks Day shirts for the boys, but it simply hasn't happened.  So I'll share someone else's instead.


While on pinterest yesterday, I saw that someone had pinned this cute little shamrock onesie.  I thought that the technique looked familiar, so I jumped to the source to see if they mentioned my blog or linked back.  Fortunately they did.  I love finding things online that were inspired by my projects, especially when they link back.


Do you remember my Layered Ribbon Christmas Tree Onesie? Well, if you don't you can go and check it out.  

The shamrock onesie is from the Ribbon Retreat blog.  The funny thing is, that I actually purchased all of the ribbon from my Christmas Tree Onesie at the Ribbon Retreat.  Which reminds me, I need to add them to my favorites page.

Thursday, December 15, 2011

Wrapping up the Holidays: Ribbons and Bows

Here's a little bit of inspiration for wrapping up those holiday gifts, courtesy of Pinterest.
Source: stylisheve.com via Tricia on Pinterest


Source: goodhousekeeping.com via Tricia on Pinterest


Source: taradennis.com.au via Tricia on Pinterest

Source: original-home.ru via Tricia on Pinterest


Wednesday, October 26, 2011

Lace Belt Tutorial


Last week I showed you how to make the lace embellished top or tank.  During the photo shoot I accessorized it with a lace, faux leather, and ribbon belt.  Although the belt is not a top in and of itself, I think that it can do a lot for a basic top.  Today I'll show you how I made my belt.


Materials: Faux Leather or vinyl, a yard or so of satin ribbon, around a yard of lace, leather punch, sewing machine, and fray check

To begin you will want to cut a strip of leather, and one of lace, that are as long as your waist plus six inches.  I cut my belt material to be about 1/2" wider than the width of my lace. Once your materials are cut you will want to center your length of lace over the belt material.  You can pin along the length to secure the two layers.  I then machine stitched down the length of the belt.  The first rows of stitching were about an eighth of an inch from the edge of the lace.  I then stitched around a quarter inch inside the initial rows. The placement of your machine stitching should be determined by the shape of your lace.  I recommend using a lace that doesn't have much of a scalloped edge to avoid the edges from pulling away from the material.

I used a regular sewing machine needle on  my project, but a leather needle or heavy duty machine needle would worker on thicker or hard to work with material.


Next fold over the ends of your belt by two inches.  Pin them in place. Stitch around the entire perimeter of the tab (see image below).


You will next want to mark where you would like the holes of the belt to be punched.  I put three holes each 1 inch apart, the first hole being 1/2" away from the edge of the belt ends. You only need two holes on each end, but adding a third allows you to adjust the belt width a bit more (great for when you are wearing the belt over multiple layers).


Now cut a length of ribbon that is long enough to tie either in a bow or a know.  Angle the edges  of the ribbon and apply fray check to prevent fraying.

That's it.  I can't wait to make more of these belts in different colors and widths.

I'll be linking here.

Wednesday, June 22, 2011

Baby Lovey Cuddle Square: With Tutorial


It seems like when Clark was a few months old he developed a fascination with tags.  He love the tags on clothing, tags on toys, tags on his blankets, etc. Before having him, I never quite understood the need for a cuddle square or lovey, but after dealing with his tag fetish, I realized that it was a wise parent that thought of making a tagged cuddle square. It satisfies the need that some little tactile learners have to pull on tags, and hold their blankets close.

I decided to use some of the scrap fabric and material that I have sitting in my stash to make a cuddle square for Baby #2.  It is a really quick and easy project that even the beginning sewist can tackle.

You'll find the full tutorial below.

Monday, December 20, 2010

Ruffled Ribbon Christmas Tree Applique Tutorial


For those of you who followed the Hip for the Holidays series, you may remember this teaser photo.  I had originally intended on creating a ruffled ribbon Christmas tree applique, but became distracted with sequined snowflakes.  I figured that rather than shelving the project for next year, I'd show you the finished product.

Thursday, October 7, 2010

Easy Ribbon and Bead Bracelet


After my plum colored dress post I received a sweet comment from Dawn suggesting that I add some fun beaded jewelry to my dress to give it a little something extra.  It was a great suggestion, but here's the deal.  I am cheap.  I have a hard time spending money on jewelry.  Also my taste is a bit selective.  I do like some big/chunky jewelry, but not much.  Anyway, I decided that I did need to start dressing myself up a bit.  I was at Joann's late last week and I found that their beads were on sale. I can't resist a sale.  So I picked up some of the least expensive beads that I could find and a few jewelry making basics.  I remembered seeing several bead/ribbon necklaces and bracelets around blogland and decided to try it out for myself.  


The bracelet that I made used this pewter colored ribbon and some tiny little beads.  I followed the tutorial here.   It was really pretty simple to make.  I love the color combination.  I added a jewelry clasp to the bracelet so that I could take it on and off, but you could totally make this out of a stretchy cord which would eliminate any need for a clasp.  


I strung the extra beads onto some stretch cord to make some simple coordinating bracelets.  I'll probably end up cannibalizing them for a future project, but until then I'll put them to good use.

It is a little baby step into the world of jewelry making and wearing, but it is a step none the less. What do you think?

Don't forget to enter to win the CSN Stores Giftcard Giveaway.  It is still open for a few more days.  

I'm linking up here today.


Friday, July 23, 2010

How to Make Paper Award Ribbons


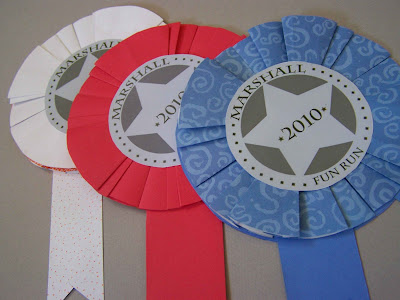
Ribbons for the oldest runner (most likely my dad), and the first woman runner.


Things are getting pretty busy around here.  I am gearing up for girl's camp next week, I am attempting to turn out a quiet book in record time, and the next three days are going to be devoted to a family reunion.  I am not quite sure how I am going to get things done.  I had intended on posting about how to sew with knits today, but I think that I will save that for when I get back from girl's camp.

I mentioned the family reunion, well my parents are planning it this year, and my dad organized a family fun run as part of the festivities.  My mom thought that ribbons were necessary.  I was given the responsibility with coming up with some sort of image for an award and some simple ribbons.  This is what I came up with.

I designed a simple medallion for the center of the ribbon using Photoshop, but you could do the same thing in most photo editing programs.  Because this is a Marshall family reunion I designed the medallion to look a bit like a Marshal badge.  I printed 6 off on a page and I was ready to go.  I searched through my box of old scrapbooking supplies and found several sheets of colored scrapbooking paper.  I used medium weight paper (not card stock) for this project.

Now lets get started.

To make one paper ribbon you will need:

2-3 sheets of medium weight scrapbooking paper
1 3 1/2" paper medallion printed as desired (birthday boy, princess, 1st place, last place, ect.)
2 paper tails for you ribbon (mine are 1 1/2" wide and about 6" long.
Glue stick or other adhesive
Tape
Bone folder *optional

Cut out  five 6" circles, I could get 4 out of a 12x12" sheet, or two from an 8 1/2x11.  Cut two tails from your remaining scraps of paper,  Cut a notch out of each end of your tails.

Fold in Half
Fold In Half Other Direction

Now we are going to fold our paper.  If you follow Make it and Love it, or Kojo Designs, they have used a similar folding technique in recent projects.  You will start by folding 4 of the 5 circles in half one way, and then in half the other way.  Your circle will be divided into equal quarters. You can use your bone folder to make your folds nice and crisp.


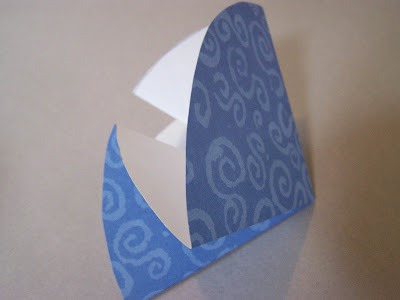
Push two sides in towards center and flatten


Now take two of the quarters of your circle and push them in towards the center of the circle.  Your new folds should meet up in the center.  Push your top quarter down on town and crease your new folds.  You should now have a wedge shaped piece of paper (when folded).  Now you could stop here, but you can continue on if you want your ribbon to look like mine.

Outer creases are bottom creases, middle crease is adjusted, and center is newly created.
This is a poor diagram to show the placement of the folds on the circle, but maybe it will help.

Now this is the portion that I don't really know how to explain.  You are going to adjust your folds and create an additional pleat so that your ribbon ends up looking like this.  Take the top side of your newly folded wedge piece of paper and adjust the edges so that they are slightly set in  from the creases on the bottom side of your wedge.  You will need to make new creases.  Now you will take the extra paper from your adjusted top pleat and make an additional pleat to sit on top.  This takes a bit of adjustment.  I wish that I had a better way to verbalize the process, but each ribbon was a bit of trial and error so I can't quite explain it properly.  Your wedge should maintain it's original size (which is a quarter circle).  When I unfolded one wedge it appeared to have 10 folding creases.  So maybe that will provide you with a bit of insight.

Front
Back-This is how your ribbon will look if you don't complete the last folding step.

You will repeat each of these steps on a total of four of your circles.  When you have four folded you will attach them in the center with a small piece of tape on front and back.

Now take your adhesive and glue your medallion to the center of the front of your medallion.

Take your two ribbon tails and secure them to the remaining 6" circle.  Mine overlapped the circle by about 1 1/2".

Apply adhesive to the paper circle and overlapped portion of the tails.  You will now attach your "bloom".  Press down your bloom and medallion so that they are securely attached.
1st, 2nd, and 3rd

You are done!  Now you can give away your beautiful paper ribbons at your family's fun run....if there is anyone else out there that does that.

If you are done and you didn't end up with a beautiful ribbon let me know.  I'd be happy to attempt to answer any questions.