Search This Blog

Showing posts with label accessory. Show all posts

Friday, June 28, 2013

Free Pattern Friday: Crocheted Crowns

Follow this blog with Blog Lovin'

Follow with Feedly


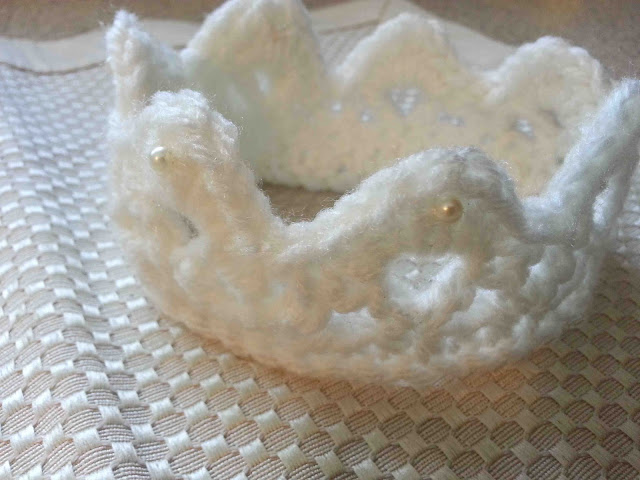
Another free pattern for you to try out this fine Friday.  This free crochet crown pattern is by Kim of Little Rays of Sunshine. It is such a simple pattern, and works up quickly.  It is the perfect project to use up that last little bit of yarn. It would make an adorable photo prop, dress up accessory, or birthday celebration piece.


I love her version with the rhinestones, but didn't have any on hand.  Some hand sewn pearl beads would have to work. Obviously, mine aren't refined as hers, but hey, I'm just learning.


Friday, July 27, 2012

Leather Chevron Necklace


I love a good scrap busting project, and this little leather chevron necklace made me giddy.  I was able to use up some of my favorite leather scraps (the ones that I was feeling guilty for holding onto because they were so small).  


 I put them together using some leather cord, and a few jump rings.  They were pretty simple to make, and an awl made piercing the leather a cinch.  The most difficult part of the process was cutting the chevron pieces so that the edges were straight and even.

Pardon all of the white fuzz...apparently the tank came right from the dryer....but what did I dry it with?

I love mixing the different leathers together, for a bit of variety.  

Inspiration piece found here. My chevron pieces are a bit wider, and my jump rings a bit smaller.

Sunday, June 17, 2012

Tutorial: Men's Shirt to Apron Refashion


Since we've celebrated Father's Day, we can now go through all of the worn dress shirts that have been replaced, and turn them into something new.  Dresses are great, a new top for yourself, an outfit for your little guy.  But if the dress shirts that you have on hand are stained, a bit thread bare, you can turn then into something useful...like an apron.


Clark loves to help me cook, and I usually love to have him help me.  It's a really good thing for us to do together, it keeps him entertained, and I feel like I'm teaching him useful things. Neither of us are really tidy cooks, so aprons are a nice thing to have on hand. We grabbed a couple of my husbands old button up shirts, cut them up, and made some nice cooking aprons for ourselves.


Read More. . .

Wednesday, October 26, 2011

Lace Belt Tutorial


Last week I showed you how to make the lace embellished top or tank.  During the photo shoot I accessorized it with a lace, faux leather, and ribbon belt.  Although the belt is not a top in and of itself, I think that it can do a lot for a basic top.  Today I'll show you how I made my belt.


Materials: Faux Leather or vinyl, a yard or so of satin ribbon, around a yard of lace, leather punch, sewing machine, and fray check

To begin you will want to cut a strip of leather, and one of lace, that are as long as your waist plus six inches.  I cut my belt material to be about 1/2" wider than the width of my lace. Once your materials are cut you will want to center your length of lace over the belt material.  You can pin along the length to secure the two layers.  I then machine stitched down the length of the belt.  The first rows of stitching were about an eighth of an inch from the edge of the lace.  I then stitched around a quarter inch inside the initial rows. The placement of your machine stitching should be determined by the shape of your lace.  I recommend using a lace that doesn't have much of a scalloped edge to avoid the edges from pulling away from the material.

I used a regular sewing machine needle on  my project, but a leather needle or heavy duty machine needle would worker on thicker or hard to work with material.


Next fold over the ends of your belt by two inches.  Pin them in place. Stitch around the entire perimeter of the tab (see image below).


You will next want to mark where you would like the holes of the belt to be punched.  I put three holes each 1 inch apart, the first hole being 1/2" away from the edge of the belt ends. You only need two holes on each end, but adding a third allows you to adjust the belt width a bit more (great for when you are wearing the belt over multiple layers).


Now cut a length of ribbon that is long enough to tie either in a bow or a know.  Angle the edges  of the ribbon and apply fray check to prevent fraying.

That's it.  I can't wait to make more of these belts in different colors and widths.

I'll be linking here.

Thursday, August 18, 2011

Sewing for Momma: Stretch Lace Belt for Pregnancy (or anytime really)


You don't have to be very far along in a pregnancy before your pre-maternity waist disappears.  In the first and second trimesters I like to pretend that I still have a waist by wearing a belt above my belly. By the time the third trimester hits your rib cage has expanded , and the space between your belly and bust is practically non existent. It makes it rather uncomfortable to wear a belt, at least a traditional belt.


I was recently playing around with some of the stretch lace that I purchased for my maternity bands.  I found that I could cut one long strip, stitch the ends together, and create a rather comfortable maternity "belt".  It could easily be dressed up with a ribbon or brooch of some sort, and I also think that it would be fun to layer a normal belt over the top of the lace layer (once my abdomen isn't being inhabited by a growing babe).


Anyway, it's just a silly little project that I thought I'd share.  Have a great weekend!


Tuesday, January 11, 2011

Fleece Scarflette Tutorial


I mentioned last week that there were several variations to the fleece neck warmer.  Not only did I end up making Fleece Neck Warmers for just about every guy that we gifted to, but I also came up with a few more feminine versions for the women.


One of the problems with a pull over neck warmer, is that fleece often creates quite a bit of static electricity.  Static and hair styles often don't mix.  To avoid pulling the fleece straight over the head, and having every hair on your head standing on end, I added a simple button closure.


On the scarflettes for the little girls, I added velcro.


There are many possibilities when it comes to making and embellishing these fleece scarflettes.  One other difference between these neck warmers, and the pull over neck warmers, is that these are not quite as tall.  They aren't designed to be pulled over your mouth or chin.

All of the above scarflettes are made with slightly different techniques, so I'm going to show you how to make the one above, and I'll provide a few instructions for making the different variations.


Wednesday, January 5, 2011

Lined Fleece Hat


Yesterday I promised a tutorial for the lined fleece hat that accompanies the fleece neck warmer.  Here it is.  It is fairly easy and fast to make. Now, this hat is almost 100% inspired by Cheri's upcycled t-shirt hats.  I modified her pattern to adjust the ear flaps, and line the hat. I'm not going to give you a full tutorial on the hat itself, but will show all of the adjustments that were made to end up with this. I'll refer you to her tutorial for the basic construction of the hat.

 This is obviously a different hat than the green and brown hat pictured yesterday.  Hopefully it will prove how versatile this hat is. This cream on cream hat was made for the little girl that I babysit during the week.  I love the flowers and the sequins.


 Rather than put a pom pom on the top of the hat, I opted for another flower.  I think that it is a nice touch.

Here's a quick shot of the hat that I made for Clark.

Now onto the tutorial.

Thursday, December 9, 2010

Hip for the Holidays-A Little Sparkle


If you're a regular follower of my blog, then I'm sure that by now you know that I love headbands.  It is such a simple way to add a little something extra to your outfit (or your ponytail).


I recently found this black buy-the-spool sparkle trim at Joann's for just one dollar.  I thought that it could  add a little fun to some of the holiday outfits that I've been making.  I had thought of embellishing some shoes, or making some bracelets, but I ended up with this extremely easy to make headband that I love.

This is a very simple tutorial, and is probably common sense, but I thought that I'd share it anyway.  These partial elastic headbands are extremely comfortable.  I can't hardly stand to wear the plastic headbands.  They always seem to dig right into the sides of my head.  I can wear this style of headband all day long and forget that I even have it on.  

Click Read More below for the full tutorial.

Wednesday, December 1, 2010

Hip For The Holidays: Day Three- Bow Ties For The Boys


 It's day three of Hip for the Holidays, and I thought we'd spend a bit of time accessorizing the boys in our lives.  It seems that it is always a bit of a challenge dressing up a little boy (or big boy for that matter).  Shirt and tie with dress pants is about as dressed up as they get.  So why not play with what we have to work with.  Instead of the traditional neck tie, let's try a bow tie.  Recently I fell in love Cheri's (of Roar, and I am Momma Hear Me Roar)  Retro pointed bow ties.  She has some fantastic bow tie patterns for the little men in our lives.


The retro pointed bow tie is a fresh twist on the slightly ubiquitous bow ties that can be found around bloggerdom. I think that this bow tie is just what every little man needs to complete his holiday outfit.


I was thrilled to try out Cheri's pattern for Hip for the Holidays. The pattern was very easy to follow.  She does a fantastic job with all of her tutorials, and this pattern was no exception.  


I was a bit fearful that Clark would refuse to wear the bow ties, but to my delight he was more than willing to wear one to church last week, I think he's trying to charm the ladies in his nursery class.
Cheri recommends using cotton fabric, which I did with the tree fabric, but I also used up some scrap decor fabric that I had in my stash. I really liked experimenting with the different fabric weights.


The pattern is extremely reasonably priced, and requires very little fabric, making this a very economical
  (and fast) project for the holidays. You can find the pattern here, and her fantastic blog over here.


After making Clark a few ties, I thought that my husband might need one to match.  When I mentioned making him a bow tie, he looked less than thrilled.  I found a free pattern for the grown men in our lives at Burda Style.  Sadly, it's not retro pointed, but it is still a nice change for the holidays.


 The pattern is called the David Bow Tie.  It was also easy to follow.  This pattern does call for the bow tie to be cut on the bias, requiring a bit more fabric.  It was a quick and easy sew. You can find it here.

My bow tie tying skills need a bit of work...HELP.


 I think that my husband has the perfect build for a bow tie, and he can totally pull it off.  He wore his bow tie to church on Sunday as well, and I'm pretty sure that he's converted.  He hinted toward the fact that he was interested in having a few more.  One tip, I think that bow ties look great when paired with vests and cardigans.  My husband wore his with a vintage three piece suit, oh he looked handsome.

Remember to link up your holiday related projects at our Hip for the Holidays link party.  Anything that you would wear during the holidays to get a bit dolled up (jewelry, hair accessories, clothing, dresses, ect).

I'll be linking here.


This post dedicated to Scott Franson and his incredible bow tie collection.

Wednesday, November 17, 2010

Women's Leather Coil Cuff


Yesterday I mentioned that I had a more feminine version of the leather cuff.  Here it is, and I'm even going to give you a tutorial so that you can make one for yourself (or anyone on your Christmas list).

The thing that I love about about working with leather is that you can cut right into it, and you don't have to worry about finishing off edges.  I also love that it is soft and really quite comfortable when worn.

I'd like to thank all of the Rodeo Queens out there who want pink and metallic silver chaps.  Thanks to you I can now have these ultra feminine leather cuffs.  This was scrap leather that I picked up on my most recent trip to the saddle store (where I buy all my leather for small projects).  Due to the fact that I am buying scrap leather, you never know quite what you'll find.  I really feel like I hit the jackpot last time.

Read more below for the full photo tutorial.

Monday, November 1, 2010

Leather Bow Tutorial and Template


Today I'm going to show you how to make these cute leather bows.  I have made several, in varied sizes, and think that they are quite adorable.  These gwere inspired by this brightly colored leather that I recently procured while on a trip to a local saddle store.  I am not a cowgirl, and to be quite frank, an not all that fond of horses (I've had some less than positive experiences with them).  While enrolled in a book making class I discovered that saddle stores were the perfect place to buy remnant leather.  They often have a box of scrap leather that is sold by the pound. On my last visit to the saddle store I found this bright pink, lilac, and mustard yellow leather.  I was so excited, but I couldn't really imagine making a journal out of it.  I bought it on impulse, and I am oh so glad that I did. I am quite pleased with these little bows and belts that I created.

Well I think that is about enough background information, lets get down to the nitty gritty.
Click read more for the full tutorial.

Wednesday, October 27, 2010

Faux-Floral Headbands


Well I hope that you haven't grown sick of all of my faux leather projects, because I have another one for you.  I am pretty sure that the fabric ladies at my local home decor fabric store are sick of cutting quarter yard pieces of this stuff (in every available color), so if you have grown tired, you're not alone.  I actually have a real leather project lined up for next week...so be excited.

I spent yesterday with my sweet sister in law.  We made ourselves some lovely little floral headbands with one of my favorite materials. I'm sure you recognize it from these booties, this belt, and this table runner.  It is just such a versatile material.  I think that the red and brown combination create a nice color combination for autumn. 


This red flower was my first attempt, and is probably my favorite overall.  


I had to make a black headband, and I love the gray centers to these two smaller flowers.


This last one is a slight variation on the first.  I like that it is a bit smaller.  I feel like the larger flower is a bit overwhelming on me (but perfect on my great model). 


Jess made several cute headbands of her own.  She tried out a brown and cream combination that I am really liking.  Thanks so much Jess for spending the day with me, and for being my model.  

I'll be linking up here.  I'll be back tomorrow with the Halloween costume reveal!