Search This Blog

Showing posts with label technique tuesday. Show all posts

Monday, July 28, 2014

Technique Tuesday: Sewing and Serging Pintucks


Today we are going to talk tucks...mostly pintucks.  I love pintucks, they are a simple sewing technique that can add an extra special detail to a project. Pintucks can be created with either a sewing machine or a serger, but I must admit, in this case I prefer my sewing machine.

First off, a pintuck is basically a straight stitch sewn on the fold of a fabric, creating a narrow lip. I've used pintucks and tucks on a number of different projects.  Here are a few examples: Sunburst Pintuck Top, Crayon Box Pleat Skirt (waistband),  Itty Bitty Remix, and my pintucked top.

Sewing a Pintuck

Light to medium weight fabrics are traditionally used with a pintuck technique. For practice, it is helpful if the fabric has a linear print on it.  For example, this cotton print has lines running vertically, horizontally, and on the bias.  If you want to practice making pintucks, it may help to use a similar fabric.  

Of course, you can use a solid, and use a removable marking pen/pencil as a guide, it just involves more measuring and marking.


Start by folding your fabric along the desired line or guide.  Pressing can make the process easier.


Place your material under the presser foot, and align the material with your 1/8" presser foot marking.  The larger the seam allowance, the bigger the tuck, the smaller the seam allowance, the smaller the tuck.  For a pintuck, I don't go any larger than 1/8", and often stick to about 1/10".

Sew a straight line along the length of the material. 


Sew as many tucks as are desired.


Press the tucks in the same direction.

.
Here's a look at some tucks created with varied widths.


From left to right: 1/8", 1/4", 3/8", 1/2", 5/8", 3/4", 1"

Serging a Pintuck

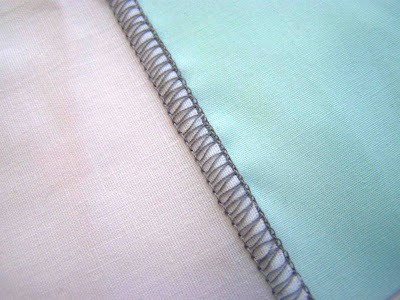
A serged pintuck is nothing more than a narrow rolled hem sewn on the fold of the fabric.  The thread is much more visible than when a tuck is created with a sewing machine.

The technique is the same, but the serger requires specific settings.


My brother 1034d uses the multi-purpose guide foot for creating pintucks.  The foot features a plastic guide that can be adjusted left to right to accommodate different widths of tucks.  The guide is really helpful in maintaining a straight stitching line.


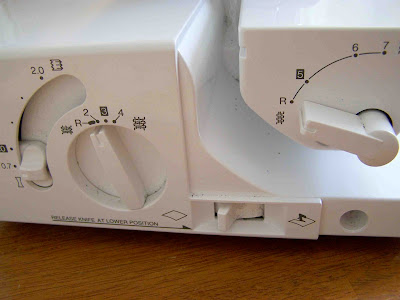
The pintuck is created using a three thread set up. The owner's manual provides these settings:

Right Needle: 4.0
Upper Looper: 4.0
Lower Looper 7.5
Differential: 0.7
Knife: Disabled
Removable Stitch Finger: Off
Stitch length 1.0-2.5 (I prefer 2.5)
Foot: Multi-purpose guide foot (aka: blind hem foot).


Here's a look at what the knobs and dials look like all set up.


 Adjust the guide foot so that the guide sits just to the right of the right needle. Place fabric under the presser foot, with the folded fabric flush with the guide.

Stitch down the length of the material.


 That's it.  The serger requires more set up, but once you've worked out any necessary adjustments to tension, it is really quite simple to do.  As I mentioned earlier, I still prefer the look of a standard sewing machine pintuck, but the serger is quite, easy, and works well.  Using a coordinating thread will help the stitching lines be less visible.

Now, aside from these basic techniques, there are a few helpful tools to making pintucks even easier.  Pintuck presser feet are available, and paired with a twin needle, pintucking becomes a cinch.

 Enjoy this informative video by Liz of JanomeLife


Tuesday, November 13, 2012

Technique Tuesday: Snip and Rip


I've been making a lot of shirred scarves lately.  Last week I shared my favorite serged hem for a sheer scarf, and today I'm going to talk a little bit more about fabric preparation.  


Most people with sewing experience are familiar with the snip and rip technique, but should you be self taught, this is a simple trick for working with wovens.


Lightweight sheer fabrics can be a bit of a beast to cut.  They shift and slide, and no matter how hard you try to get the rotary cutter heading in the right direction, things are bound to happen, and mess up your straight cut.  Ripping your fabric is actually a much easier way to establish a straight cut or edge.  To snip and rip, you will want to snip an inch or two into the fabric, and make sure that your cut is straight, and in line with the grain of the fabric.

Then grip the fabric on either side of the cut, and quickly rip it.  A fast and firm rip has given me the best results. Because a woven fabric has threads that run up and down, and left and right, (warp and weft). When the fabric is ripped quickly, the rip will fall in line with the woven threads, to keep your edge straight and square.


 With some sheers, the fabric along the rip will start to curl in a bit (above).


You can also use this technique with medium weight wovens, like quilting cottons and flannels.  The larger the weave of the fabric, the more difficult it will be to snip and rip.  I recommend it only on light to medium weight wovens.  I love snipping and ripping when I'm making crib sheets, or receiving blankets.  I don't recommend it on small pieces of fabric, such as quilt blocks.  As you rip the fabric, it loosens the weave along the ripped edge.  If you are ripping your fabric, you will want to make sure that your seam allowance is large enough to extend beyond any loosened weave of the ripped edge.


More textured wovens are more difficult to rip.  The fabric above was light weight, but has a textured pattern on it as well.  I had to use more pressure to tear the fabric, which can skew the print of the wovens.  

Ripping fabric can be a bit terrifying at first, but it sure is a big time saver.  A great way to square up your fabric, or rip it into strips or squares.

Monday, September 24, 2012

Tips For Tuesday

I've been really about about Technique Tuesday.  It's something that I love doing, but haven't gotten around to doing much of lately.  I'm convinced that things are going to get back to normal around here soon, but more and more I realize that they're just becoming more chaotic.  With Christmas a coming there's not going to be any slowing down around here.  I guess it's time to change my routine, and make things work.  Anywho, rather than sharing one technique with you today, I have a whole round up of sewing tips from the web.  Such Clever ideas.  Enjoy.

Measure and secure hem as you sew.


Make 5 yards of bias tape out of one fat quarter.


A must read about speeding up your production speed at home.  I agree with SO many of these tips.  Pattern weights, skipping the pins, sewing order, etc. 


Sizing Chart for babies.  Helpful little measurements for when your model isn't present.


Tuesday, August 28, 2012

Technique Tuesday: Basic Three-Thread Flatlock Stitching


Flatlock stitching is a technique that I've wanted to figure out on my serger for awhile now.  A flatlock seam can be decorative when serged on the fold of a fabric, or used to join two fabrics together, while creating a finished flat seam.  


The set up of the machine is pretty simple.  It is a three thread stitch, with the needle in either the left or right position. The multi-purpose guide foot is used, and can be extremely helpful when stitching along a folded fabric.  

Tension Settings: (Brother 1034 D)
Left Needle: 1.0 (wide stitch)
Right Needle: 1.0 (narrow stitch)
Upper Looper: 4.5
Lower Looper: 7.0-8.0 

 See your serger handbook for settings for other makes and models.


Differential: 0 (far left)
Stitch Length: 3.0-4.0


 Knife: 3.0-4.0


 Multi-purpose guide foot attached.  The white plastic piece on the right of the foot is the guide.  The metal wheel on the left adjusts the position of the guide.


If you are flatlock stitching on the fold of a garment, you will press the fold.  Then align the fold of the fabric with the guide foot.


  I found that my stitches were the best if the guide sat in the middle of the stitching. 


Because the stitching is unbalanced, when the fabric is pulled open, the stitching pulls flat on the surface of the fabric.  

Bunchy fabric.

Initially, I had my guide foot wider, and my fabric always bunched up between the stitching when pulled open, when I moved the guide closer to the left needle, the fabric laid nicer.


The wrong side of the flatlock stitch is decorative in and of itself.  It creates ladder pattern, very similar to the blind hem stitch. Either side of the stitching can be shown on the garment.


Flatlock stitching can be done to join two pieces of fabric.


 When flatlocking two pieces together, the wrong sides of the material should be facing each other.  The right sides should face outward (unless you want the ladder stitching to be on the right side of the fabric). When joining two pieces together with a flatlock stitch, it is not necessary to use the guide.  Trimming the material with the knife will ensure an even and clean edge.


 Serge just as you would if the material were on the fold.  When the seam is pulled open, the top piece of material will fold over toward the edge of the flatlocked stitch.

I've yet to try the technique out on an actual project, but can't wait to do so.

 Have you used this technique on any projects?  If so, what were they?  

I've seen the stitching on swimsuits, raglan t-shirts, and kids clothing.  I love the look of it.

 Just a little reminder that you can receive 10% off your orders from the P&G eStore this month, with free shipping on orders over $25.  There are several olympic deals going on still, so be sure to stop by and snatch your favorite products from the comfort of your home office. 


Tuesday, July 17, 2012

Technique Tuesday: Zig Zag Stitching


When I purchased my first sewing machine, I was so confused by all of the stitches that came standard on my sewing machine.  They were a major selling point for me, but once I opened the box, I had no idea what I'd ever use many of them for.  Three years later, and I've discovered many useful applications for many of the stitches.  Today we're just going to talk about a few of them...mainly the zig zag stitches.

There are three main zig zag stitches that are found on most sewing machines: The standard zig zag, a narrow zig zag stitch, and a two or three point zig zag stitch.  So they sound similar, and they look similar, so why would one need three different stitches?  Well, you probably could get away with a standard zig zag stitch, but having the additional stitches really can come in handy.  

So let's get down to the nitty gritty shall we...


The standard zig zag stitch: can be used to do a variety of things, including but not limited to: overcasting raw edges, attaching appliques, working with stretch fabrics, and creating decorative details.

Three Point Zig Zag Stitch: Overcasting on stretch or medium weight fabrics, darning, attaching elastics (Sheer Thing Skirt). I use it most often when attaching elastics.  The multiple stitches in the zig zag help the seam hold up to greater stress and strain.

Narrow Zig Zag Stitch:Sewing stretch fabrics, and creating decorative details.  Because this stitch is narrow, you can sew seams on stretch fabrics with it.  The angle of the stitches prevents the thread from breaking as the fabric stretches, and the seam is stressed.  I used the narrow zig zag stitch on the side seams of my swimming suit.  I also like to use it when sewing with knit fabrics.


If your sewing machine doesn't offer three point or narrow zig zag stitches, you can generally adjust the stitch to meet your needs.  By adjusting both the stitch length and width, you can create a large variety of stitches to meet your sewing needs.

Decorative Application

By shortening the stitch down to next to nothing, you can create a satin stitch.  Satin stitches are often used as decorative details (especially when done using specialty threads).  The stitches fall right next to one another, creating a satin like appearance.

Practical Overcasting Application

Before I had a serger I had a sewing machine, and my good ol' zig zag stitch was my best friend as I finished off the raw edges of my fabrics.  To do so, you just want to make sure that the needle drops just off the side of your fabric when it is in the right position.  In this case, my zig zag stitch is at it's preset settings.

Overcasting raw edges prevents fraying and gives the garment or project a more polished finish.


Appliques
Appliques can be attached to projects by using an overcast zig zag stitch.  The stitch length and width can be adjusted to fit the size and shape of the applique.  In this case I narrowed the stitch, but didn't shorten the stitch length much.  If your fabric frays easily, you may want to shorten it to create more of a satin stitch.


 Hope that helps understand a few practical applications of the zig zag stitches.  What do you use your zig zag stitches for?  Any particular projects, techniques, or materials that you like to use them for?


Tuesday, July 10, 2012

Technique Tuesday: Diamond Pintuck Fabric


This week we're trying out a technique that I've wanted to experiment with for a while-Diamond Pintucked fabric. Diamond pintucked fabric is made by creating small pintucks running perpendicular to one another, usually on the bias. (Pintuck Tutorial)

After creating your first series of pintucks, all running in the same direction, you'll press your fabric so that your pintucks all lie flat.  Rotate your fabric, and sew additional pintucks running at a 90 degree angle to the existing pintucks.  I generally use a seam allowance between 1/16th and 1/10th of an inch for my pintucks.  

You can use diamond pintucked fabric just like you would any other fabric.  The tucked detail creates can add a bit more visual excitement to a simple fabric or project.  

If you don't want to spend the time sewing diamond tucks on your fabric, you can find some diamond pintucked fabrics in the store.  

I've had diamond tucked fabric on my mind for a while now, but was excited to see some diamond tucked table linens at a wedding reception this weekend.  

You can also read Jill's Diamond Pintuck tutorial for more information.

Monday, June 11, 2012

Technique Tuesday: Gathering Fabric With a Sewing Machine or Serger


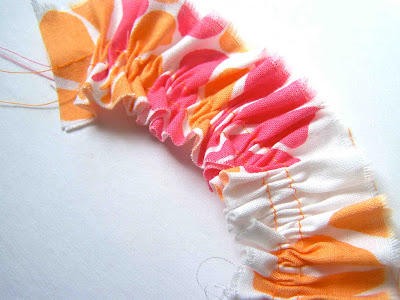
Gathers and ruffles are often used in feminine garments.  Waistlines, cuffs, necklines, yokes, and sleeve caps, often feature gathered material. Gathering material really is a simple technique, but to a beginning sew-er it can seem a bit daunting.  We're going to go over the basics of creating gathers or ruffles with both a basic sewing machine, with a ruffler foot, and an overcast serger.

 Read More...

Tuesday, May 15, 2012

Technique Tuesday: How To Sew A Straight Line


Sewing straight lines is pretty basic when it comes to sewing.  I don't know that it can really be considered a technique, but more of a necessary skill.  Unfortunately, sewing a straight line isn't always as easy as it sounds.  So, I thought that I'd share a few tips and tools to help keep those lines and seams straight.
Basic presser foot, quilting guide, rubber band (in case you didn't know).

 Your sewing machine has a lot of built in tools that are ready to help you obtain those straight and even stitching lines.  If you understand what those tools are, and how they work, they are quite helpful.


Tuesday, April 17, 2012

Technique Tuesday: Selecting the Right Sewing Machine Needle

Tip: Color Code your sewing needles with nail polish

When I first started sewing I used a universal sewing machine needle for every project.  I wasn't going to spend more money on a simple sewing machine needle.  The more I sew, and learn about sewing, the more I realize the importance of using the correct sewing machine needle. I've gradually added different  needles to my collection: heavy duty, twin, ball point, leather, wing tip, etc.  Yesterday, however, I was working with a really fine polyester woven, and I didn't have the correct needle.  My fabric was catching, puckering, and pulling.  I really needed a different needle.

So in an attempt to save you from sewing machine needle frustration, I've found a couple of really great posts that talk about which machine needle to choose.


Source: sew4home.com via Tricia on Pinterest

Sew 4 Home


Sew Mama Sew!

and this little PDF guide from Schmetz might be the best resource of all.  

Schmetz Sewing Machine Needle Guide PDF

A little something extra: Joann's has their sewing notions 50% off this week and next.  Perfect time to stock up.