Today we are going to talk tucks...mostly pintucks. I love pintucks, they are a simple sewing technique that can add an extra special detail to a project. Pintucks can be created with either a sewing machine or a serger, but I must admit, in this case I prefer my sewing machine.
First off, a pintuck is basically a straight stitch sewn on the fold of a fabric, creating a narrow lip. I've used pintucks and tucks on a number of different projects. Here are a few examples: Sunburst Pintuck Top, Crayon Box Pleat Skirt (waistband), Itty Bitty Remix, and my pintucked top.
Sewing a Pintuck
Light to medium weight fabrics are traditionally used with a pintuck technique. For practice, it is helpful if the fabric has a linear print on it. For example, this cotton print has lines running vertically, horizontally, and on the bias. If you want to practice making pintucks, it may help to use a similar fabric.
Of course, you can use a solid, and use a removable marking pen/pencil as a guide, it just involves more measuring and marking.
Start by folding your fabric along the desired line or guide. Pressing can make the process easier.
Place your material under the presser foot, and align the material with your 1/8" presser foot marking. The larger the seam allowance, the bigger the tuck, the smaller the seam allowance, the smaller the tuck. For a pintuck, I don't go any larger than 1/8", and often stick to about 1/10".
Sew a straight line along the length of the material.
Sew as many tucks as are desired.
Press the tucks in the same direction.
.
Here's a look at some tucks created with varied widths.
From left to right: 1/8", 1/4", 3/8", 1/2", 5/8", 3/4", 1"
Serging a Pintuck
A serged pintuck is nothing more than a narrow rolled hem sewn on the fold of the fabric. The thread is much more visible than when a tuck is created with a sewing machine.
The technique is the same, but the serger requires specific settings.
My brother 1034d uses the multi-purpose guide foot for creating pintucks. The foot features a plastic guide that can be adjusted left to right to accommodate different widths of tucks. The guide is really helpful in maintaining a straight stitching line.
The pintuck is created using a three thread set up. The owner's manual provides these settings:
Right Needle: 4.0
Upper Looper: 4.0
Lower Looper 7.5
Differential: 0.7
Knife: Disabled
Removable Stitch Finger: Off
Stitch length 1.0-2.5 (I prefer 2.5)
Foot: Multi-purpose guide foot (aka: blind hem foot).
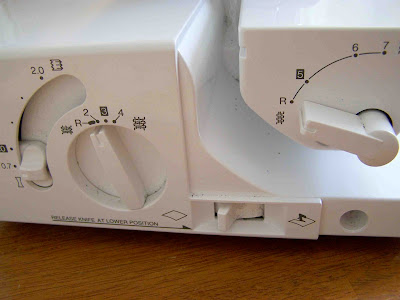
Here's a look at what the knobs and dials look like all set up.
Stitch down the length of the material.
That's it. The serger requires more set up, but once you've worked out any necessary adjustments to tension, it is really quite simple to do. As I mentioned earlier, I still prefer the look of a standard sewing machine pintuck, but the serger is quite, easy, and works well. Using a coordinating thread will help the stitching lines be less visible.
Now, aside from these basic techniques, there are a few helpful tools to making pintucks even easier. Pintuck presser feet are available, and paired with a twin needle, pintucking becomes a cinch.
Enjoy this informative video by Liz of JanomeLife


