Search This Blog

Showing posts with label womens clothing. Show all posts

Thursday, October 18, 2012

Top-Toberfest: Peplum Lace Yoke Top Tutorial


Welcome to day four of Top-toberfest.  Today I'm sharing a tutorial for a DIY Peplum shirt, with a lace yoke. I made the shirt from scratch, but you could easily refashion an existing shirt to make your own peplum.

One of the first clothing related tutorials that I wrote on this blog was for a cap sleeve top.  I used the same basic technique to create my pattern pieces for this top. You could use any style knit top pattern to do this, cap sleeves are just easier.


Sunday, June 3, 2012

Sheer Summer Skirt


I have another skirt to share.  I found this sheer polyester fabric for $1.50 a yard.  I love the colors and the print, but don't really enjoy sewing this type of fabric.  I purchased the fabric without a particular project in mind, but I knew that whatever it was that I made would have to be simple. I wanted to keep the number of seams to a minimum.

I cut out a simple two rectangle panels for the skirt, and the lining.  I then sewed the side seams, hemmed the bottom edges with a narrow rolled hem, gathered the waist slightly, and attached it to an elastic waistband.


I picked up the navy elastic at Joann's.  I wish that it were a bit wider, but it does the job.  The skirt falls just below the knee, and the lining is about 2 inches shorter than the skirt fabric.

Sheer polyester fabrics like this can snag and pull easily when working with them.  I recommend using Sharp needles when working with it.

Sunday, May 20, 2012

Exposed Zipper Pencil Skirt


So I made myself a skirt.  Another bengaline pencil skirt. The pattern was drafted using a stretch pencil skirt that I have in my closet.  I added a contrast waistband, that angles down in the front.   I also added an exposed metal zipper that runs down the front of the skirt.  As you can see, I inserted the zipper upside down.  The zipper pull is quite large, and I really didn't want it jabbing me in the stomach while seated. To avoid having my skirt unzipped by my children I plan on tacking it down along the zipper line.


I like the skirt. What I don't like quite as much is how it fits my body.  My body has changed with  babies, and unfortunately I haven't put in the time or effort that I need to rebuild my atrophied gluts and abs. My rear just seems to be getting longer and flatter, probably in large part because of sewing and blogging.  I am pretty straight by nature, and I need some junk in my trunk to define my waist....hmmm that probably requires exercise (or a glutimax padded bum enhancer that I see advertised on the spanish channel).


Okay, enough about my rear, more about the skirt.  I had to shorten the zipper a bit to fit the skirt length.  I ended up removing some of the metal teeth with my handy dandy pink tool set.  I found this helpful tutorial on removing zipper teeth and stops. One of the things that I love most about this skirt is how much it cost me.  I spent 20 cents on the zipper (it was on super clearance), and about $2.25 for the black bengaline (remnant at 50% off the sale price).  So I have a brand new skirt for less than three dollars.

With the zipper on the bottom, I can easily adjust the length of the slit in my skirt.  Adding the zipper completely eliminated any need to add a back slit, and was so much easier to do.

So are any of you entering skirts in the Crafter Hours Skirt Week?  I've added a couple, I always want to be more active in participating in online sew alongs and challenges, but I don't usually get around to it.  This time I think I'll make more of an effort.

Happy sewing, and thanks for reading!


Monday, April 23, 2012

Tutorial: Lounge Shorts From a Sweatshirt


I've got a little upcycling project for you today.  I've had a lot of people view my yoga pants from a t-shirt post, and this project is very similar.  Today I'll show you how to turn an oversized sweatshirt into a pair of sweat-shorts, perfect for sleeping, lounging, yard work, or exercising.  


At the end of winter I found this 5X sweatshirt at wal-mart for $1.  It would be pretty difficult to find this much sweatshirt fleece at a fabric store for this price.  So, this project set me back one dollar, but you could use any old sweatshirt or t-shirt to make some lounge shorts for yourself.  I'll show you how.

Wednesday, April 11, 2012

Peaches and Cream Spring Top


It has felt like spring around here the past couple of days, I'd say few, but that would be a lie.  We woke up to several inches of snow on Friday.  Sunday and Monday though, were beautiful.  It seems that every time the seasons change I realize that my wardrobe situation is in pretty sad shape.  Last year at this time I was filling out my maternity clothes. So, to give myself another warm weather option, I  made myself a top.  The funny thing is, that this totally could have been a first or second trimester maternity top. Don't you worry your pretty little head, I'm not pregnant.


The top has two layers of knit fabric.  The top layer is a thin single knit, and is a lovely shade or peachy pink.  The  bottom layer is a cream interlock knit.  I layered the peachy one on top, and added several pieces of cream lace around the neckline, hem, and above the bust.


The back has a simple little pearl closure.  The top is really comfortable, and the cap sleeves will be great for summer as well.  

I almost turned the top into a dress, but I don't wear dresses much during the week, and I thought that it would be a bit too casual for church. I'm also afraid that it looks a bit like a nightgown...oh well, it's comfortable, it's new, and I like it just fine.


So have you done any springtime sewing for yourself?  I have a feeling that I will need to be sewing up several more tops before summer hits.  How about Rae's Spring Top Series, are you following it?  I've never submitted anything before, but I suppose that there's a first time for everything.

Thursday, March 22, 2012

The Crayon BoxPleat Skirt: Tutorial Part 3

Here are the links for the previous tutorial posts: Part 1, Part 2.


We are going to finish up the skirt today-Wahoo.  I'm probably as sick of typing up this tutorial as you are of seeing it pop up in your reader. The finished product is going to be well worth the work, and the good news is that there aren't any mathematical formulas in this section of the tutorial. Now, let's get on with it.

Monday, February 20, 2012

Knit Wrap Dress


Update: I've posted a tutorial for this dress here: Two Piece Knit Dress

It seems like you always want what you can't have.  When I was pregnant with Miles all I wanted to wear were high waisted skirts, and that just wasn't happening.  Now that I have my waist back, it seems that all I want to wear are dresses.  Most people can wear dresses, but when you are a nursing mother, they can be problematic.


I fell in love with this Tibi Wrap dress.  The original has a zipper in the back, and is fairly fitted, but doesn't it look comfy?


I decided to attempt to make the dress myself.  I didn't want to sew in a zipper, and I wanted to make sure that I would still be able to nurse while wearing it.  To work around the zipper, I decided to make the dress two pieces.  The skirt is a tube dress, and the wrap is essentially a jacket.  I shortened the sleeves, and left off the built in belt.

It actually works out quite nicely when nursing.  I can pull the tube layer down, and the wrap up-  Easy access.  I'd like to take in both the skirt and the tube portion of the dress, there is just a bit too much fabric there. I wish that I were better about mending and altering, I simply hate spending time on projects that I feel should be complete.

  When I wore the dress to church, a lady that I serve with asked me if I'd worn the dress while pregnant.  I didn't, but I most certainly could have.  It is super comfortable. I didn't wear a belt with the dress during the photo shoot, but the great thing about this dress is that you can wear a belt, and it would never have to be removed to feed your babe.

Thanks for reading, and for all of your kind words in the past few posts.  I love hearing from you.


Wednesday, January 11, 2012

A Pencil Skirt, and My New Favorite Fabric


As I was sewing up blessing outfits and bow ties for Christmas, I started to wish that I had something new to wear to church.  After all, we all deserve to dress up a bit, don't we?


I have a simple black stretch pencil skirt that I've had for a few years now.  I love the way it fits, an I wear it all too often. I decided that I'd like to recreate the skirt in a different fabric, and make it just a little bit longer.


I was thrilled when I found a similar suiting fabric at Joann's...Bengaline.  Have you heard of Bengaline?  Have you sewn with it?  I hadn't, but I fell in love with it.  It is a suiting fabric that has micro ribs running perpendicular to the selvage edge (at least this particular fabric did).  The small ribs give the fabric a nice vertical stretch.  I needed a horizontal stretch, so I simply positioned my pattern pieces with the stretch running horizontally.

The fabric is great for skirts.  It lays well, only wrinkles slightly, and it doesn't cling like most knits do.  It was also really easy to work with.  I didn't have any issues cutting out the pattern pieces, or sewing it up.  If you are afraid of stretch fabrics, this is a great starting point. The fact that the fabric had so much stretch eliminated any need for a zipper-Wahoo! I believe that I probably could have eliminated the slit in the back as well.


As far as the skirt goes, I added about an inch and a half to the hem of the skirt, and brought up the waistband.  The waistband is long enough that I can wear it up on the waist, or fold it down and wear the skirt lower on my hips.  I have a feeling that this skirt will make a great early maternity skirt (don't worry...I'm not expecting again-just planning ahead).

Just an FYI- I bought 1.25 yards of fabric, but probably only used about a yard.  The fabric is 58" wide, so you have quite a bit of material to work with.  Also, if you want to make your own pencil skirt, but don't have a pattern or existing skirt to use as a guide, check out the tutorial on Cotton and Curls.

Wednesday, January 4, 2012

Selfish Sewing: Shirred Scarf

You can see the bobbin side of the shirring in this shot.
In an effort to expand my wardrobe, and bust my fabric stash, I've been sewing a bit more for myself lately, and may I just say that it feels great. I've made a couple of scarves lately, and I love how quick and easy they are to make.  I also love that one size fits all. If you are trying to think of something to give a new mama, a scarf is a perfect option.


This particular scarf is a shirred scarf.  It was made by using two widths of material that were sewn together to form a long strip (I believe that I cut my material to be 9 inches wide).  I used a narrow rolled hem to finish off the edges, and I then shirred two rows using elastic thread. My shirred rows are roughly 3 inches from each edge.

You can find my tutorial for this scarf here.


One thing that I'd really like to do this year is use up the fabric that I've collected over the past couple of years.  I've picked up fabric on sale, but unfortunately it seems that I've collected it quicker than I've been able to use it up.  This particular fabric I've only had since June, but still that is 6 months. I'd like to use the fabric I have before I decide that I no longer like it.  

So, what are your favorite stash busting projects, and how long do you hold onto fabric before passing it on?  I'm thinking that eventually I'll have to have a fabric stash swap with some local sewists.


Tuesday, January 3, 2012

Bling in the New Year Belt


Everyone needs a little sparkle to ring in the New Year.  Have you noticed all of the sequins and glitter popping up everywhere?  I made myself a sparkly sequined belt for the New Year, and it couldn't have been simpler.


What I used:
Sequined trim from Joann's (4-6 inches longer than the width of waist)
Strip of faux leather (cut to the same width and length as trim)
Velcro: same length as overlap
4 covered buttons


To create the belt I used a three point zig zag stitch to stitch the trim to the faux leather.  I stitched all the way around the trim.  I then attached a piece of velcro to the belt.  The rougher piece was attached to the right side of the belt, and the softer piece was attached to the wrong side of the belt.  When attaching velcro you'll want to make sure that you try the belt on for proper placement.

I then sewed a four covered buttons to the end of the belt.  So simple.

Yep, still breaking out the maternity clothes.

I'm not a very glitzy girl, so a semi sparkly belt is perfect for me. Speaking of sparkle, did you see the glitter hot pants shared on Grosgrain...my behind couldn't handle that much sparkle.

Don't forget to enter the My Memories Giveaway.


Tuesday, November 8, 2011

Nursing Sleep Bra


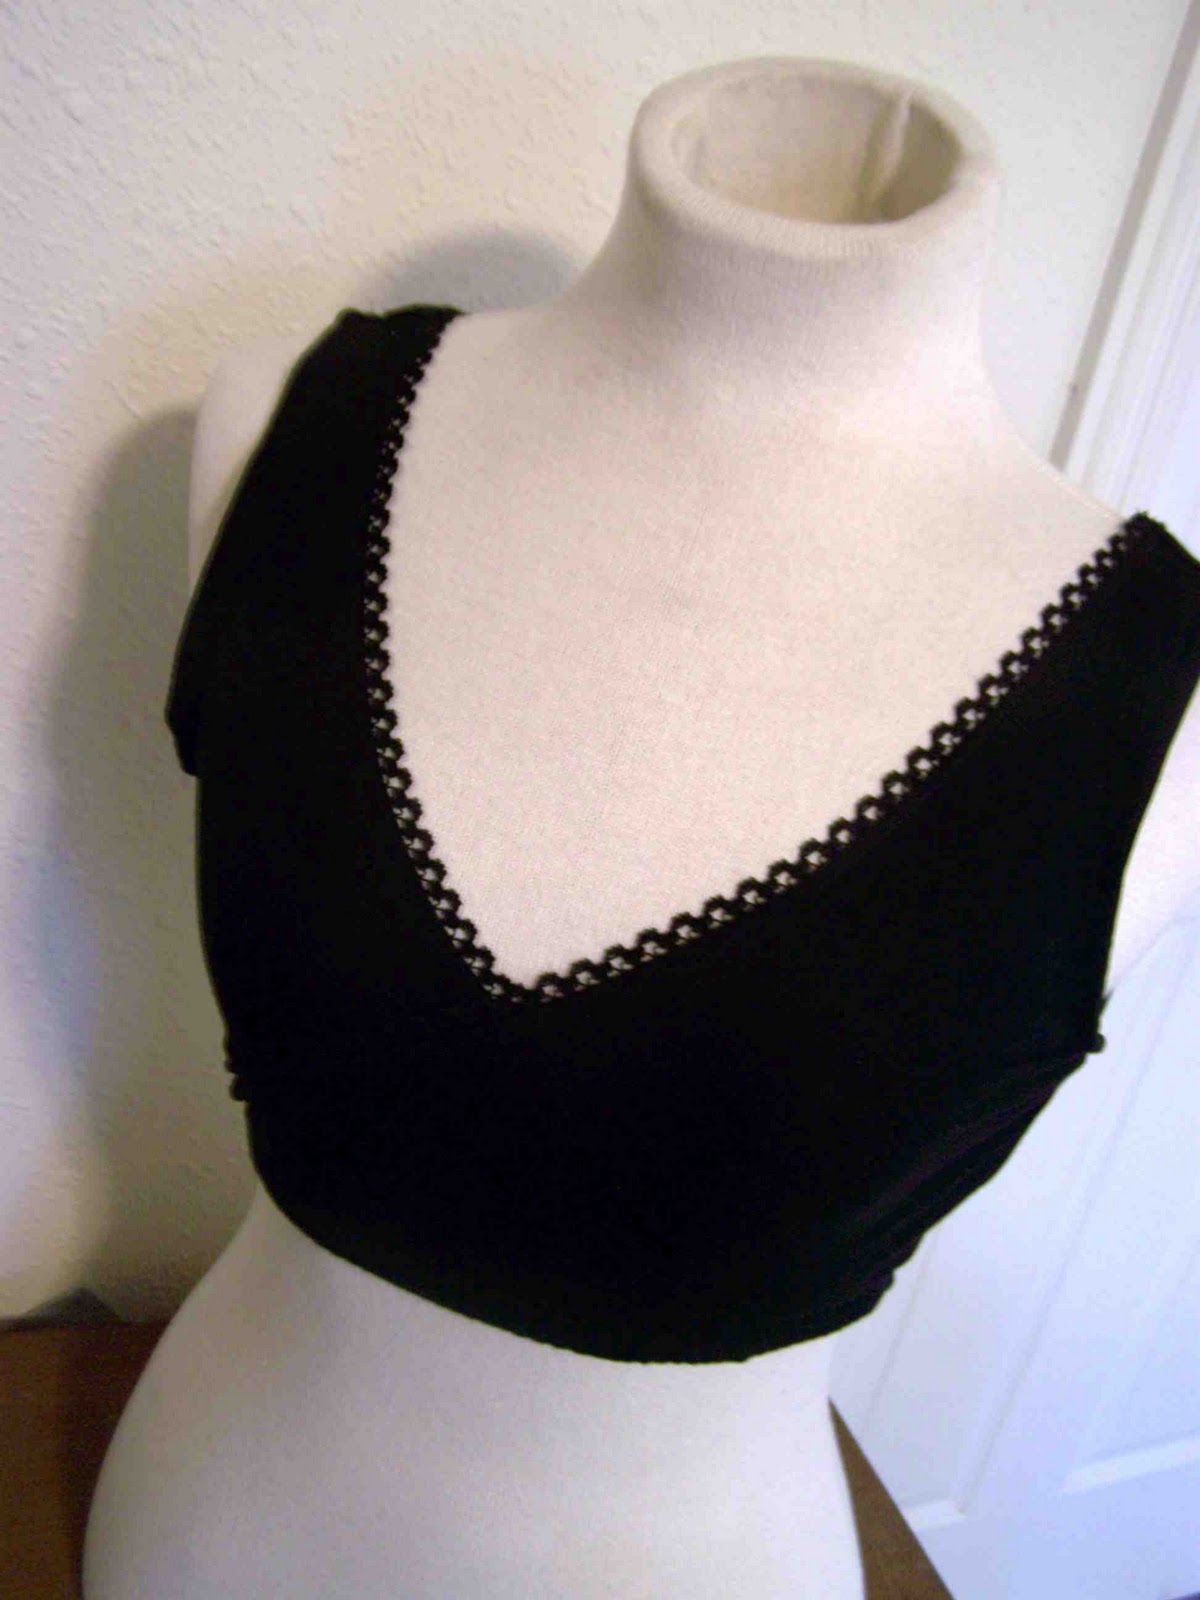
I'm currently nursing a newborn baby, and nursing bras are a must.  When I had Clark I bought a nursing sleep bra from Motherhood Maternity, and was surprised at how much I appreciated having it.  It was great for holding nursing pads in place, and was supportive (enough) and comfortable.

Just a week before Miles was born I decided to use up some knit fabric that I had in my stash and make another one.  I used my existing bra as a guide, and came up with a very similar style.


I hadn't intended on sharing this project, but then I figured that someone out there might appreciate it.


It is a lapped front nursing bra with elastic trim.  I have all of the photos to share a tutorial with you, but I'd like to know if there is any interest in a tutorial before I sit down to right it.  Anyone interested in a tutorial?


Thursday, October 27, 2011

Top-toberfest: The Dahlia Top with Lorene of I am Just Lu

I'm thrilled to welcome of Top-toberfest guest blogger today.  Lorene, of I am Just Lu, is going to share a fun reverse appliqued top.  I love her choice of colors, and the best part of this top is that it was made using two tops that she already had in her drawers-Wahoo.  Be sure to hop on over to her blog for the full tutorial.  While you are there check out all of her other fun projects, informative articles, and tasty kitchen creations.  She's as well rounded and talented as they come. 

Hello Leafy Treetop Spot fans! I am Lorene, or Lu, and I blog over at just Lu about crafting and whatever else comes up in the course of being mommy to two adorable little ones and wife to an elementary school teacher.

Right now, we're just finishing up a year-long series about Becoming the Housewife MacGyver, for which Tricia has been my honored guest! We've had a lot of fun, and I hope you'll come see what we've been learning.
I am just Lu
 I love Toptoberfest so I am so thrilled to be participating this year as Tricia's guest. Without further ado, I now present to you...


The Dahlia Top is a reverse-applique design using two knit fabrics, both old tshirts in this case. That might sound (or look) complicated, but it's really more a matter of patience than talent. Trust me -- there's not a particular abundance of patience around my house (especially that's left over for crafts... I figure my children need my patience more than my other creations ;), but there is definitely more patience than artistic or sewing talent. :)
This top was inspired by this top on Etsy. I am a big fan of buying and supporting handmade, but I knew that I could put together a similar top in colors that I really loved for a tiny fraction of the cost. Of the three tops I've made, two of them were free, using only old tshirts that I wasn't wearing anymore. You can't beat free!
So, come stop by my place for the full tutorial and template -- and you can use the template for so much more than just a top! The same flower would look great on a skirt or a bag or anyplace else that you can think to put it, with any type of fabric -- or even paint! I've provided the template in several different sizes, or you can resize it to fit your projects needs. 
See the full tutorial for the Dahlia top here on just Lu.


 Thanks so much Lu for sharing your darling top with us. I can't wait to try out this technique.

Wednesday, October 26, 2011

Top-toberfest: Sweater Knit Cowl Neck Tunic


I thought that it would be fun to recreate a top from last year's Top-toberfest series and change it up just a bit. I thought that it would be a great way to show how easy it is to adjust your own patterns and create a new look. The cowl neck tee was a favorite of mine from last year, and the pattern was basic enough that I new it could be adjusted easily. I picked up some lightweight sweater knit, and felt that it was begging to be transformed into a fall tunic.

There's no new tutorial for this top, but you can see my post from last year on my cowl neck tee for links on drafting the pattern.


To adjust the pattern I first found a sweater with the same fit and length that I wanted in this top.  I then created a separate pattern piece for these sleeves by transferring the shape of the arm opening to my new pattern piece, and used my existing article of clothing as a guide.  


Rather than finishing off the sleeves with a hem I gave them a good pull when the top was completed.  The tension on the fabric caused the knit to curl up on the ends, just what I was hoping that it would do.


 I used an existing sweater dress/tunic that I have as a guide on determining the length of the top.  When adjusting the pattern I followed the basic shape of my garment.  This top fits rather close to the body, and the hem hits me about six inches below the hips.


A couple of basic adjustments to a pattern I love, and now I have a new top for the season. I had hoped to take a few pictures of me wearing it on Sunday, but by the time my husband was around for a photo shoot I was covered in spit up and chocolate finger prints.

Want to make the belt, you can find my tutorial here.

Don't forget to link up your tops to the Top-toberfest link party.


Lace Belt Tutorial


Last week I showed you how to make the lace embellished top or tank.  During the photo shoot I accessorized it with a lace, faux leather, and ribbon belt.  Although the belt is not a top in and of itself, I think that it can do a lot for a basic top.  Today I'll show you how I made my belt.


Materials: Faux Leather or vinyl, a yard or so of satin ribbon, around a yard of lace, leather punch, sewing machine, and fray check

To begin you will want to cut a strip of leather, and one of lace, that are as long as your waist plus six inches.  I cut my belt material to be about 1/2" wider than the width of my lace. Once your materials are cut you will want to center your length of lace over the belt material.  You can pin along the length to secure the two layers.  I then machine stitched down the length of the belt.  The first rows of stitching were about an eighth of an inch from the edge of the lace.  I then stitched around a quarter inch inside the initial rows. The placement of your machine stitching should be determined by the shape of your lace.  I recommend using a lace that doesn't have much of a scalloped edge to avoid the edges from pulling away from the material.

I used a regular sewing machine needle on  my project, but a leather needle or heavy duty machine needle would worker on thicker or hard to work with material.


Next fold over the ends of your belt by two inches.  Pin them in place. Stitch around the entire perimeter of the tab (see image below).


You will next want to mark where you would like the holes of the belt to be punched.  I put three holes each 1 inch apart, the first hole being 1/2" away from the edge of the belt ends. You only need two holes on each end, but adding a third allows you to adjust the belt width a bit more (great for when you are wearing the belt over multiple layers).


Now cut a length of ribbon that is long enough to tie either in a bow or a know.  Angle the edges  of the ribbon and apply fray check to prevent fraying.

That's it.  I can't wait to make more of these belts in different colors and widths.

I'll be linking here.