Search This Blog

Showing posts with label guest blogger. Show all posts

Friday, October 28, 2011

Top-Toberfest: A Shirt for Thunder by guest contributor Janine

 A Shirt For Thunder
Today I'm thrilled to have a guest contributor for Top-toberfest: Janine.  Janine is a work at home mom that loves to craft.  I'm so appreciative that she was willing to share her talents, and these great boys tops with us today.  She uses a variety of techniques, including: freezer paper stenciling, hand stitching, bleach, hand painting, and bubble wrap, to create some custom tops for her son Thunder.


My son’s name is Thunder Jason and I thought it would be neat to have fun with it and make him an original shirt. I find that boy’s clothing seems to be all the same and if you find something with words, pictures, etc it’s usually too over-the-top for me. I’m not a huge fan of  all the cartoony pictures and cheesy sayings.

I bought a plain, grey shirt from WalMart. First I washed it in case of shrinkage, then I sprayed some bleach on it. I would have used a bleach pen and done a more ’tatoo’ looking design, but I couldn’t find bleach pens anywhere in my town. After washing the bleach out and drying it I made a freezer paper stencil like this. I followed Cheri’s instructions and used red Tulip fabric paint as recommended by her, painting in the stencil with a small paintbrush. I made a large "T" lightning bolt and the small letters spell 'Thunder J.' When the paint dried I painted some bubble wrap and stamped it randomly on the shirt.


 And finally I did some embroidery. I made some tiny lightning bolts, ‘x’s on the wrist, collar, and bottom hemlines and embroidered “Made By Mama” on the shoulder.


   I’m SO happy with how it turned out! I‘ve also included pictures of 2 other shirts I made.


 The red shirt says, “You’ve been…Thunderstruck” and was made using the same freezer paper stencilling and bubble wrap technique.


   The blue one says, “THUNDERIFIC SO TERRIFIC!” and was made by hand painting with fabric paint and a paint brush. Hope you enjoy it as much as I do! Be careful, freezer paper stencilling is very addictive :)


Thanks so much Janine.  The tops turned out great, and I'm sure that your son loves them. I especially love the hand stitched details that you added, they really add something special.


  Want to share your custom tees or tops with us?  Link up all of your shirt related projects in our Top-toberfest link party. I'll be featuring some of my favorites from the party come November.

Thursday, October 27, 2011

Top-toberfest: The Dahlia Top with Lorene of I am Just Lu

I'm thrilled to welcome of Top-toberfest guest blogger today.  Lorene, of I am Just Lu, is going to share a fun reverse appliqued top.  I love her choice of colors, and the best part of this top is that it was made using two tops that she already had in her drawers-Wahoo.  Be sure to hop on over to her blog for the full tutorial.  While you are there check out all of her other fun projects, informative articles, and tasty kitchen creations.  She's as well rounded and talented as they come. 

Hello Leafy Treetop Spot fans! I am Lorene, or Lu, and I blog over at just Lu about crafting and whatever else comes up in the course of being mommy to two adorable little ones and wife to an elementary school teacher.

Right now, we're just finishing up a year-long series about Becoming the Housewife MacGyver, for which Tricia has been my honored guest! We've had a lot of fun, and I hope you'll come see what we've been learning.
I am just Lu
 I love Toptoberfest so I am so thrilled to be participating this year as Tricia's guest. Without further ado, I now present to you...


The Dahlia Top is a reverse-applique design using two knit fabrics, both old tshirts in this case. That might sound (or look) complicated, but it's really more a matter of patience than talent. Trust me -- there's not a particular abundance of patience around my house (especially that's left over for crafts... I figure my children need my patience more than my other creations ;), but there is definitely more patience than artistic or sewing talent. :)
This top was inspired by this top on Etsy. I am a big fan of buying and supporting handmade, but I knew that I could put together a similar top in colors that I really loved for a tiny fraction of the cost. Of the three tops I've made, two of them were free, using only old tshirts that I wasn't wearing anymore. You can't beat free!
So, come stop by my place for the full tutorial and template -- and you can use the template for so much more than just a top! The same flower would look great on a skirt or a bag or anyplace else that you can think to put it, with any type of fabric -- or even paint! I've provided the template in several different sizes, or you can resize it to fit your projects needs. 
See the full tutorial for the Dahlia top here on just Lu.


 Thanks so much Lu for sharing your darling top with us. I can't wait to try out this technique.

Tuesday, October 25, 2011

Top-Toberfest: Peter Pan Collar Tutorial with Erin of Sutton Grace

It surprises me how many people I know that have craft blogs. I know people from high school, people from college, and people from church.

Our guest poster today is someone that I know through family, but didn't meet in person until after I'd found her blog.  I'm pretty lucky to share a sister in law with her, and was thrilled when I got to meet her in person this past summer.  Erin, of Sutton Grace, is not only extremely talented, but she's a doll as well.  She has a Top-toberfest tutorial that I  am eager to try out.  It is for a Peter Pan Collar embellished top.  Hold onto your socks because this is too cute. Make sure to stop by her blog, she has adorable projects waiting for you to explore.

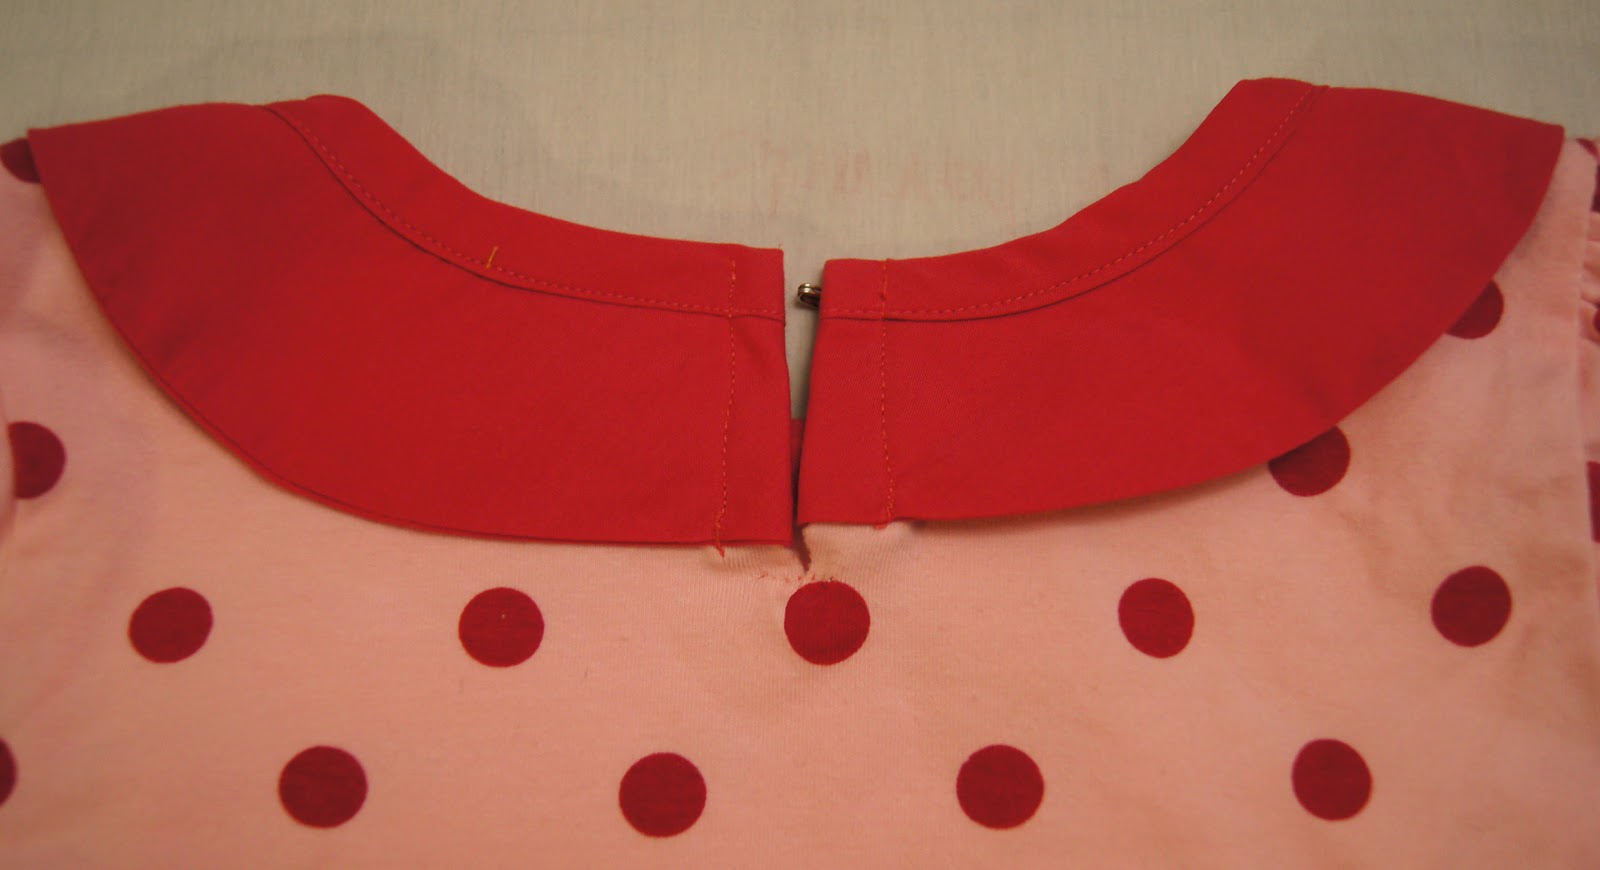
Hi! My name is Erin and I blog at Sutton Grace. I am so excited to be guest blogging for Tricia. She is one of the few people I first "met" via blogging and have met in real life. She is just as sweet and kind as she appears on her blog! I am not a very fashionable or trendy girl. I am a stay at home mom (of four!) and a t-shirt and jeans or a t-shirt and a skirt is my daily uniform. But sometimes I get bored with plain old tees! I have embellished t-shirts with all sorts of different ruffles and I love them but I was craving something a little different... enter the peter pan collar!


I loved it so much I added peter pan collars to matching store bought dresses for my daughters. How cute are they?


Peter Pan Collar Tutorial supplies: scoop neck t-shirt (I got mine at Wal-mart for $4) or dress. coordinating fabric about a 1/4 to 2/3 of a yard depending on the size of collar you are making. matching or contrasting bias tape- make your own or use store bought basic sewing supplies 1- Trace the curve of the back neckline. 2- Place a piece of paper inside the shirt and trace the curve of the front neckline. 3- Draw a second line 2.5" from the original lines. 4- Cut on the lines leaving a few inches of excess paper on each end.


5- Find the center of the front piece. Fold in half draw and cut the center curve (I just free handed it). 6- You now have one back pattern piece and two front pattern pieces.


7- Find the center front and center back of your shirt and pin the pattern pieces to the shirt leaving the excess paper extending passed the shoulders. 8- Fold the excess paper of the back pattern piece over the front piece so it lines up with the neckline (doesn't make the shirt buckle & fold and there is no gap between the paper and the shirt). Pin the paper together (do not pin the paper to the shirt).


9- Remove all the pins except the two holding the front and back pattern pieces together at the shoulder seam. Tape and trim the pattern. Remove pins. Now you have one pattern piece.


10- Pin and cut out your pattern piece on fabric that is folded on the bias. Cutting fabric on the bias helps it to lay flat around curves. (I forgot to take a picture of this step that is why the fabric is different in this picture!)

11- With your two fabric pieces right side together sew along the bottom edge. Clip the seam around the curves. Turn right side out and press.


12- Find the center front of your shirt. Start at the center and pin the collar to the shirt. Baste.


13- Sandwich the bias tape around the raw edge with the longer side of the tape on the inside of the collar. Pin and sew.


Finished!

I did the collars on my daughters dresses the exact same way except one thing. To make it easier to get the dresses over their heads I cut a slit on the center back, reinforced the bottom of the slit with a few stitches, folded and sewed the collar around the slit and added a hook and eye.


Thank you Tricia for having me be part of Toptoberfest!


Thanks Erin for the great tutorial.  I love this project, and am so glad that you were willing to share it with us.


Friday, October 21, 2011

Top-toberfest: Turtleneck Refashion with Guest Blogger Emily


Today I'm so excited to have Emily from Replicate then Deviate.  Although I've never met her face to face, she is just about the sweetest thing.  She's always takes the time to comment on a post, and my fellow bloggers will understand that nothing keeps a crafter/blogger going like encouraging comments. Aside from being sweet, she's also very talented. She sews, she plays the piano, she cooks,  she's the mother to an adorable little girl, she's basically what we all want to be.  Today Emily is going to show us how she turned a couple of oversized turtleneck shirts into these cute crew neck tops. Here's Emily...


I got each of these turtlenecks for about a dollar. They were a few sizes too large for me, which is great for refashioning. Now they're some of my favorites.


I used a shirt that fit well (with a similar amount of stretch as the turtleneck) and traced the body of the shirt, adding my seam allowance. (I kept the bottom hem of the shirt in tact). If you want the neckline to be more scooped in the front, open up the shirt and line up the side seams (so you're only cutting one layer of the shirt instead of two). I left my necklines symmetrical.


I kept the original hem of the sleeve bottom as the bottom of my new sleeve. My grey shirt had three quarter length sleeves and I wanted half sleeves so I didn't trace the full length of the grey shirt sleeves. (make sure the fold of your shirts line up). I was able to keep the sleeve seam the same too (only cutting the top curve for the shoulder).


I sewed the body of the shirt, right sides together. I sewed the sleeves in (shirt inside out, sleeves right side out). (not pictured) Using the scraps from the side of the shirt, I cut some strips to bind the neckline. (both the shirt and the strips are doubled in this picture). Since the fabric isn't stretchy in this direction, I should've cut more. (more like 90% of the neckline, rather than 80%). I'll show you what to do if that happens to you too.


Even out your strips if necessary and sew short ends together to form a loop.


On the right side of your shirt, sew the binding while gently stretching the binding loop. Start in the back of your shirt.


Open up your loop and add another scrap if you need to. Since you started in the back, it won't be as obvious. Reclose the binding loop.


Fold the binding up and over the neckline (so the raw edge is now on the inside of the shirt) and sew with a decorative stitch.

Go model your shirt. Skirt refashioned and blogged here. (They matched great when I got dressed in the dark).


Thanks so much Emily,  I love a good refashion!

Want to share your latest tops or tees?  Link them up to the Top-toberfest link party.

Wednesday, September 7, 2011

Wanted: Toptoberfest Guest Bloggers and Contributors

Day One: Pleated Dress Shirt


Some of you will remember that last year in October I ran a series on this blog that I called Toptoberfest.  It was a week of tutorials based on tops and tees.  It was nice to challenge myself to come up with some new styles and projects.
 Day Two: Night Owl Expedition Shirt

I'm hoping to run the series again, I am just going to need a bit of help this time.  With my baby due at the end of this month I'd originally thought that hosting the series was out of the question, but then I thought that maybe some of my wonderful readers would like to help me out. 
Contributors could share tops made from ready made patterns, self drafted patterns, refashioned tops, embellished tops, or even appliqued tops.

I'd also love to have a variety of projects.  I know that I'll have at least a couple of boy themed projects, but if any of you are interested in contributing tops for girls, or even older kids.  

Day Four: Cowl Neck Tee
If you would like to participate, but don't want to be a guest blogger, I'm hoping to host another link party to showcase all of the great tops that you've been making.

Toptoberfest Day Five: Robot Applique
I don't have any firm dates set, but I'm thinking of having the series start mid October.  If you are interested in participating, please shoot me an email and let me know what type of a project you think you'd like to contribute.

Hope to hear from some of you soon.  If you have any special requests for projects that you'd like to see please let me know.