Search This Blog

Showing posts with label T Shirt Embellishment. Show all posts

Thursday, April 18, 2013

Faux Peter Pan Collar Embellished Onesie


I had a few of you ask about the shirt that went along with my niece's birthday outfit.  I did make embellish the shirt, but didn't sew it from scratch.  Embellishing is my favorite approach to a top.  

First I started with a 24 month size onesie.  They can be hard to come by, but I've picked some up at Ross Dress for Less, and this particular one my mom found for me.


This onesie (which I love for girls in skirts), has a super simple sparkly faux peter pan collar.  You only need a few basic supplies:

1-Scrap piece of knit fabric, mine was a piece of dance knit that I use for super hero cape appliques.  
2-Heat and Bond fusible web, sewable bond
3-Press Cloth
4-Iron/sewing machine
5-Buttons
6-Scrap Piece of paper, and a pencil

First off, you'll want to make a template.  Start by placing your scrap piece of paper over top of the onesie.  Feel your way around the neckline, tracing the basic shape.  Follow the neckline all of the way up to the top, extending about an inch underneath the envelope closure.

Once you have your basic neckline shape, fold the paper in half, at the center point of the neckline.  Sketch out your basic peter pan collar on one side, add a mini placket if you'd like, and cut.  With your template folded in half, it should be cut symmetrically.


Once you have your template, transfer the shape to the paper side of your fusible web.

Iron your fusible web to the back side of your knit material.


Once your fusible web has cooled, cut out your collar. 


Position your collar on the outside of the onesie, matching up center marks (look for the tag). Use a press cloth to prevent any foiled knits from melting, and adhere to the onesie according to manufacturers directions.

Make sure that you are adhere the collar under the envelope sleeve as well.


 Once adhered and cooled, stitch 1/8" away from the outside of the collar.  If you are using knits, you should not have to worry about finishing off edges.  A straight stitch with a ball point needle will do the trick.  Add a couple of matching buttons to the faux placket, and you are done.


Here is a look at the tips of the collar that hides under the envelope sleeve.  I like the collar to extend right up to the top of the shoulder, that way it doesn't peek out when the shirt is being worn.

Obviously, you could use this technique with any shirt, it doesn't have to be a bodysuit.  You could either extend the collar up to the shoulder seam, or create a narrow band to extend around the back of a crew neck top.

There you have it.  A super quick embellishment.  It adds just a bit of sparkle, and is still wearable.

Tuesday, October 25, 2011

Top-Toberfest: Peter Pan Collar Tutorial with Erin of Sutton Grace

It surprises me how many people I know that have craft blogs. I know people from high school, people from college, and people from church.

Our guest poster today is someone that I know through family, but didn't meet in person until after I'd found her blog.  I'm pretty lucky to share a sister in law with her, and was thrilled when I got to meet her in person this past summer.  Erin, of Sutton Grace, is not only extremely talented, but she's a doll as well.  She has a Top-toberfest tutorial that I  am eager to try out.  It is for a Peter Pan Collar embellished top.  Hold onto your socks because this is too cute. Make sure to stop by her blog, she has adorable projects waiting for you to explore.

Hi! My name is Erin and I blog at Sutton Grace. I am so excited to be guest blogging for Tricia. She is one of the few people I first "met" via blogging and have met in real life. She is just as sweet and kind as she appears on her blog! I am not a very fashionable or trendy girl. I am a stay at home mom (of four!) and a t-shirt and jeans or a t-shirt and a skirt is my daily uniform. But sometimes I get bored with plain old tees! I have embellished t-shirts with all sorts of different ruffles and I love them but I was craving something a little different... enter the peter pan collar!


I loved it so much I added peter pan collars to matching store bought dresses for my daughters. How cute are they?


Peter Pan Collar Tutorial supplies: scoop neck t-shirt (I got mine at Wal-mart for $4) or dress. coordinating fabric about a 1/4 to 2/3 of a yard depending on the size of collar you are making. matching or contrasting bias tape- make your own or use store bought basic sewing supplies 1- Trace the curve of the back neckline. 2- Place a piece of paper inside the shirt and trace the curve of the front neckline. 3- Draw a second line 2.5" from the original lines. 4- Cut on the lines leaving a few inches of excess paper on each end.


5- Find the center of the front piece. Fold in half draw and cut the center curve (I just free handed it). 6- You now have one back pattern piece and two front pattern pieces.


7- Find the center front and center back of your shirt and pin the pattern pieces to the shirt leaving the excess paper extending passed the shoulders. 8- Fold the excess paper of the back pattern piece over the front piece so it lines up with the neckline (doesn't make the shirt buckle & fold and there is no gap between the paper and the shirt). Pin the paper together (do not pin the paper to the shirt).


9- Remove all the pins except the two holding the front and back pattern pieces together at the shoulder seam. Tape and trim the pattern. Remove pins. Now you have one pattern piece.


10- Pin and cut out your pattern piece on fabric that is folded on the bias. Cutting fabric on the bias helps it to lay flat around curves. (I forgot to take a picture of this step that is why the fabric is different in this picture!)

11- With your two fabric pieces right side together sew along the bottom edge. Clip the seam around the curves. Turn right side out and press.


12- Find the center front of your shirt. Start at the center and pin the collar to the shirt. Baste.


13- Sandwich the bias tape around the raw edge with the longer side of the tape on the inside of the collar. Pin and sew.


Finished!

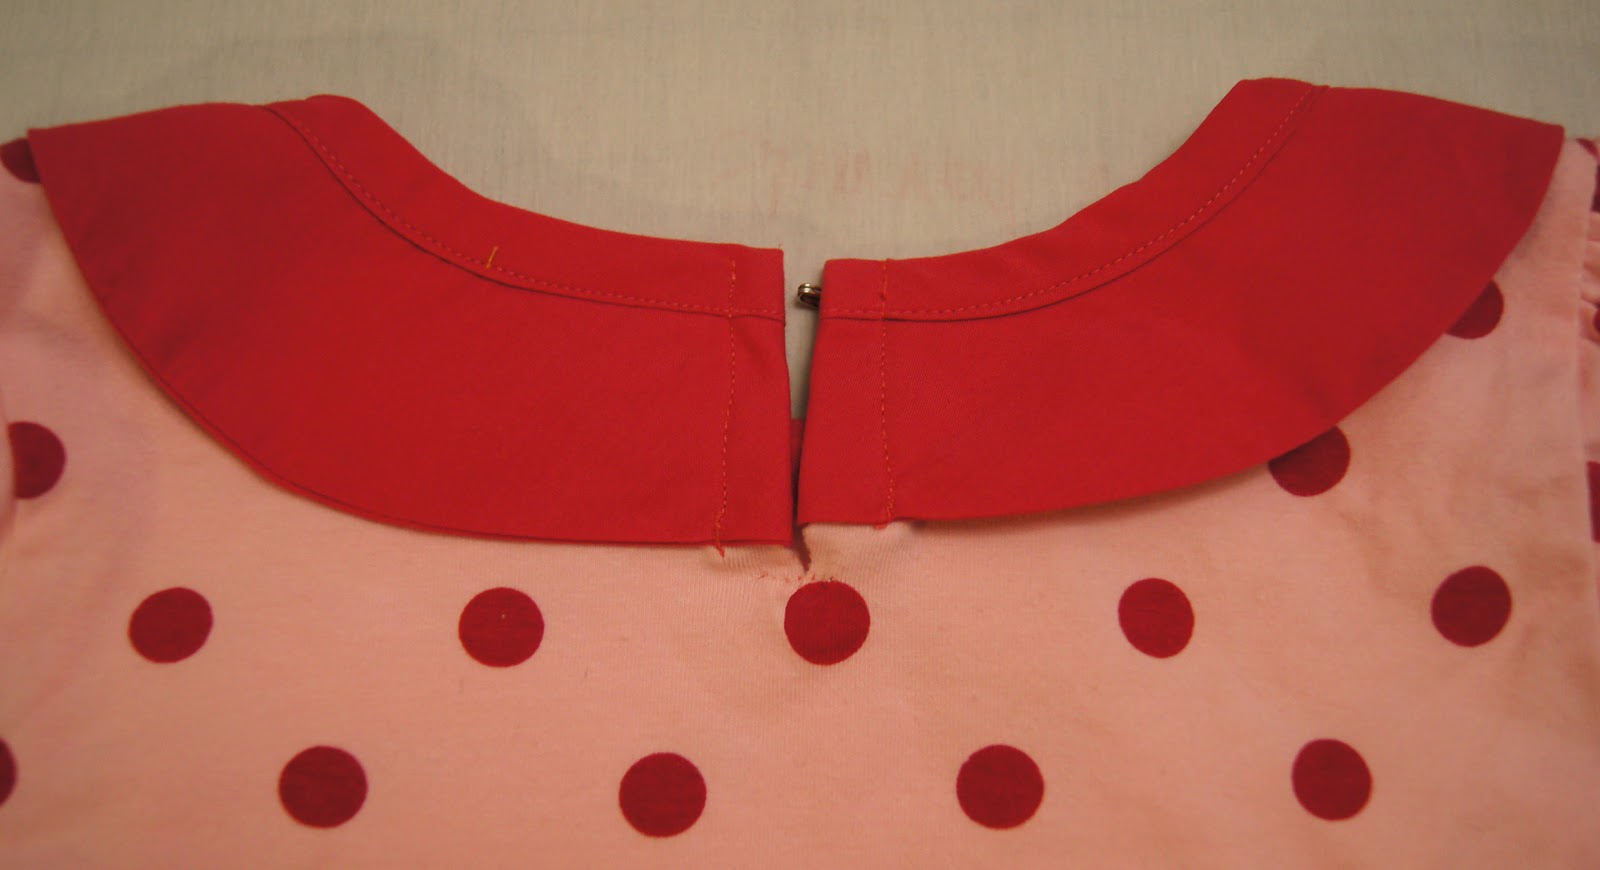
I did the collars on my daughters dresses the exact same way except one thing. To make it easier to get the dresses over their heads I cut a slit on the center back, reinforced the bottom of the slit with a few stitches, folded and sewed the collar around the slit and added a hook and eye.


Thank you Tricia for having me be part of Toptoberfest!


Thanks Erin for the great tutorial.  I love this project, and am so glad that you were willing to share it with us.


Monday, August 8, 2011

Well Dressed Man Onesies and Shorts

The practice onesie that I'll be hanging on to for my little guy.

 My brother was married last month, and I decided to take on the responsibility of making some little outfits for  two of my sweet nephews.  I found some men's dress shirts on clearance at Old Navy, and thought that they would make some darling, and lightweight,  little wedding outfits.


The tops have an appliqued tie, and a vest that is attached at the side seams of the onesie.  I ended up using interfacing on both of the vest pieces to provide it with a bit more structure.


The shorts were designed by me, and made to match.  They feature a faux fly, and some decorative tabs on both the side of the short pant, and on the back pocket.  The vests and shorts have several yellow buttons to pull the whole outfit together.

I love that the men's dress shirt's provided a lightweight material for the shorts.  Who wants to make a little baby suffer in the summer heat?  I was able to squeeze both outfits out of the two shirts, but I did have to be very careful when laying out my pattern pieces.


I don't have a tutorial or pattern prepared, but maybe in the future. I was really pleased with the fit of the shorts, and the overall appearance of the outfit, but these little cuties could make anything look good.


Thursday, August 4, 2011

For the Baby: No Hablo Onesie


I've made a couple of embellished onesies for the baking bun. I saw this idea several months ago, and had to replicate it for the little one (unfortunately I don't remember where I first saw it).  I freezer paper stenciled the saying onto the front.  Super simple. 

Monday, August 30, 2010

Pintuck Sunburst Top

The Sunburst Top

Notice the Subtle pintucks around the neckline?


I seem to be on a t-shirt kick lately.  It is a lot of fun to make clothes for myself.  My most recent creation is this basic pintuck shirt.  I have wanted to try pintucking for a while, but I wanted a basic project to start with.  I used the same cap sleeve pattern that I've been using the last little while.  I found this great tutorial from Burda Style on pintuck fabrics.  It really was such a simple technique.  I am excited to try out a couple of different ideas that I have running through my mind.  

The fabric that I used was a really lightweight aqua knit (another piece I snagged from my mom's collection), lined with some white knit that I purchased at Wal-mart on clearance. To do the pintuck technique I traced my pattern onto the fabric, marked where I wanted my pintucks to be, and stitched away.  After sewing my pintucks I went back and adjusted the pattern (retracing the original pattern to accommodate for the pintucks-I needed more fabric for shoulder seams).  Normally when pintucking you pintuck and then cut out your pattern from the prepared fabric.  In this case I wanted the shirt to be one piece, and I wanted the pintucks to form around the neckline.  If you try a similar project you will want to be sure that you layout your pattern with a bit of extra material on each side of your pattern.

I chose not to trim the neck and armholes with ribbing.  Because I was using two layers of fabric,  I simply stitched the neckline and armholes with wrong sides together, clipped the curves, and turned the shirt right-sides out.  I added topstitching around the openings, stitched the side seams, and I was done.  The lightweight knit had a nice curled edge so I left the hem unfinished.

It is a pretty basic top, but was the perfect project to try out pintucking.  I think that it is going to be a great layering piece come fall.  

I hope that it inspires you to try out a few new sewing techniques.  It also feels great to use up fabric that I've had stowed away.  Don't forget to sign up for Stashbusting September if you haven't already.

Check out where I'm link-partying today.     


Check out my tips and tricks for sewing with knits: Part 1, Part 2

Tuesday, August 24, 2010

Mock Screen Print Tops


Blue Angels inspired Top


I am really excited to share a few of my newest discoveries.  I recently whipped up another pair of pajamas for Mr. C. The discoveries that I made were used in the image making aspect of the shirt.  By looking at the tops you might think-Freezer Paper Stencil, but no.  This is a Mock Silk Screen stencil that I used following a tutorial from Wowzzy.  I found a video tutorial a month or so ago and finally got around to trying it out.    It is basically a hybrid between silkscreening and stenciling.  The thing about the technique is that you can reuse the stencil.  How great is that?  The day after I worked out my stencil I noticed that Char from Crap I've Made posted about the same technique.  There are a few different resources available if you are wanting to try this technique out for yourself.  Basically how it works is this.

1-Select an image that you want to transfer to your fabric.
2-Stretch a piece of sheer drapery fabric in an embroidery hoop (I picked up a half yard at Wal-Mart for around a dollar).
3-Transfer your image to your screen.
4-Use Mod Podge to block out the negative space (space surrounding your image)
5-Lay your shirt or fabric out flat, with a board or paper beneath it.
6-Use fabric paint to fill in the image.
7-Wash out screen (so that it can be reused).
8-Heat set paint according to instructions on paint.

Those are the basics of the process, for details you will want to visit the original tutorials (since this isn't MY technique I'm not going to try to claim it or make it mine by creating my own tutorial.


Aside from the technique itself, my second favorite new find is Ottobre.  It is a Finish website that has a number of different resources including some free patterns and images for appliques or embroidery.  I loved their airplane and the pedal car.  You can print off the images and use them for your personal use.  Aren't they great?  They also have a pattern for a Hobby Fox that I am planning on making for my son's birthday.

Read More

Monday, August 16, 2010

Petals, Ruffles, and Lace: My Super Girly T-Shirt


Here it is, my version of the Petal T-shirt from Ruffles and Stuff.  I love Disney's colorful take on the shirt, but I chose to go monochromatic on this one.  I made the shirt along with the embellishment, but you could easily add the petals, ruffles, or lace to an existing shirt if you choose.  I used the same pattern that I made for my cap sleeve T-shirt from last week.  I did make a couple of modifications, and will probably make a couple of more before I do a tutorial on the shirt itself.  

Petal T-shirt from Ruffles and Stuff
Want to make a Petal T-shirt of your own?  Visit Disney's blog for a complete tutorial.  I added a couple of my own touches, but the process is basically the same.


I originally considered doing all of the petals out of lace (which I think would still look great), but I ended up just adding a base layer of lace petals.  I cut the lace into petals by following the natural arc of the scalloped lace.  


I then arranged my petals from the same fabric as my shirt.  I had two layers of fabric petals, with the bottom layer being slightly larger than the top petals, and slightly smaller than the lace petals.


After I had an arrangement of petals that I liked I stitched about 1/4" from the edge of the neckline. 


Then I lifted up the top layer and stitched down the middle layer of petals. You could choose to attach the petals one layer at a time, but I didn't want to have to reposition all of the petals once I found a layout that I liked.  
                                   

Once I had stitched around the edge of the petals I had a feeling that I was going to be repositioning my petals every time I wore the shirt.  I decided to stitch down the center of the petals on the top layer.  I helped anchor down the top layer, and prevented many of the middle layer of petals from moving every which way.  I have a feeling that if the petals weren't made from knit that they wouldn't have moved quite so much.

Next I added my ruffle.  I had intended on putting a ruffle on this shirt, but it happened.  I made a double layered ruffle by cutting two strips of fabric.  One layer is 1" wide, and the other is 3/4" wide.  I stacked them on top of each other and using a long stitch I gathered them.  I then pulled my top thread and ended up with this cute little ruffle. I pinned the ruffle in place and stitched down the center of my ruffle anchoring it at each end with back stitching.  

I'm not positive, but to me it looks like Disney added petals all of the way around her T-shirt.  I just added the petals in the front and ended them at the shoulder seam.  
I'm sitting down in this picture, my posture really isn't that poor.  


I like the way that the shirt turned out.  It is much girlier than I typically wear.  I might just look like I'm wearing a clown costume.  What do you think?  Is the ruffle too much?

It feels great to check a project off of my list.  Unfortunately, probably added more to my list than has been checked off.

Want to know how I made the belt?  Click here.

Wednesday, June 23, 2010

Freezer Paper Bleached T- Shirts: Part 2, Project Saved


I was slightly disappointed with the results from my first attempt at bleaching my t-shirt.  The thing that was really pleasing to me was the shade of pink that my blue t-shirt turned when it was bleached (a lovely thistle color).  I also liked the image transfer...but I was a bit disappointed with how subtle it was.  I made some rookie mistakes with this project. 1-I didn't properly adhere a piece of freezer paper to the inside of the shirt...this allowed the bleach to bleed through the  fabric onto the back, and back up into the image area from behind.  2-I used a cleaning spray bottle that didn't have a fine mist.  A perfume spray bottle or old hairspray bottle probably would have worked better. The cleaning bottle was hard to control, I couldn't bleach small areas as well as I'd liked to have been able to. Oh well, live and learn.


 So my attempt at transferring my image didn't turn out as well as I'd hoped.  I did like the color as I  and the pattern of the transfer, so I decided that the piece could still be salvaged.  I picked up my bleach bottle again, and began spraying the majority of the fabric, being careful not to interfere with the pattern previously transferred. I didn't like the area around the transfer, it wasn't as subtle of a transition from bleached to unbleached fabric (it kind of looked like a bucket of bleach was splashed on my shirt).  So my second attempt with the bleach bottle went much better.  I was able to alter the color of the majority of the fabric, just leaving happy little blue spots that peek-a-booed through my new "thistle" color.  (Does anyone remember Hypercolor T-shirts from the late 80's early 90's (you would breath on them and they'd change colors), well I never had one, but now I feel like the hippest girl on the block. )


I'd resolved the color issue with the T-shirt and now it was on to making the image "pop".  You can see in the early photos that the transfer did work, but it was rather subtle (2 shades of thistle instead of thistle and blue).   So I picked up my handy embroidery thread and began doing some hand stitching around my image.  I didn't stitch around all of the little circles in the design, but I did do the flower.  My T-shirt is stretch so I allowed my thread to pucker the fabric a bit (I just liked the look of it). I then attached a simple coordinating button in the center of the flower for added interest.  Then I used some lightweight fusible interfacing to secure the threads and prevent them from pulling when the shirt is being worn.


I'll be honest, for my first attempt I used an old T that I wasn't crazy about, it usually serves as a pajama top.  So the fit isn't perfect.  My new flower image, paired with the new thistle hue, filled me with a desire to "girlify" the T-shirt even more.  I gathered the sleeves by using some more embroidery thread. I just gathered  the top of the sleeve (probably the top 1/3, I did want it to be comfortable and still fit over my arms).

The fit of the T-shirt isn't perfect, but I am much more pleased with the alterations.  I might still wear it to bed, but I will probably wear it out to do yard work, maybe I'll even wear it camping this weekend.