Search This Blog

Showing posts with label sewing. Show all posts

Friday, May 2, 2014

The Lazy Saturday Maxi Dress: A Pattern Hybrid


It's Selfish Sewing Week over at Imagine Gnats, and I decided it was high time I did a bit more sewing for myself.  So, I busted out some ITY knit that I've had in my stash, and a couple of my favorite self drafted patterns, and created this super comfortable knit maxi dress.  I LOVE it.


First off, you can find the two projects that I combined to make this dress on my blog:  The Easy as Pie Tank Pattern was used to draft the neckline and arms, and the Lazy Saturday Shirt  uses a similar technique to shirr the extra material in the width of the dress. You can find my more information on the shirring technique used, here and here.

The Easy As Pie Tank has a dart included in the pattern, I didn't change that.  The shirring pulled in the extra material from the dart.  Using an existing maxi dress as a guide, I determined how long, and wide  I wanted my dress to be, and cut my fabric accordingly. 
  

I finished off the neck and arms using a technique similar to attaching ribbing.  The only difference was that my ITY knit didn't have quite as much stretch as my typical ribbed knits, so I used longer strips to finish them off?  Lost?  I'll have to do a ribbed knit technique tutorial in the future.  


The shirring pulls the dress in at the waist, and gives the dress a bit more shape.  After sewing up the dress, at the side and shoulder seams, I tried the dress on, and decided where I wanted my first row to start.  It was really a sew as you go type project.  The important thing to remember is that you don't want your shirred rows to start too high (like my Lazy Saturday Shirt), or the rows will be crawling up your bust.


This was a super quick sew, and well worth the time and material.  I love the finished product.  It might be the only selfish sewing project of the week, but I'm happy with it, so that is a win!

Tuesday, March 11, 2014

For The Home: Toy Box Cushion


If you remember, one of my New Year's Sewing Resolutions is to sew for my home.  I have been so proud of myself for all that I have done.  I'm up to about four or five projects.  They are just little things, but they make me feel better about my home.

We have a nice little starter home that we are outgrowing, but we don't have any immediate plans for moving into anything larger.  So, I've been trying to maximize our storage space, and find different ways to make our small space work for our growing family.  Minimizing clutter is difficult.  Kids have so many toys, and they are inevitably hauled out to the living room where most of the playing happens. In our cozy home, our living room is also where we entertain, and the first thing someone sees when they come into our home.  So, being able to put toys away quickly (as soon as there is a knock at the door), is a plus.

I picked up this white chest a couple of years ago while out thrifting.  It was in decent shape, but nothing beautiful.  From the beginning I'd planned on making a cushion for the top.  It was a way to add a bit more seating to our small space, while hiding away toys.


It took me a long time to get around to making the seat cushion.  It's not the most exciting thing to sew, but I am so pleased with the way it cleans up the room.  I purchased the foam at a local craft store that was going out of business.  It was 3.5" thick, so a perfect little cushion for any behind.  The herringbone fabric is the same that I used to recover the glider.  It is nice and neutral with a really subtle sheen.

Velcro became my best friend on this project.  I chose to use it both to attach the cushion to the chest, and as a closure on the back of the cushion (no photo, sorry).  I attached the rough side of the  sew on velcro to the material, to avoid snagging if it wasn't perfectly aligned.  I used a sticky back velcro for the chest.  


 Now we can store all of those toys with their brightly colored packages.  It really does make a big difference in the space.

Friday, February 7, 2014

Free Pattern and Tutorial: Baby Dribble Bib Bandana


Accessories for little boys are limited, and after three boys, I am feeling the need to accessorize. Pair that with the fact that he's constantly dribbling down his chin, and this is a perfectly satisfying quick sew.


You've probably seen bandana dribble bibs before, but I happen to think mine are the cutest (yep, I said it).  These little bandanas cowl at the neck, and have a fun closure that looks like it's tied.  So adorable. No matter which way the bandana shifts, it still looks cute.


Want to make some?  I've got a tutorial and free pattern for you today! Don't want to make your own?  I just listed a second set of baby bandana bibs in my etsy shop, get them while you can.

Materials
1/3 yard exterior fabric (I used a soft cotton flannel from Riley Blake's Sasparilla line)
1/3 yard lining (I used a sweatshirt fleece, but a knit, terry cloth, or flannel would all work)
Coordinating thread
Seam Ripper
Iron
Button Hole presser foot (optional)
Printable Bandana bib pattern (Personal/Non-commercial use only)

Cut out your pattern pieces, and tape together matching up triangles.

Fold your fabric in half, and align the pattern with the fold to cut out your bandana pieces.  Repeat with lining fabric.


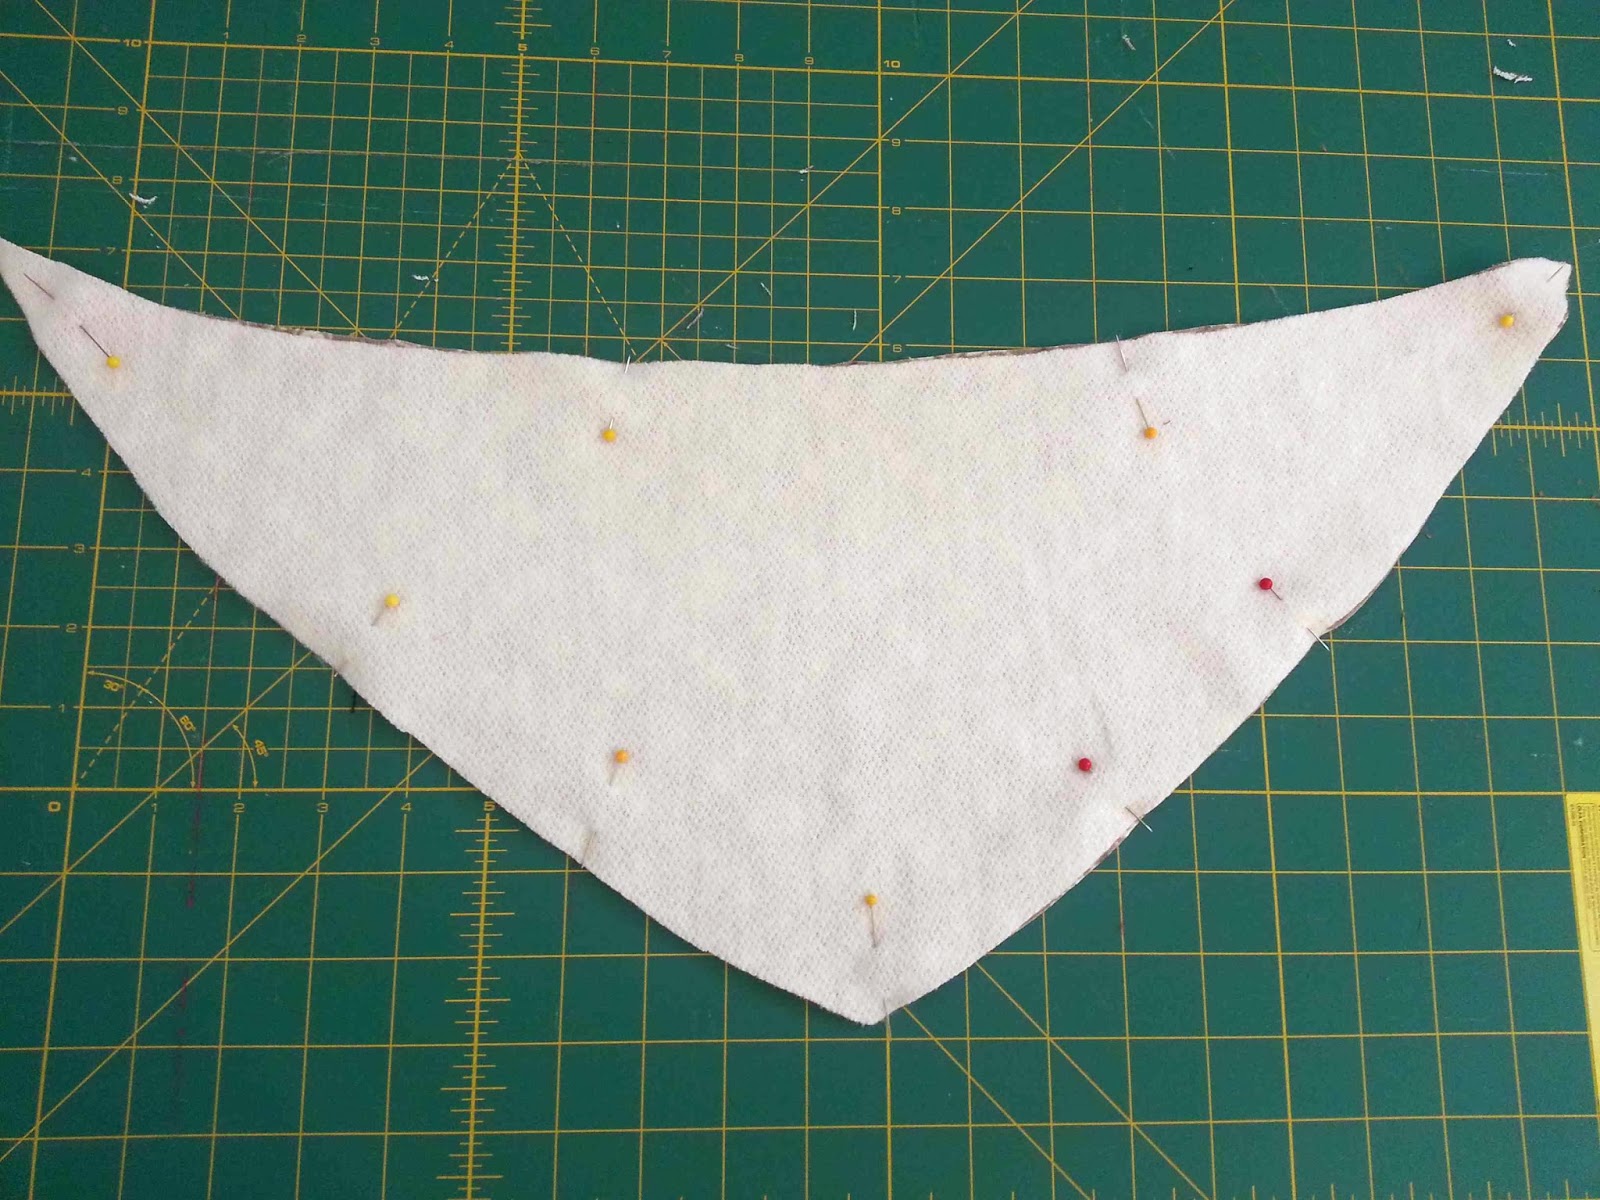
Place your exterior and lining pieces right sides together, and pin in place.  Mark the area to be left open (see pattern) with  a marking pencil, or different colored pins.


Sew around your bandana, starting and stopping your seams according to the pattern markings. The pattern allows for 3/8" seam allowance.  You should be left with an un-sewn area for turning your bandana right side out.

Clip the three corners of your bandana, making sure not to clip through your seam line.  This will reduce the seam allowance bulk, and make for sharper points on the finished bandana.


Reach into the un-sewn portion of the bandana, and pull the material right side out.  Make sure that your points are nice and sharp at the corners.


Press with a hot iron, making sure that the open edges of the bandana are turned inward.


Topstitch around your bandana, 1/4" from the edge. This should secure your un-sewn area.


On one tie end of the bandana, fold the tie in half.  Measure four inches from the tip of the tie and mark.


 Adjust your button holing foot to allow for a 5/8" button.  Attach the button hole foot to your machine, and adjust machine settings. (Read more about sewing button holes)


 Line up your button hole foot with the 4" mark, sew your button hole.


Ah, a thing of beauty.


Use your seam ripper to open up the button hole.


Your finished bandana should look like this.  The tie end opposite the button hole will be pulled through the button hole to secure the bandana.

So cute, right?  If you're button hole is too large, the tie could slip too far, and make the bandana too tight.


 Tie around your favorite little cow poke, and catch those rascally dribbles.  They'll keep your dear ones dry, and make them absolutely irresistible.

Buy your own set of red and grey bandana bibs in my etsy shop (SOLD OUT).  Check out my Dribble Bib-danas for sale in my Etsy shop!

Friday, June 7, 2013

Tutorial: Pants to Shorts Refashion


I remember wearing cut offs as a kid.  I was always embarrassed.  Why? I don't know, but I was.  I don't blame my mom for cutting off my worn out jeans.  As a parent myself, I can now hardly believe how quickly my four year old can outgrow, and wear out a pair of pants.


So, in an effort to save money, and make the investment last, I turned several pair of his worn kneed jeans into shorts, but I'm not going to call them cut offs, let's call them refashions. I'll share a few tips on creating successful short refashions.

First off, make them (if for boys), as long as possible.  Mid thigh shorts are a dead giveaway that the shorts were once pants. Second, try to incorporate as many of the design elements of the pants into the hem of the shorts.  Third, control the fray.


This brown pair of shorts started out as a pair of pants that never quite fit right.  We liked them, but by the time they fit with the waist adjusted, they were too short.  So in an effort to get more use out of them, we figured they'd get more wear as shorts.  I pulled out a pair of Clark's existing shorts that fit well.  They served as a length guide.  Match up the top of the waistbands, and determine how long you want the shorts to be.  Next, determine how big you want the hem of the shorts to be.  Add this length (plus 1/4" if turning the hem under), to the length of the short.


 Fold the pants in half, matching up pant legs.  Make a straight cut using a rotary cutter and a straight edge.

If you have a serger, serge the edges.  It will control the fray, and make turning the hem easier.  If you don't, you can use an overcast zig zag stitch to control the raw edge.


Stitch Witchery, or any sort of sewable fusible adhesive is great for this project.  I found this unused package at a thrift store-score.

Turn your shorts inside out.


 Align the edge of the fusible adhesive with the raw edge of the shorts.  


Fold up the hem along the inside edge of the hem tape.  Press with an iron.  Your iron shouldn't come in contact with the hem tape at any time, so make sure it's nicely tucked into your hem.


Turn your shorts right side out.  Select a thread that matches the existing stitching on the shorts.  If you have a golden thread, use gold.  It's important to match the existing stitches, and not the fabric. If you don't have a matching thread, consider another contrasting color, and repeat in multiple places on the garment (see upcycled shorts).

 Select a stitch that most resembles that stitching on the shorts.  If your garment has a longer stitch length, lengthen the stitch on your hem.  If it has a reinforced triple stitch, then adjust your setting as well.  Repeating these design elements will help the shorts feel intentional.

Stitch 1/8" inside your hem allowance.  I stitched 5/8" away from the folded hem, of my 3/4" hem. Try to keep your stitching line as straight and consistent as possible (how to sew a straight line).


These blue shorts had worn out at the knee.  The hem is narrow, but I was able to repeat a double row of lengthened triple stitches.  It helps the shorts feel more finished.


Single row of elongated straight stitch for these brown shorts.


 Repeat on both legs.  Done and done.  Another example, my pants to maternity shorts refashion.

Another option is to try to use the existing hem of the pants on the shorts. This will only work well if the pants is relatively straight legged.  If the pant hem is narrower than the knee/thigh, then you won't have enough material to work with.


Monday, June 3, 2013

Baby Hat and Pants from a T-shirt


I spent last week tackling my upcycle clothing pile, which was getting too big.


I selected about eight pieces of clothing that needed to be turned into something new, and worked my magic.  One of those articles of clothing was a gray turtleneck that was never worn, but was in great condition.  It became a new pair of baby pants, which happen to be one of my favorite little things for baby boys, and an adorable top knot hat with a Mom Tattoo Applique (another of my favorite things).


For the hat, I printed off Prudent Baby's Top Knot Hat Pattern.  I aligned the original hem of the turtle neck, with the hem line on the pattern.  Cut out the hat, leaving the side seams of the turtle neck intact for the baby pants.


I followed her instructions, minus the cuff on the hat, and the hat was finished in no time flat.  Then, just to dress it up a bit, I added a small  Mom Heart Tattoo Applique.  I love it so much more than I ever did the turtle neck.

 As I mentioned, I preserved the side seams of the shirt, and cut out my infant pants using the existing hem as well.  I added a faux fly, crotch and leg seams, and the casing, and these were done in minutes also.  So easy.  I'm thinking that I need to make at least one more pair of these.  Do you want a tutorial?


Then, just for good measure, I whipped up a Mom Tattoo appliqued body suit to complete the look.

You can find my PDF file applique template here.

Thanks for reading, and I have more upcycled goodness to come.  It was a productive week.


Wednesday, May 29, 2013

Boy Faves: Quilts

Every baby needs a blanket to call their own, and just because a quilt isn't appliqued with flowers or ruffles, doesn't mean that it can't be adorable.  I've collected a few of my favorite quilt ideas for the lil' guys in my life.

I adore this plaid houndstooth.  Isn't it great?


Do you have a favorite?

  I love the gingham, and am so tempted to make one for this little guy.  Both grandmas have quilts in the works, so I'm trying to exercise a bit of self control.  After all, it will only be a couple of more years before I need to make one for a big boy bed.  He can snuggle in his grandmas' quilted love for the first few years.

Thanks for reading.

Monday, May 13, 2013

Snap Clutches


Mother's Day was pretty low key as far as gift giving goes.  I wanted to make something for my wonderful Mother and Mother In Law.  A clutch seemed like the perfect choice.  They are cute, practical, and quick to make.

I searched Pinterest for some free online tutorials, and found this cute little envelope clutch pattern.  It sews up really quick, and doesn't require any special supplies.  Sew on snaps, random buttons for the front, and that's about it.


I searched my stash, and found some of my favorite home dec weight fabrics, and sewed up these little beauties.

They are perfect for holding a pair of sunglasses, some cash, lip gloss, etc.  Great for stuffing in a summer tote or bag.

NOTE: The tutorial is written in Japanese ( I think).  Pay close attention to the photos and you should be alright.  I also printed off the pattern pieces at 150%.  Look for the link with the printer icon to access the pattern.

Looking for something different?  Search my To Make Board on Pinterest for some other cute clutch options.

Tuesday, April 30, 2013

Boy Faves: Fabric

I'll be honest.  I thought that once I found out the gender of our baby, that I'd be filled with ideas of projects that I wanted to work on.  I'm sure if it had been a girl, that I'd be sewing away full force.  It's a boy.  We are thrilled, and we will love him, but with two boys already, the needs for this baby are minimal.  There are a lot of things that I'd love to sew for him, but really, what we needed to get for him was a bigger car, and another bed.  Burp clothes, blankets, and clothing are taken care of.

But, I am still determined to sew for this little guy. There is something special about sewing for baby.  Boys can be hard to sew for.  There aren't as many options when it comes to clothing and color choices.  So, I thought that I'd start a little Boy Faves series, both to inspire me, and share with you some great boy related options that are available.

Today I thought we'd talk fabrics.  Fabrics are inspiring. Although designers can neglect the baby boy, there are some really great fabrics available.  If I needed to make blankets, or car seat covers, I'd be all over these, but I am trying to exercise a bit of self control.

Patterns

I love using geometric and repeating patterns for boys. There are a number of different options available, but these are a few of my favorites. One of the reasons that I love them so much is that I think they can grow up with a baby.  No need to immediately replace the bedding when they start walking.


Prints
I tend to lean more toward patterns than illustrative prints, which is funny seeing that I have a background in illustration, but I love the graphic nature of a repeating pattern. That being said, here are a few more pictorial prints that I love. Jay-Cyn is one of my favorite designers, which explains why the majority of the prints are his. Camp Sur and Camp Modern have won me over, and are my favorites.  How great is that wood grain print? Note: I've pinned a lot of his samplers to share examples of the great fabrics available in the individual lines.  


There you have it. A few more options for sewing with boys. Stripes, plaids, and even polka dots. What are your favorite boy related fabrics? Do you have a boy theme that you really love? I'm kind of over race cars and robots.

Wednesday, February 27, 2013

Lace Baby Bonnet

I have a sewing project for you today, are you shocked?  I regret to admit that it's not a tutorial, but a sewing project none the less.


I picked up a remnant piece of fabric a couple of years ago.  I was sure that it was going to turn into something lately.  Unfortunately, when I got it home, I realized that it was embroidered on one end, and that the majority of the fabric was simply sheer with small flowers every six inches or so.  The scalloped edge ran along the side, which was only 18 inches or so.  So, it sat, and sat, and sat in my drawer, waiting to be used.  It would have been a beautiful overlay for a christening or blessing gown, but like I said there was only 18 inches.

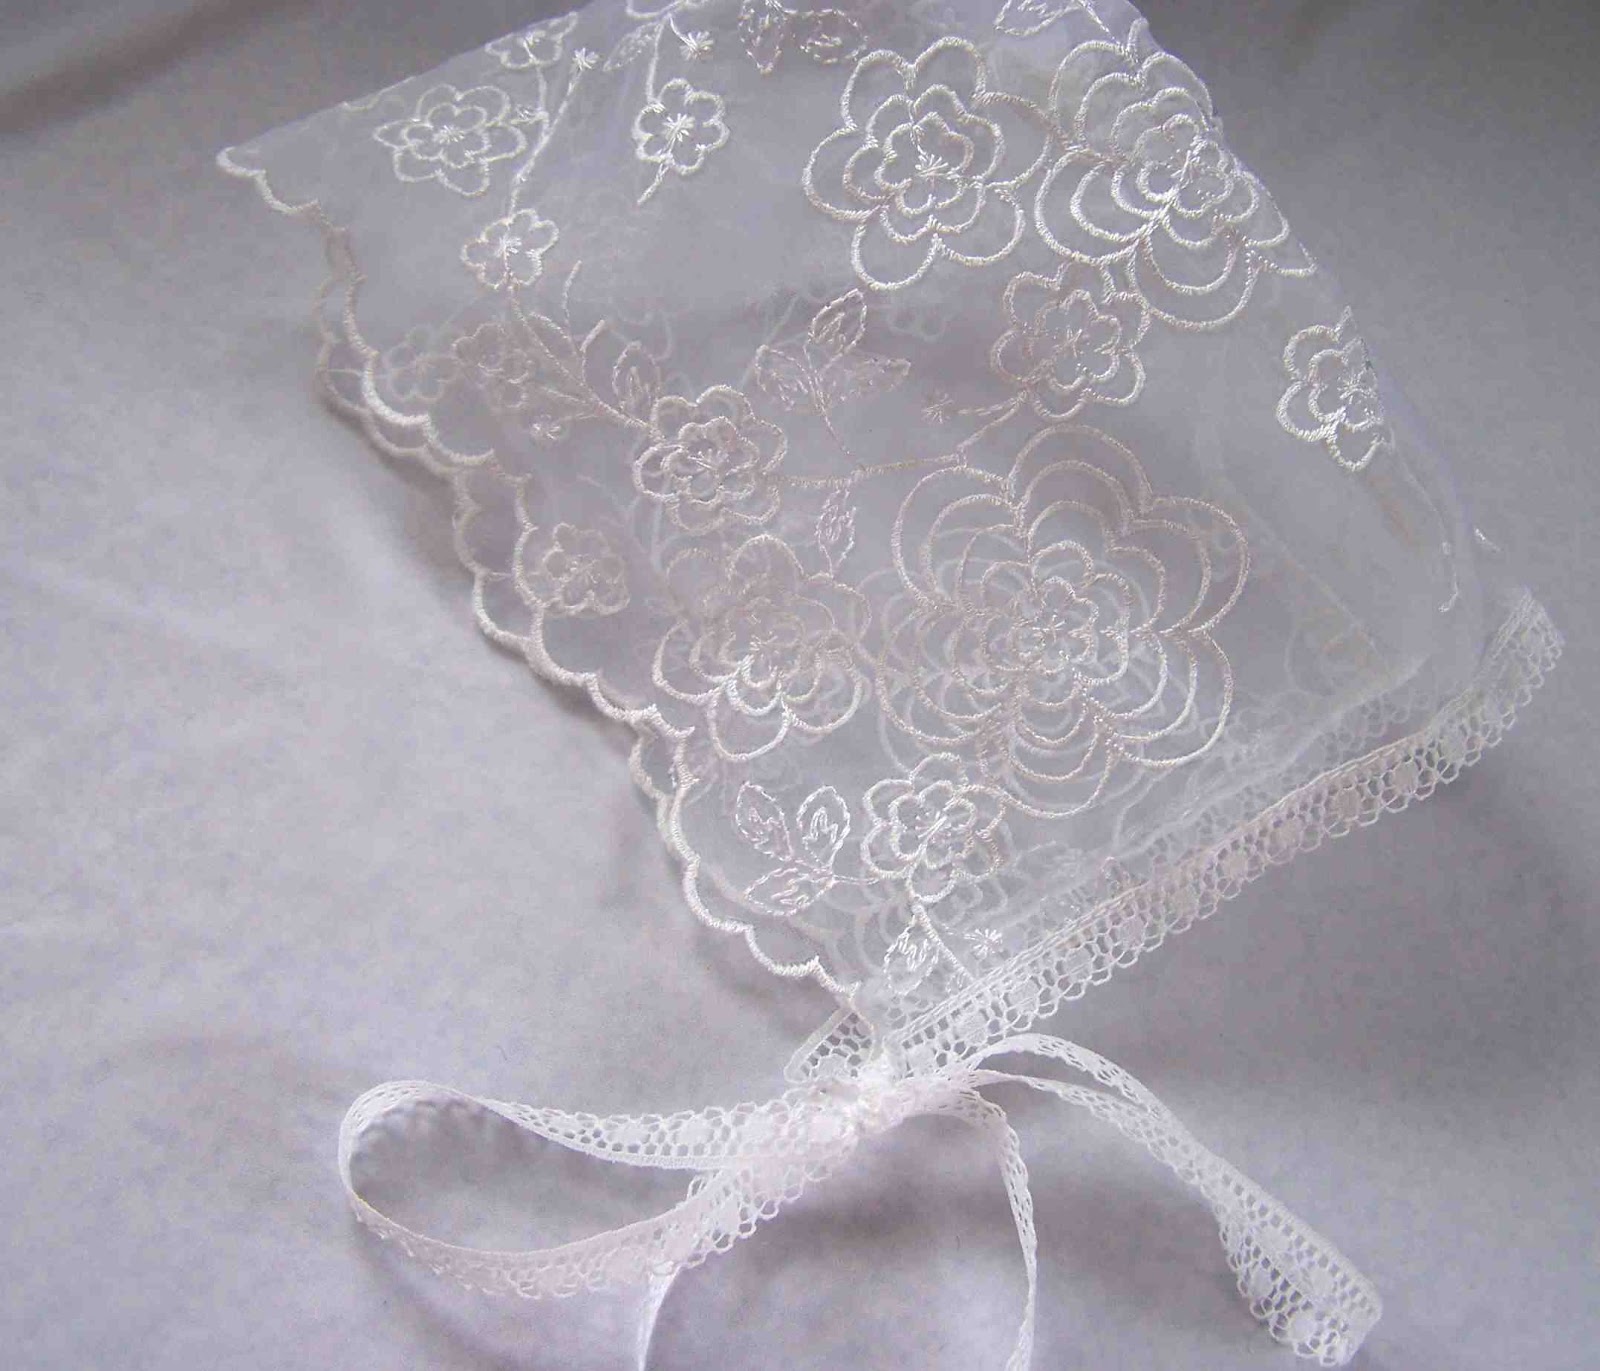
Inspiration finally struck last week, and I sewed it into a quick little baby bonnet. It was perfect because I was able to use all of the border detail, and finish the project with the small amount of fabric that I had on hand.  Let me admit, that this might be the worst project photo ever.  It was really hard to shoot, but trust me, it's darling.


To make the bonnet, I used a bonnet pattern that I had on hand from Clark's blessing outfit pattern (Simplicity 5813).  It is a two piece pattern.  The original pattern is lined.  I had to eliminate seam allowances for the front edge of the bonnet, seeing that I was using the scalloped edge as my finished seam.  I also decided to add a bit of lace all along the bottom edge of the bonnet.  It gave it a more finished feel, and allowed me to attach the ties at the same time. All of the raw edges of the bonnet were serged with a rolled hem prior to sewing them together.

This is in no way an announcement that we are having a girl.  We still don't know the gender, 4.5 weeks left.  I made up the little bonnet for my friend Kandice, of Kandice McDermott Photography.  Just a fun little photo prop for a sweet little baby.

Is it ridiculous that putting fabric to good use gives me an odd sense of accomplishment. It does.

By the way, did you notice that I added some  new social media buttons, my Facebook, and Instagram icons have been updated, follow if you'd like (I'm not going to bribe you).

Thursday, July 5, 2012

Worn/Stained Clothing Up-cycle


Having two boys in a row has been nice to our pocket book.  We haven't had to build a wardrobe for Miles completely from scratch.  Aside from a few onesies with mustard yellow stains, most of Clark's baby clothes are still in great condition.  Unfortunately the clothes that Clark is growing out of, haven't faired as well.  Boys get bigger, and clothes wear out sooner.  I was about ready to chuck a pair of too short, holey kneed pants, when I had this revolutionary idea.  Turn the pants into shorts.  I know, it's brilliant.  Who ever thought of such a thing (please sense sarcasm).  

I grew up wearing cut off jeans during the summer.  I can't say that I was ever thrilled to wear cut-offs, but I did it none the less.  As a mother I like my kids to look somewhat presentable when we are out in public, but when Clark is digging holes in the back yard, and looking for dinosaur bones, cut-offs are quite fitting. 


So, I took that old pair of pants and cut them off. (Rotary cutters are great for that)


Then, in an effort to control the ridiculous amount of fraying that occurs with cut-offs, I stitched a few rows of contrast stitching along the bottom of the shorts.  They'll still fray, but only up until the stitching lines.  I used a lengthened triple stitch; it makes the stitching a bit more visible.

Clark really wanted red stitching, but the only red stitching was along the bottom.  It looked a bit out of place.


 I had a fantastic art teacher in college that had several one-liners that he'd often repeat to us when discussing our artwork.  One of his famous phrases was "If it looks out of place, add more of it".  

So I added more of it.  I added some contrast stitching on the coin pocket...


...and along the back pocket...


 ...and I couldn't forget the tag.  

They look better, still like cut-offs, but a bit better.

My favorite part about this project was Clark's reaction.  He was absolutely amazed that I'd turned a pair of pants into shorts.  He's asked me more than once how I did it.  I tell him that it is just one of my many mom super powers.


Along with the pair of holey jeans, we had a stained shirt that I figured couldn't be passed down.  I was about to chuck it as well.  I know, it sounds horrible, but I'm feeling overwhelmed with STUFF lately.  Anyway, I didn't throw it away, I cut it apart.

I've always loved the banded stripes on this shirt.  It reminds me of clothes that I wore as a little girl.  So, I saved the stripes.


I added some fusible web to the back of the knit fabric, and adhered it to a onesie.

I then stitched around the outside edges with my sewing machine.  I used a basic straight stitch as the knit won't fray.  It's now a super simple striped onesie. I love it, and I love the fact that I was able to reuse something that even I thought was junk.

So, what are your mom super powers, and your favorite ways to salvage damaged clothing?  I'd love to hear.