Search This Blog

Showing posts with label home decor. Show all posts

Wednesday, February 12, 2014

Recovered Glider Rocker


Two and a half years ago, when I was pregnant with Miles, I found this glider rocker at a thrift store, and snagged it for $5.  The rocker itself was in good condition, but just not my taste as far as color and fabric.  I had planned on recovering it immediately, but that didn't happen.  Babies came, and kept coming, and I couldn't ever decide on a fabric.  


A big bold print or pattern would be fun, but not very versatile.  So, I found this fabric on sale for $1.50 a yard and it was a nice heavy upholstery fabric.  It was the perfect weight and price.


 It might not be too exciting, but it is neutral and I'll be able to fit it in to almost any room in the house.


Before I started the re-covering process, I took plenty of photos of all of the different angles of the existing cushion covers.  I then busted out the seam ripper, and dissected that bad boy.  After all was said and done, I had a perfect pattern to work from.


 I was able to use the existing plastic piping cord, and then found a new zipper in my stash that was long enough for the zipper closure.


Rather than dissecting the back seat cushion, I just covered over it.  I clipped the loops off of the top, and used them to determine how, and what size, to make my new loops.  


To determine the size to cut my pattern pieces, I first measured the depth of my cushion.  My cushion was about 2.5" deep. 


  Because I was using both a front and back piece for the cover, I added 1.25" to my .25" seam allowance, and was able to cut my pieces the proper size.  The cover was nice and snug.


It's not perfect, but it is a huge improvement over the old dirty forest green that sat  in my living room for far too long.  Now what to do about that horrible honey oak stain?  I'll probably leave it for another 2.5 years!

Don't forget to enter the Suave Moroccan Infusion giveaway for a chance to win a $1,000 gift card.

Wednesday, February 5, 2014

Sweater to Slip Cover Upcycle


One of my New Year's ReSewlutions was to do more sewing for my home.  We are a month into 2014, and I have one little project to prove I'm moving in the right direction (progress is progress right).

I've had this chunky cable knit sweater in my refashion pile for quite some time.  I finally chopped it up, and turned it into something pretty, a new pillow slip cover for my couch.


Because it was a button up sweater, all I had to do was cut out my material, which proved to be the most difficult part, and then sew four straight lines.


I chopped off the hood, and the arms of the sweater, trying to save as much of the fabric as possible.


 I then cut my material into a square that was roughly the size of my pillow form.  I would have loved to have the buttons offset on my slip cover, but I didn't have enough material to work with.

I turned the material so that the right sides were facing, stitched around all four sides, and then finished off my edges.  With this chunky knit, the stitches unraveled quickly, so I really had to make sure that I caught all of the secure material in my seam allowance.


 I love the open weave of the sweater slipcover, and the wood buttons have a certain amount of charm.


One little step in the right direction.  

My two year old thinks that this project is absurd, and continues to try to undress my pillow.  At least he is getting plenty of practice learning to button and button something.

Tuesday, January 7, 2014

Minky and Flannel Magic Pillowcase


With my children getting older, their Christmas lists are beginning to fill up with things that mom just can't make.  Despite my best efforts, there was no way that I'd be able to work any sewing magic and create and sort of video game with swappable characters.  So, in order to fulfill my emotional need to make handmade gifts for my family, I came up with a couple of projects that would meet their needs rather than wants.


 One thing that I made my boys was minky and flannel pillowcases.  Miles has recently transitioned to a big boy bed, though he still prefers to sneak into our bed,  I thought a soft and cuddly pillowcase would help make him feel more comfortable in his big bed.  I have to tell you, the pillowcases were a hit.  Both Clark and Miles love their new soft pillowcases.


 I'd heard about "Magic" Pillowcases and thought I'd give them a try.  They were as simple as I'd heard they'd be.  Basically you start with 3/4 yard of the minky, or main fabric, 1/4 yard for the wide band, and two inches of fabric for the thin detail band.  With proper positioning, you are able to sew all of the bands to the main fabric at one time, and then all you are left to do is sew the side and bottom pillow case seam.  I know it doesn't seem to make any sense when I explain it that way, but fortunately for all of us, there are a huge amount of online tutorials for making them.  Check out this one, or this one, or even this one.

*None of the tutorials that I referenced used minky as a fabric choice.  Minky has always washed up well for us, and my boys love it.  If you find it difficult to sew, try using a walking foot, and pin generously.  You will also want to trim your minky down to the width of your flannel, as minky tends to be quite wide.


They are super cozy, and a perfect project to use up a remnant piece of minky. It was something that my boys didn't even know that they wanted for Christmas.


Wednesday, July 17, 2013

Baby Boy Nursery


This week I made some time to work on the baby's nursery.  The space is small, and it will only be a temporary space, so I didn't want to spend a lot of money decorating it.  The decorations also needed to be temporary, so no painting was involved. I tossed around a lot of different ideas, and finally settled on paper airplanes.  Sweet, simple, and easy to work with. I actually woke up one morning thinking of a paper airplane mobile made out of fabric.  I don't know if that project will ever see the light of day, but it served as a jumping off point.  You can find more of my paper airplane inspiration on my nursery board on pinterest.

A few months back I picked up a killer deal on some indoor vinyl from Pick Your Plum, and it has been waiting in my craft closet for the perfect project.  These little paper airplane decals were super easy to make, even without any sort of craft cutter to speak of.  I designed the airplanes, and then printed out a template.  I then transferred the image to the paper backing side of the vinyl, and used an x-acto knife to cut them out.  The white pieces were cut out first, and then spaced slightly apart on darker pieces. The dash marks are all the same width and length, and I just made up the design as I went.

It was a fun, inexpensive, and easy way to update the space. At least now I feel like some effort has been made to prepare our home for this little guy.

The I Am A Child of God printable I found on Pinterest, but you can access it on Mommy Mormon Blogs if you are interested.  It is available in several colors.  This shade of blue just happened to match my vinyl and the blue stripe in the striped crocheted afghan.

Read more about the refinished bassinet.

Apologies for the low lit photo....the room is in the basement.


Tuesday, May 14, 2013

Boy Faves: Nurseries

I don't ever spend a lot of money decorating a nursery, but I love gathering inspiration, and picking a few favorite ideas to incorporate into the baby's space.  Baby boy nurseries don't have to be crammed with cars, dump trucks, basketballs, or camo.  You can easily make a nice space that will grow with the baby.

Do you have a favorite baby boy color combination or theme?  I'd love to hear your ideas, I haven't decided on anything yet.

(Don't mind the captions under the pins, I'm lazy about changing the original caption)

Here are a few of my favorites:

Nice and Neutral


Black and White


Bright and Bold


Getting Graphic


Wednesday, April 3, 2013

Jack and Jill


We have a Jack and Jill bathroom in our home.  It was a great way to maximize the usable space in our small home.  One door connects to my boys' room, and the other to my office/sewing space.

Jill

I picked up some vinyl a few weeks ago from Pick Your Plum, and I thought it would be a fun (non permanent) way to add some details to the rooms.

I created some templates in Photoshop, and then cut my vinyl by hand.  You see, I'm still living in the crafting dark ages.  No fancy shmancy cutter here.  Me and my x-acto knife went to town, and in a matter of minutes, cut out our little couple.

The orange man fits in nicely with the decor in the boys' rocket ship room, but I kind of think that I need to make him a space helmet.  The pink doesn't work quite as well with my office decor, which is decorated much like my blog.  Blue and green.  I figured I'd use up the pink vinyl, seeing that I can't see any immediate need for it.

Anywho, should you be interested in the templates, you can download them here.

Thanks for reading.

Tuesday, October 11, 2011

Candy Corn Halloween Bunting


Those of you that have been reading my blog for a while will know that I rarely share holiday decor projects.  It's not that I don't like the holidays, but it seems like so much work to set up decorations, and convince Clark to leave them alone. So you may be surprised that I'm posting some holiday buntings or garlands.


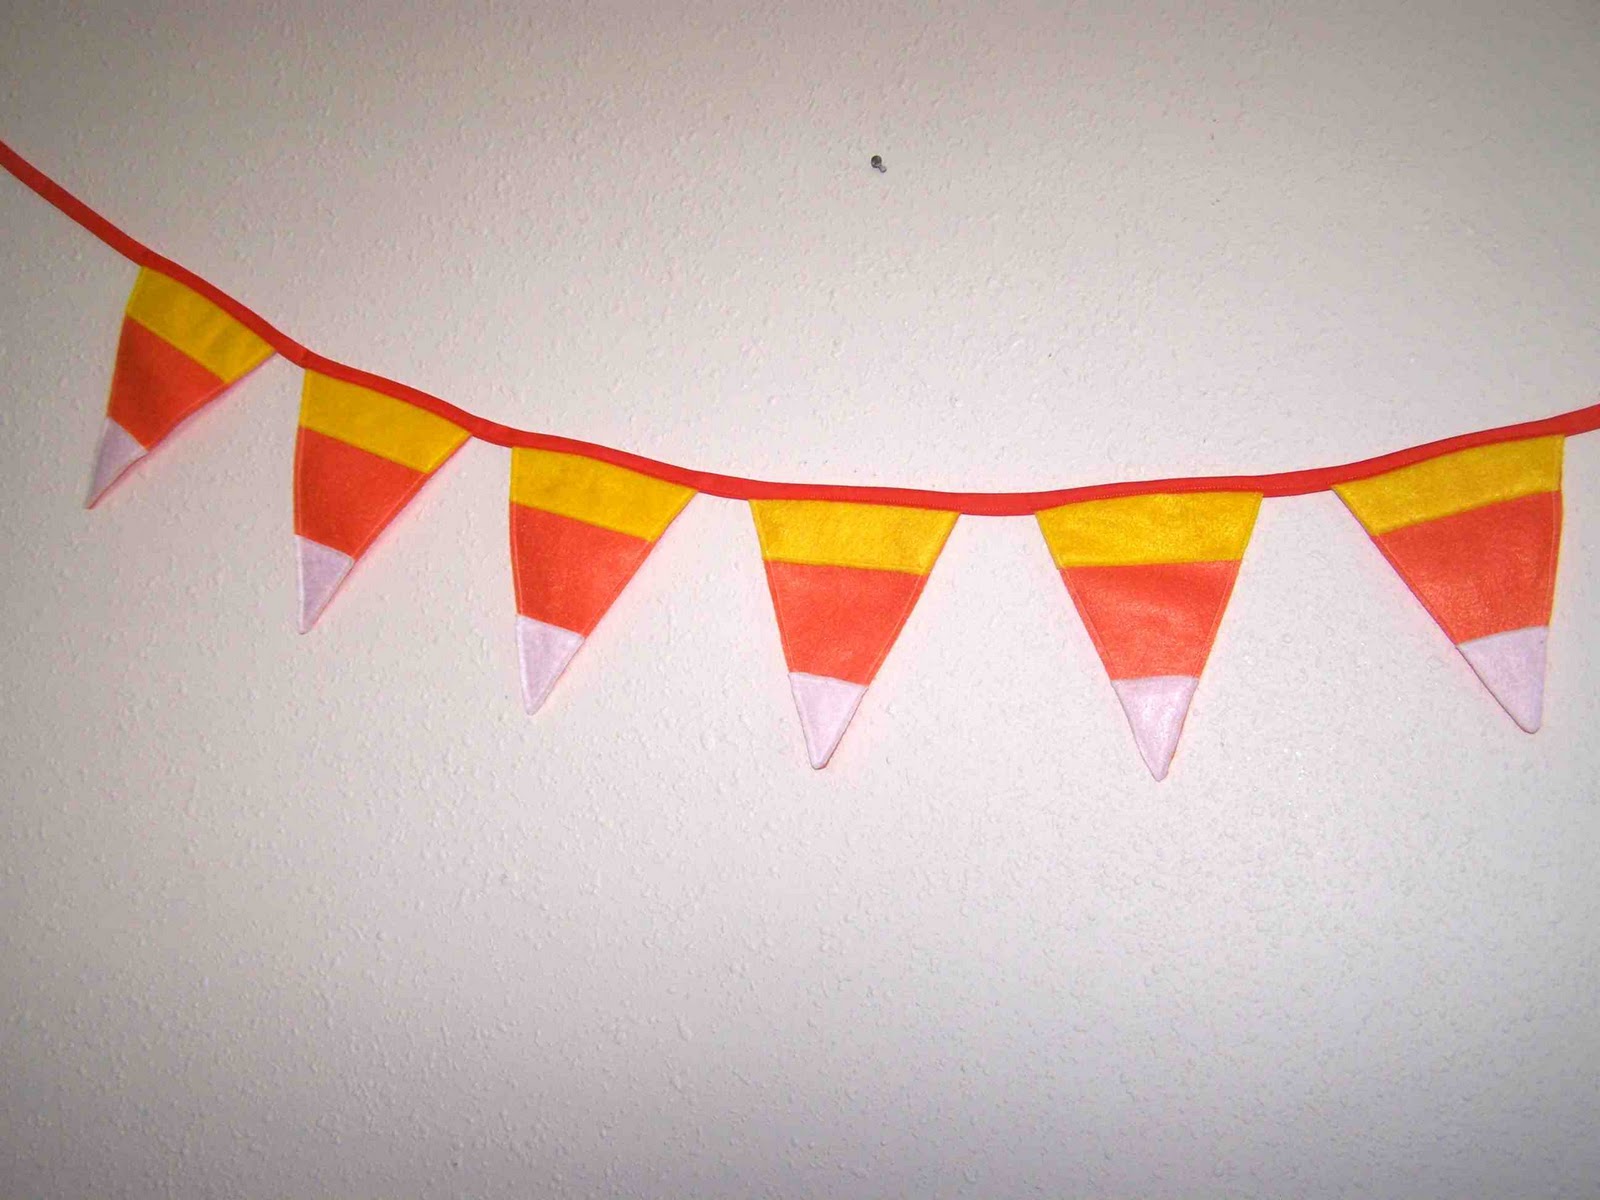
Aside from being one of my favorite halloween candies, I think that candy corn is rather cheery.  This bunting started out with orange felt triangles, and then I stitched on the white and yellow pieces.  The individual flags were then sewn to a piece of extra wide double fold bias tape.


I also made a few trick or treat garlands for my bazaar booth.  I love the font, and think that it is perfect for halloween.  The font that I used was Arcanum, and it can be downloaded for free from urbanfonts.com.

What Halloween decor projects have you been working on?  What is your favorite holiday to decorate for?


Tuesday, September 13, 2011

Sewing For Baby: Pack and Play Sheets


With a toddler at home, I'm anticipating that our new baby will spend a lot more time in the port-a-crib than our first did.  With Clark I would throw down a blanket and let him have tummy time while I worked around the house.  Although Clark is a tender little guy, I'm pretty terrified that he is going to clobber our new baby and try carrying him around the house when I'm in the restroom or preparing dinner.  Hopefully we can use the pack and play to prevent that from happening.


Because I'm anticipating using our port-a-crib more, I figured that I should make up some sheets for it.
I found this great tutorial online by Modest Maven on how to make sheets for port-a-cribs, or pack and plays.  She claims that she can make these sheets up in 15 minutes, and I have to say that I believe her.  I made two different sheets, and probably got down to around 20 minutes each using my serger.  

Don't worry though, if you don't have a serger you could easily make these.  Hop on over to her blog for the full tutorial.

While we're on the topic, does anyone have any advice to share on helping toddlers adjust to a new sibling?  Clark is really excited, but I have a feeling that it is going to be harder than we expect for us all.


Monday, September 12, 2011

Rocket Ship Applique - Accuquilt Go! Baby Tutorial


A couple of weeks ago I mentioned that I am now part of the Accuquilt Go! Blogger incentive program.  Accuquilt contacted me, and asked me to both review their new Accuquilt Go! Baby fabric cutter and dies, and  also share some tutorials with my readers.  I very willingly accepted their offer.

I must say when I first heard from them I was thinking "hmmm...do they know that I've only made a couple of quilts in my lifetime".  I soon discovered that the Go! baby is very versatile, and can help streamline any type of sewing or craft related projects, it is NOT just for quilters.


My Go! baby fabric cutter is lightweight, portable, and extremely compact.  I especially love the fact that it is compact.  I have a small sewing area, and I don't have a lot of extra room to store my "toys".  Clark even refers to it as my "small machine".  One of the things that Accuquilt says about their products is that they are easy to use and very friendly to quilters/crafters that suffer from arthritis or other joint pain that prevents them from enjoying their crafts.  The Go! baby really cuts with ease, and Clark likes to help me by turning the handle as we cut out shapes. 

Not only is it easy to use, but it does everything that it says it will do.  I have used it to cut multiple layers of fabric, felt, and even faux leather (projects coming soon).  So as I'm sure you've gathered, I am very much in love with my new Go! baby fabric cutter, and would recommend it to any and all of you. September is the perfect time to start dropping hints about your holiday wish list.

22 Free Patterns - Download Now

Click on the badge above to get 22 free project patterns, just for subscribing by e-mail.  Even if you don't have one of their cutting machines yet, these projects are sure to provide you with some inspiration.

Now on with the tutorial.  For this Rocket Ship Applique tutorial, I used my Accuquilt Go! Half Square-4" Finished Triangle die.  When I was selecting my dies I knew that this would be a very versatile die.  Have you seen all of the fantastic chevron quilts out there?  If you haven't there are several tutorials done by Accuquilt bloggers that feature this same die.  I wanted to show the versatility of this die, and focus on the fact that you don't have to be a quilter to use this cutting system.

Go! Half Square-4" Finished Triangle
As you can see the die features clipped corners, and features quarter inch seam allowances.  It really takes so much of the work out of cutting.

Keep reading for the full tutorial on this fun and more dimensional rocket ship applique.

Wednesday, August 24, 2011

Nursery Decor: I am a Child of God, and Love You Printables


I recently created a few printable for a collage frame that we had hanging in the area of our baby's nursery. The frame was previously filled with our wedding photos, but I thought that it would only be appropriate to switch them out with something new.


I created these simple printables in Photoshop Elements. The love you print was inspired by a print that I saw on Pinterest.  The I am a child of God print is based on a children's song from church.  The files are designed for 5x7 prints.  You can find my files below.  They are free for your personal use.

I Am A Child Of God 5x7

I Love You 5x7

I Love You 8x10

Enjoy! Once our little one arrives we'll have to switch out that last wedding photo with a baby picture.

Tuesday, August 23, 2011

Nursery Decor: Bentwood Rocker Refinish


When we found out that this baby was going to be a boy I was relieved to know that we wouldn't have to build an entire baby wardrobe from scratch. Without the added expenses of new bedding, clothing, and toys, we were able to set aside a little bit of money to get a few additional baby supplies that we didn't have with Clark.  One thing that was on the top of my list was a rocking chair.  Clark wasn't/isn't much of a sleeper, and I remember many a night sitting on his bedroom floor, holding him in my arms, and rocking back and forth trying to get him to sleep.

I was really excited when I found an old bentwood rocker at our local thrift store.  New rocking chairs can be rather pricey, and I think that bentwood rockers have a lot of charm.  I bought the rocker immediately, and bungie corded into the back of our tiny corolla, and hauled it home.  I was especially excited about the possibilities of the rocker because I'd seen this before and after project from Crazy Domestic.


I was so excited about my new find, that I failed to take any before pictures of the rocker.  Just imagine a very damaged light finish, with rust colored tufted cushions.

I completely replaced the foam, and used some home decor fabric that I had in my stash for the cushions.

It's not perfect, but I'm pretty excited to have it in our little nursery.  Do you have a similar rocker to refinish?  If you do you can find the tutorial that I followed for refinishing the rocker here.


 Thanks for reading!


Monday, August 22, 2011

Nursery Decor: Embroidered Monogram


When I first started thinking of what I'd like to do in our nursery space, I knew that I wanted to have a large initial hung on the wall.  I'd planned on a large wooden letter, but I wasn't able to find anything in the scale or style that I'd wanted.  In the back of my mind was the thought that if I were to spend money on preparing for the baby, it should be on diapers and not decor.  So using what I had on hand, I came up with this simple embroidered initial for the space.


I used some gray duck cloth for the background, and then used several strands of green and navy embroidery thread to stitch the initial.  I used a simple chain stitch, and it actually came together quite quickly.  I would have liked to fill in the entire shape, but I didn't have enough thread on hand.


The decorations in this room are quite simple, but it is a temporary space at the end of our bedroom, and I didn't want to spend a fortune decorating.  I also didn't want to make any permanent changes to the room.


Nursery Decor: Paint Chip Mobile


I've been trying to spend a little bit of time (and very little money) on decorating our baby's "nursery".  One thing that I never made for Clark was a mobile, and I thought it would be a nice touch for the space he'll be occupying.

I've seen paint chip mobiles online, and thought that it would be an easy and inexpensive option. Most of the mobiles that I've looked at have circles in varying sizes and colors.  I chose to do that very thing.  The one change that I made to many that I've seen, is that I strung the double sided circles so that they were parallel to the floor, rather than perpendicular.


To make the mobile I used several scrapbook dies to cut out varying sizes of circles.  I had several different shades of blue, green, and gray.  I then glued the circles together with a glue stick and let them dry.  The structure of the mobile is two embroidery hoops that are attached with fishing line.  The smaller of the two hoops hangs down a couple of inches lower than the larger of the two.   I then strung the paint chip discs onto embroidery thread, and tied a knot beneath each disc.  I intentionally pierced the discs in different places when stringing them.  Offsetting the disc causes the discs to tilt at different angles, and I kind of liked the effect.


It was a pretty simple project, the most time consuming part was cutting out the circles.  I spent next to nothing on it, although I must admit that I wish I'd purchased some scrapbook paper rather than using paint chips, I feel a bit guilty about depleting the stores supply. I picked up the embroidery hoops at a local thrift store for twenty five cents a piece, and I had the embroidery thread on hand.

So there it is, the first piece of decor for our little one's nursery. I've got more to show you later this week.

Thanks for reading.