Search This Blog

Showing posts with label knits. Show all posts

Friday, May 2, 2014

The Lazy Saturday Maxi Dress: A Pattern Hybrid


It's Selfish Sewing Week over at Imagine Gnats, and I decided it was high time I did a bit more sewing for myself.  So, I busted out some ITY knit that I've had in my stash, and a couple of my favorite self drafted patterns, and created this super comfortable knit maxi dress.  I LOVE it.


First off, you can find the two projects that I combined to make this dress on my blog:  The Easy as Pie Tank Pattern was used to draft the neckline and arms, and the Lazy Saturday Shirt  uses a similar technique to shirr the extra material in the width of the dress. You can find my more information on the shirring technique used, here and here.

The Easy As Pie Tank has a dart included in the pattern, I didn't change that.  The shirring pulled in the extra material from the dart.  Using an existing maxi dress as a guide, I determined how long, and wide  I wanted my dress to be, and cut my fabric accordingly. 
  

I finished off the neck and arms using a technique similar to attaching ribbing.  The only difference was that my ITY knit didn't have quite as much stretch as my typical ribbed knits, so I used longer strips to finish them off?  Lost?  I'll have to do a ribbed knit technique tutorial in the future.  


The shirring pulls the dress in at the waist, and gives the dress a bit more shape.  After sewing up the dress, at the side and shoulder seams, I tried the dress on, and decided where I wanted my first row to start.  It was really a sew as you go type project.  The important thing to remember is that you don't want your shirred rows to start too high (like my Lazy Saturday Shirt), or the rows will be crawling up your bust.


This was a super quick sew, and well worth the time and material.  I love the finished product.  It might be the only selfish sewing project of the week, but I'm happy with it, so that is a win!

Monday, February 13, 2012

Tips Tricks and Techniques: Knit Appliques

Mom Heart Tattoo 

I love appliques, it is such a quick and easy way to dress up any shirt or onesie. I especially like using knit fabrics for appliques, not only are they soft, but they make appliqueing even easier because they don't fray like a quilters cotton. I thought that today I'd share some of my favorite supplies, stitches, and secrets to creating successful knit appliques.

You can read more below.

Tuesday, November 15, 2011

Nursing Sleep Bra: The Tutorial (with pattern)


A big thanks to all of those that expressed interest in this tutorial.  I love to hear from you and know what it is that you like.  It takes quite a bit of time and energy to write up tutorials and scan in patterns, so it was very nice to know that there was some interest in this one.

Before I get started I must apologize for these photos.  I hadn't looked through them until recently.  I noticed that there was a smudge on my lens in several of the photos, and some of them were taken at night with a flash, my apologies.


I mentioned in my initial post that this is a bra that I created by analyzing an existing sleep bra that I own.  Mine is a size medium, but according to the sizing chart on the manufacturers website, this medium sized bra can accommodate 34 D and E, 36 C and D, and 38 B.  I'll be providing a pdf pattern if you want to use mine, it's not perfect, but it worked for me.  

If you need a different size then I'd recommend either adding or subtracting from the seam allowances on the sides of the bra.  I'm assuming that there probably isn't a huge difference in the size of the front lapping pieces, but you could add a little extra room to the top of the front pattern pieces if your well endowed and would like more coverage.

Wednesday, October 26, 2011

Top-toberfest: Sweater Knit Cowl Neck Tunic


I thought that it would be fun to recreate a top from last year's Top-toberfest series and change it up just a bit. I thought that it would be a great way to show how easy it is to adjust your own patterns and create a new look. The cowl neck tee was a favorite of mine from last year, and the pattern was basic enough that I new it could be adjusted easily. I picked up some lightweight sweater knit, and felt that it was begging to be transformed into a fall tunic.

There's no new tutorial for this top, but you can see my post from last year on my cowl neck tee for links on drafting the pattern.


To adjust the pattern I first found a sweater with the same fit and length that I wanted in this top.  I then created a separate pattern piece for these sleeves by transferring the shape of the arm opening to my new pattern piece, and used my existing article of clothing as a guide.  


Rather than finishing off the sleeves with a hem I gave them a good pull when the top was completed.  The tension on the fabric caused the knit to curl up on the ends, just what I was hoping that it would do.


 I used an existing sweater dress/tunic that I have as a guide on determining the length of the top.  When adjusting the pattern I followed the basic shape of my garment.  This top fits rather close to the body, and the hem hits me about six inches below the hips.


A couple of basic adjustments to a pattern I love, and now I have a new top for the season. I had hoped to take a few pictures of me wearing it on Sunday, but by the time my husband was around for a photo shoot I was covered in spit up and chocolate finger prints.

Want to make the belt, you can find my tutorial here.

Don't forget to link up your tops to the Top-toberfest link party.


Monday, October 24, 2011

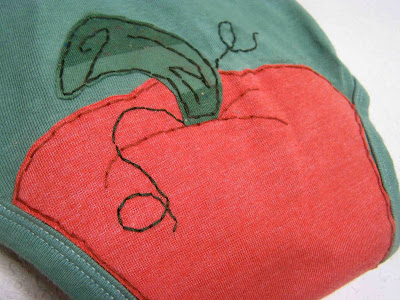
Top-toberfest: Lil' Pumpkin Appliqued Onesie Template


I thought that I'd share a Harvest/Halloween applique with you today.  I call it the "There's a pumpkin on my bumkin applique".  There are very few times in life when it's okay to have pictures or words plastered on your bottom, but the baby stage is one (if not the only) acceptable stage. Having boys, I don't get to indulge in ruffled bottom tights and bloomers, so an appliqued onesie will have to work.


It's a simple little applique that I designed.  I'll share the file with you so long as you respect that it is for personal use only.  The template is designed to fit a pre-washed Carter's 0-3 month onesie.  You can feel free to adjust it to different sizes.


My applique is done with some scrap knit fabric that I have had stashed away, heat and bond fusible adhesive,  some embroidery thread, and lightweight fusible interfacing.


Begin by applying the heat and bond to the wrong side of the fabric.  


Next transfer the image to the front side of the fabric using pattern marking/transfer paper. Cut out your pieces.


Adhere the applique pieces to the onesie.  I had the small pumpkin in the front, and the large pumpkin on the behind.  It should fit right in line with the seams and snaps on the onesie.


 I used my embroidery thread to do some hand stitching.  I feel that it adds some visual interest to the applique.  You could do some machine stitching around the images if you prefer.  If you are using a fabric that frays (knits generally won't) you will want to ensure that you either satin stitch (tight zig zag) around the image, or apply some sort of fray check or fray block to the raw edges.


Once I was done with the applique and hand stitching I used some fusible interfacing to secure the embroidery threads, and prevent the thread from irritating babies chest.


That's it.


A fun little applique for the season.

You can find the template here.  Once again, the template is for personal use only. Please link up the tops that you've been working on this year in the Top-toberfest link party.  


Friday, October 21, 2011

Top-toberfest: Turtleneck Refashion with Guest Blogger Emily


Today I'm so excited to have Emily from Replicate then Deviate.  Although I've never met her face to face, she is just about the sweetest thing.  She's always takes the time to comment on a post, and my fellow bloggers will understand that nothing keeps a crafter/blogger going like encouraging comments. Aside from being sweet, she's also very talented. She sews, she plays the piano, she cooks,  she's the mother to an adorable little girl, she's basically what we all want to be.  Today Emily is going to show us how she turned a couple of oversized turtleneck shirts into these cute crew neck tops. Here's Emily...


I got each of these turtlenecks for about a dollar. They were a few sizes too large for me, which is great for refashioning. Now they're some of my favorites.


I used a shirt that fit well (with a similar amount of stretch as the turtleneck) and traced the body of the shirt, adding my seam allowance. (I kept the bottom hem of the shirt in tact). If you want the neckline to be more scooped in the front, open up the shirt and line up the side seams (so you're only cutting one layer of the shirt instead of two). I left my necklines symmetrical.


I kept the original hem of the sleeve bottom as the bottom of my new sleeve. My grey shirt had three quarter length sleeves and I wanted half sleeves so I didn't trace the full length of the grey shirt sleeves. (make sure the fold of your shirts line up). I was able to keep the sleeve seam the same too (only cutting the top curve for the shoulder).


I sewed the body of the shirt, right sides together. I sewed the sleeves in (shirt inside out, sleeves right side out). (not pictured) Using the scraps from the side of the shirt, I cut some strips to bind the neckline. (both the shirt and the strips are doubled in this picture). Since the fabric isn't stretchy in this direction, I should've cut more. (more like 90% of the neckline, rather than 80%). I'll show you what to do if that happens to you too.


Even out your strips if necessary and sew short ends together to form a loop.


On the right side of your shirt, sew the binding while gently stretching the binding loop. Start in the back of your shirt.


Open up your loop and add another scrap if you need to. Since you started in the back, it won't be as obvious. Reclose the binding loop.


Fold the binding up and over the neckline (so the raw edge is now on the inside of the shirt) and sew with a decorative stitch.

Go model your shirt. Skirt refashioned and blogged here. (They matched great when I got dressed in the dark).


Thanks so much Emily,  I love a good refashion!

Want to share your latest tops or tees?  Link them up to the Top-toberfest link party.

Tuesday, August 9, 2011

Sewing For Baby: Baby Animal Hats

Source: Moth and Sparrow
Moth and Sparrow offers adorable free (for personal use) patterns for knit baby hats.  When I stumbled upon the image on Pinterest they were instantly added to my list of things to make to welcome baby. She offers patterns for A Fox, Raccoon, and an owl.


I couldn't resist turning the little owl pattern into a penguin hat.  I tilted and elongated the beak, and slightly altered the face shape.


The hats are easy to sew up, and don't take much time at all.  I left all of my raw edges unfinished....laziness mostly, but you really don't have to worry about knit fraying much.


If you're expecting a baby, or simply can't resist sewing up cute little things, then I highly recommend trying out this project.  I used scraps from my knit pile, but you could certainly cup up a soft old t-shirt or two to whip these up.


Tuesday, August 2, 2011

Sewing: Maternity Wear for Summer

I don't know why it's worked out this way, but with both of my pregnancies I've spent my third trimester in the hottest months of the year.  It is difficult to find maternity clothes that are attractive, but it's especially difficult to find maternity clothes that will keep you cool while covered.

I recently converted a pair of old Gap dress pants into these knee length maternity shorts.  I chopped them off, hemmed them up, and added a knit waistband following this tutorial from Grosgrain.


I also made a lightweight knit top that I love.  It has ruching on the sides, and has short sleeves.  I found the slub rayon knit at fabric.com, and only spent a couple of dollars on it.  The shirt is my own design, well actually a combination of a couple of different shirts that I own.  If I had more fabric, I'd sew up a few more to help me make it through the next eight weeks.

It is nice to have some lighter weight options for the summer heat.

Tuesday, March 15, 2011

Lace Trimmed Maternity Belly Bands: A Half Hearted Tutorial

My Sister-in-law's adorable pregnant belly.

When I was pregnant with Clark I really wanted to buy a maternity belly band.  The idea behind the product is that it is a comfortable and stretchy band that bridges the gap between pre-pregnancy and maternity clothes.  When your pants start getting so tight that you can't button them up, you leave them open, and wear a belly band over your pants.  It keeps your pants up, and also adds a bit of length to shirts that may become too short with a growing belly.  You are supposed to be able to wear the maternity bands through out pregnancy, and they should come in handy when your belly becomes too large for even your maternity clothes.  Commercial belly bands sell for more than I would like to pay for them.   


With this pregnancy I decided to make my own.  I've started sewing since my last pregnancy, and I realized just how easy these would be to make.


Do you want to make one?


Here's what you'll need:

-Stretch Lace (distance around your hips, plus one inch). My lace is about 3" wide.  I bought it here.
-Stretchy Knit fabric (I bought mine at Joann's, it isn't the interlock knit, it has a good four way stretch, and will really stretch with an expanding belly). You will want enough for the width of your band times two. I'd recommend anywhere from 14-18" of fabric.
-Coordinating thread
-Sewing machine with ball point needle
-Serger with ball point needle(s) *optional

Getting Started:

The first thing that you are going to want to do is determine the width and length of your maternity band. You want your band to fit snuggly around your hips, this will allow it to do it's job in holding up your pants.  You will also want it to stay up on your waist.  I chose to measure the smallest part of my waist, and cut my fabric 1 inch longer than the distance around my waist.  The cut measurements of my material were 14"x30". The finished dimensions of my band (not including the added width from the lace) are: 6 1/2 "x29".


NOTE: This method of determining the size of your band is assuming that you are using early pregnancy measurements.  The fabric should accommodate for great stretch.  If you are already quite round, you may want to cut your band so that it is about 2-3" smaller than the size of your belly.


Next cut your lace to the same length as your knit material (30 inches, or determined length).

If you have access to a serger I recommend finishing off the long sides of the belly band.


We are now going to attach the lace to the belly band.  You can do this a couple of different ways.  One option is to sew the lace to the top of the material.  The wrong side of the lace would be on the right side of the fabric.  I'd overlap the fabric by at least 1".  Use a three step zig zag stitch to stitch along the top edge of the lace, and also the bottom edge of the fabric.  Your lace should be attached at two points.


Another option is to place two top edge of the right side of the lace on the bottom edge of the right side of the fabric.  Pin in place as shown.  Use a triple stretch straight stitch (not zig zag) to attach the lace.  Stitch about 3/8" away from the edge of the lace and the fabric.  
Photo shows both methods of attaching lace.  The top band show the top stitching that allows seam allowance to lie flat.

Fold the lace down, and the seam allowance up so that your band lies flat.  Top stitch about 1/4 inch away from where the lace and fabric meet. (see photo above)

Next you will want to pin the short ends of your band together.  Make sure that right sides of the band are facing each other.

Stitch along the pinned edges.  Serge or overcast raw edges. Your band should now form a tube.


Now fold your material in half hot dog style.  You will want to meet up the edges of your knit material, with wrong sides together.  Pin together along the entire tube.  Use a triple stretch stitch to sew in place.


You're done.  That was easy wasn't it.  As you can see the top edge of the band is the folded edge of the material. I attempted a belly band with only one layer of the material, but it wasn't nearly as successful.  The top edge was always curling up, and wouldn't lay nicely.  The two layers of fabric were much more successful.

Sorry that I didn't have photos for every step.  I've been a half hearted documenter of my projects lately.  Please let me know if you have any questions, or need clarification.