Search This Blog

Friday, July 23, 2010

How to Make Paper Award Ribbons


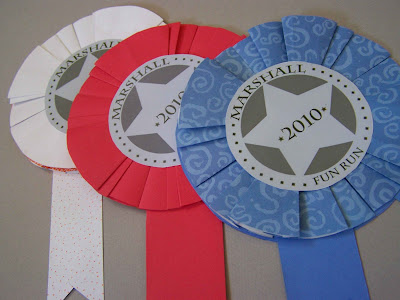
Ribbons for the oldest runner (most likely my dad), and the first woman runner.


Things are getting pretty busy around here.  I am gearing up for girl's camp next week, I am attempting to turn out a quiet book in record time, and the next three days are going to be devoted to a family reunion.  I am not quite sure how I am going to get things done.  I had intended on posting about how to sew with knits today, but I think that I will save that for when I get back from girl's camp.

I mentioned the family reunion, well my parents are planning it this year, and my dad organized a family fun run as part of the festivities.  My mom thought that ribbons were necessary.  I was given the responsibility with coming up with some sort of image for an award and some simple ribbons.  This is what I came up with.

I designed a simple medallion for the center of the ribbon using Photoshop, but you could do the same thing in most photo editing programs.  Because this is a Marshall family reunion I designed the medallion to look a bit like a Marshal badge.  I printed 6 off on a page and I was ready to go.  I searched through my box of old scrapbooking supplies and found several sheets of colored scrapbooking paper.  I used medium weight paper (not card stock) for this project.

Now lets get started.

To make one paper ribbon you will need:

2-3 sheets of medium weight scrapbooking paper
1 3 1/2" paper medallion printed as desired (birthday boy, princess, 1st place, last place, ect.)
2 paper tails for you ribbon (mine are 1 1/2" wide and about 6" long.
Glue stick or other adhesive
Tape
Bone folder *optional

Cut out  five 6" circles, I could get 4 out of a 12x12" sheet, or two from an 8 1/2x11.  Cut two tails from your remaining scraps of paper,  Cut a notch out of each end of your tails.

Fold in Half
Fold In Half Other Direction

Now we are going to fold our paper.  If you follow Make it and Love it, or Kojo Designs, they have used a similar folding technique in recent projects.  You will start by folding 4 of the 5 circles in half one way, and then in half the other way.  Your circle will be divided into equal quarters. You can use your bone folder to make your folds nice and crisp.


Push two sides in towards center and flatten


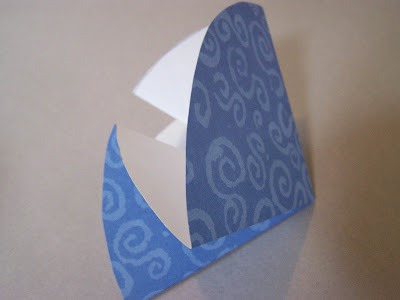
Now take two of the quarters of your circle and push them in towards the center of the circle.  Your new folds should meet up in the center.  Push your top quarter down on town and crease your new folds.  You should now have a wedge shaped piece of paper (when folded).  Now you could stop here, but you can continue on if you want your ribbon to look like mine.

Outer creases are bottom creases, middle crease is adjusted, and center is newly created.
This is a poor diagram to show the placement of the folds on the circle, but maybe it will help.

Now this is the portion that I don't really know how to explain.  You are going to adjust your folds and create an additional pleat so that your ribbon ends up looking like this.  Take the top side of your newly folded wedge piece of paper and adjust the edges so that they are slightly set in  from the creases on the bottom side of your wedge.  You will need to make new creases.  Now you will take the extra paper from your adjusted top pleat and make an additional pleat to sit on top.  This takes a bit of adjustment.  I wish that I had a better way to verbalize the process, but each ribbon was a bit of trial and error so I can't quite explain it properly.  Your wedge should maintain it's original size (which is a quarter circle).  When I unfolded one wedge it appeared to have 10 folding creases.  So maybe that will provide you with a bit of insight.

Front
Back-This is how your ribbon will look if you don't complete the last folding step.

You will repeat each of these steps on a total of four of your circles.  When you have four folded you will attach them in the center with a small piece of tape on front and back.

Now take your adhesive and glue your medallion to the center of the front of your medallion.

Take your two ribbon tails and secure them to the remaining 6" circle.  Mine overlapped the circle by about 1 1/2".

Apply adhesive to the paper circle and overlapped portion of the tails.  You will now attach your "bloom".  Press down your bloom and medallion so that they are securely attached.
1st, 2nd, and 3rd

You are done!  Now you can give away your beautiful paper ribbons at your family's fun run....if there is anyone else out there that does that.

If you are done and you didn't end up with a beautiful ribbon let me know.  I'd be happy to attempt to answer any questions.


Thursday, July 22, 2010

Freezer Paper Stencil Meets Embroidery Hoop


The Finished Project


Before Freezer Paper Stenciling 


If you remember a little while back I shared some of my favorite ways to display fabric.  I absolutely love stretching fabric in embroidery hoops, it is such a quick way to add a bit of color to your walls.  I also shared a couple of photos of a few hoops that I have hanging in my craft/computer room.  I really like them on the wall, but two of them were solid fabrics and needed a little something more.  Originally I thought that I'd create a freezer paper stencil and make a silhouette of my son's face, but I decided against it (mostly because I can't get him to sit still without looking directly at the camera).  So instead of the silhouette, and instead of  doing a large initial (which I also considered), I decided on a fairly simple shape that would add a little something extra.

I found my image on a website called craftsmanspace.com I have referenced them before, but they have an archive of free patterns for download.  I think that it is primarily a wood workers website, but they have beautiful scroll saw patterns that can be used in a multitude of projects.  I decided on this rather decorative organic shape that was simple enough that I wouldn't be cutting out tiny pieces for hours on end.

Traced Image
I started by pulling my design element into Photoshop and resizing it.  After I had my shape the desired size I printed it off, laid it underneath my freezer paper and traced my image.  I know that everyone out there has their own tutorial for freezer paper stenciling, but if you've never tried this project here is a bit of basic information.  You buy freezer paper in the paper goods section, near the aluminum foil or plastic wrap.  It comes in a roll and has one matte papery side, and one shiny wax side.  The wax side adheres to the fabric, so you will want to trace your image onto the matte papery side.


Because we are making a stencil the actual shape or image is going to be removed leaving a border that will serve as the stencil. After tracing the image I made several x's in my image area (the portion that will be cut away).  This step just helps me keep things straight.  I know exactly what is to be removed and what is staying.   Using an X-acto knife I carefully cut away my image (be careful not to cut into the stencil area).


Now tear off a piece of freezer paper that is as large as your stencil.  You will place the solid piece of freezer paper beneath your piece of fabric with waxy side toward the fabric.  Iron the fabric to adhere this piece to your fabric.  This step stabilizes your fabric and will prevent paint from seeping through the fabric.  Now center your stencil on top of your fabric adjusting any parts that might need repositioning.  After your stencil is laid out as you want it adhere this stencil to your fabric using a hot iron.  Make sure that all of the edges are adhered, any puckers in the paper will result in paint seeping beneath the stencil. 


Once your stencil is securely attached it is time to paint.  Now if you are creating a freezer paper stencil for a piece of clothing or an item that will be worn or washed, you will want to make sure and use a flexible fabric paint.  This can be purchased at Joann's or Michael's for a couple of dollars.  I used Tulip brand fabric paint and it worked well.  In this particular project you could probably get away with using an acrylic paint just because it will not likely be washed.  Apply thin coats of paint using an up and down motion.  Allow paint to dry between coats.  I ended up using 2 coats of paint.  There are special round flat stencil brushes available, but you could get away with using a normal sponge brush.  Allow your paint to set according to instructions.  Tulip brand paint is supposed to be set in 4 hours, but other brands require heat setting with an iron, so read the package during use.

After the paint has set you can remove your freezer paper.  This is always a bit exciting/nerve wracking to me.  Simply pull off your paper on the front and back of your fabric.  If paint has seeped under your stencil, which it always seems to do to some degree or another, you can touch up your shape using paint and a detailed paint brush, or you can attempt to scrape off excess paint by carefully using the side of your x-acto knife. 


If you are going to stretch your fabric in an embroidery hoop you can follow the instructions here.  That's it.  You've created a lovely little dandy for your wall. 

Freezer paper stencils can be used for many different things.  I just finished up a project of stenciling 12 different nylon bags for girl camp (the image was a bit too detailed, and the freezer paper didn't love the nylon bag fabric, but they turned out cute).  You could also use the freezer paper stencil to personalize pillow cases, sweatshirts, ect.  

Wednesday, July 21, 2010

Chunky Braided Bracelet Tutorial


Yesterday in my post I mentioned that I really loved the bracelet that I was wearing with my "Warhol Top", well today I am going to show you just how to make it.  I had hoped to make a video on top of some step by step photos, but I had a migraine yesterday and it kind of killed that idea.  Hopefully the photos will do.  The bracelets are super simple to make, but maybe not so simple to explain.  I'll do my best.


After making my Yoga pants and my Warhol Top I was left with several half-shirts and strips of fabric.  I couldn't bring myself to throw them away so I held onto them knowing that I could make something wonderful out of them (originally I figured a headband-shocking I know), and I did-these simple braided bracelets.  I have been assisting our girl's camp director in  making friendship bracelets for our upcoming girl's camp-so it was fresh on my mind.  I sat down and was chatting with my husband and fiddling around with a scrap of knit fabric from my yoga paints when this little dandy emerged. Now let's dive right in.

Cut your fabric:  For the white bracelet that you will see I used three strips of 1"wide (this can be increased or decreased to vary the width of bracelet) fabric that was cut 69" long if you have small wrists your pieces of fabric could be shorter, but I'd try to have pieces that are at least 55" in length.

Fold your fabric in half lengthwise.  You are going to find the center of your strips of fabric and you will tie a knot about an inch down from the center of your strips of fabric.  This loop that is created by the knot is going to be the loop for your button closure. You will no have 6 strands of equal length fabric.

For the tutorial I've used Red, Yellow, and blue fabrics so you can clearly see which strands I am using-don't worry I will not be wearing this bracelet.


Braiding Step 1: Divide your 6 strands of fabric into three sections.  You will have a middle section that will act as the center of your braid (blue) and two strands on each side that you will use to form your knots.  Take the two strands on the left hand side (red) of your bracelet and create a loop by placing your strands across (on top) of your center strands (blue).  It should look somewhat like a number 9.


Braiding Step 2: Take the two strands of fabric on the right hand side(yellow) and place them on top of the tail end of your (red) left hand strands.  Now move your right hand strands (yellow) under the center strand and through the loop that you created with your left hand (red) strand. Pull both the right and left hand strands tight to create your first knot.


Braiding Step 3: Step 3 and 4 are going to be the opposite of one and two. We will start by taking our right hand strand (red) and crossing it's tail end over the top of the center strand, creating a loop on the right hand side of our center strands.  It should look like a letter P.


Braiding Step 4: Take your left hand strands and place them on top of the tail end of the right hand strands and move them under the center strands and up through the loop on the right hand side.  Pull tight.  You've just created the four basic steps for the bracelet.


Repeat braiding steps 1-4 until desired bracelet length is reached.


When your bracelet is the correct length you will want to tie a simple knot to the end, pull it tight, and trim the ends of your strings.

Now that we have our bracelet braided we are going to attach a covered button.  This is a super simple process, and I don't mean to insult anyone's intelligence, but I thought I'd show some basic steps to remove any fears that might be out there.  To cover a button this is what we need to do.

Gather your materials.  You can buy a kit at any craft store or craft department.  This kit cost just over a dollar for 4 buttons.  You will need your kit which includes the needed tools, and a scrap of fabric that is slightly larger than your button.


Place the scrap of fabric in the indentation of the white button covering tool. Place the domed shell of your button directly on top of the scrap of fabric.


Tuck in the edges of your fabric so that they are all pointed toward the center of the button. Place the back of the button on top of the fabric and front of the button.  Make sure that you can't see any raw edges of your fabric.


Take your blue push tool and place it on top of the backside of the button.  Firmly press down and secure your button.


That's it-you have a beautifully covered button.

Now it is time to attach the button.  I use a doubled thread and tie the button directly onto the knotted end of the bracelet (not the loop end).  Don't worry I am not going to show you how to sew on a button.  Do secure the button several times so that it doesn't pull loose.


You now have a beautiful braided bracelet, and better still you used up your scraps of knit (and no sewing required).

You can make variations to this bracelet by alternating colors of looping fabric, or using multiple colors as in the example (but please don't use yellow and red).

By the Way-I'm planning a post on how to sew with knit fabrics, if you have any helpful tips that I should share please let me know.


Tuesday, July 20, 2010

I MADE Modifications-Warhol Dress and Shirt

Please forgive the wrinkles.

Last week I mentioned that the Warhol dress from Dana at MADE was on my project to do list. I finally got around to making it. I started out using a that bright yellow T-shirt that you saw in the photo of my previous post, and added a royal blue shirt that I've had for 10+ years (isn't it sad that I'd held on to it for that long?). The blue shirt had yellow stitching around the hem so I thought that the two shirts paired well together. The pattern really was simple to follow. I had a difficult time determining how long I should make the collar (because I didn't have a model to try it on) right now it looks quite long, but I can always take it in when I need to.


After making the adorable dress I knew that I really wanted to convert the pattern into a top for myself.  I  laid out the toddler dress pattern, stacked a tank top of mine on top, and then adjusted the pattern as needed (factoring in seam allowance, and adjusting the width of the pattern so it would wrap around my trunk).  I had to cut the V neck off of my striped t-shirt so I basically kept all of the length of the t-shirt.  When it came to making the collar I believe that I used a strip 8 inches wide.  I also cut three  23"strips which I sewed together to  create 1 long strip.  The collar ended up being the perfect length. After I had the body of the shirt sewn together I tried it on to determine the position of the collar.


I had planned on adding pockets to the front of the shirt or maybe a ruffle of contrasting color just below the collar, but it didn't happen.  Maybe next time.  I really like the fit of the shirt and like the way that it turned out.  (and I really love my jersey knit bracelets seen in the photos-come back tomorrow for a tutorial).

The most difficult part of this particular project was the fact that I was working with knit.  I am relatively new to sewing, and I don't have much experience working with knit. The Yoga Pants from a couple of weeks ago were much prettier on the outside than the inside. Luckily, the night before I started this project I stumbled upon some helpful information.  Here are some tips and tricks that I found.


Made by Rae shared that you can stack thin paper on top of your knits to fool your machine.  Instead of thinking that it is sewing knits it thinks that it is sewing paper (which technically it is sewing both).  Rae suggests cutting pieces of paper to match the curves of your pattern pieces, but I was too lazy.  I used one piece of paper, placed it on the bottom of my stack of fabric, and it worked like a dream.  The paper is perforated by the needle and easily pulls away after stitching.  If you have any pieces of paper left behind, I've found that it is easy to dislodge them with a pair of tweezers.

I can't remember the exact source, but I recently read that they make Jersey knit needles for your sewing machine.  I don't actually own any (I looked yesterday without luck), but they are supposed to push through the fabric rather than piercing it like a universal sewing needle does.

Sew Mama Sew also offers these tips for working with knit.

I hope that these tips help you in your knit sewing projects.