Search This Blog

Showing posts with label child craft. Show all posts

Wednesday, January 25, 2012

Cardboard RocketShip with Template


I've got a fun little project to share today.  This is a cardboard rocket ship that Clark and I made out of some cardboard that we've had stored. 

Crafting with kids can sometimes be frustrating.  I like to keep the crafts simple and quick. We turned this little rocket ship into a birthday card for Clark's Papa.  On the back we wrote: "Hope your birthday's a blast".  This is could a really fun homemade valentine as well.  


We gathered up our colorful cardboard, though I really wish we'd used some old cereal or kleenex boxes.  This cardboard was a bit too thick for the project.  You want it to be thin enough to cut through (especially for little hands), and rigid enough to keep it's shape.  You can find my printable rocket ship template here. The basic instructions are included on the template.

We added a small picture of clark to personalize the rocket a bit, but you could decorate with stickers, markers, glitter, etc.

Now have fun crafting with your kids/grandkids.

Wednesday, September 1, 2010

How to make a Mod Podged Puzzle


The puzzle pieces aren't laying flat in this picture, the pieces do fit together nicely normally.
We are kicking off Stashbusting September with this wonderful Mod Podged Puzzle.  I have several white backer boards that I use for mailing my prints, unfortunately I have several that are a bit beaten up.  I chose to make this simple little puzzle with my battered boards, and an irregularly formatted print of Meadow Moose.

I thought that it would be fun to have a few more simple puzzles in the house.  I chose to make an eight piece puzzle, but of course you could increase or decrease the number of pieces to fit your families needs.

Want to learn how to make it?  Buckle up and let's go. 

Friday, July 23, 2010

How to Make Paper Award Ribbons


Ribbons for the oldest runner (most likely my dad), and the first woman runner.


Things are getting pretty busy around here.  I am gearing up for girl's camp next week, I am attempting to turn out a quiet book in record time, and the next three days are going to be devoted to a family reunion.  I am not quite sure how I am going to get things done.  I had intended on posting about how to sew with knits today, but I think that I will save that for when I get back from girl's camp.

I mentioned the family reunion, well my parents are planning it this year, and my dad organized a family fun run as part of the festivities.  My mom thought that ribbons were necessary.  I was given the responsibility with coming up with some sort of image for an award and some simple ribbons.  This is what I came up with.

I designed a simple medallion for the center of the ribbon using Photoshop, but you could do the same thing in most photo editing programs.  Because this is a Marshall family reunion I designed the medallion to look a bit like a Marshal badge.  I printed 6 off on a page and I was ready to go.  I searched through my box of old scrapbooking supplies and found several sheets of colored scrapbooking paper.  I used medium weight paper (not card stock) for this project.

Now lets get started.

To make one paper ribbon you will need:

2-3 sheets of medium weight scrapbooking paper
1 3 1/2" paper medallion printed as desired (birthday boy, princess, 1st place, last place, ect.)
2 paper tails for you ribbon (mine are 1 1/2" wide and about 6" long.
Glue stick or other adhesive
Tape
Bone folder *optional

Cut out  five 6" circles, I could get 4 out of a 12x12" sheet, or two from an 8 1/2x11.  Cut two tails from your remaining scraps of paper,  Cut a notch out of each end of your tails.

Fold in Half
Fold In Half Other Direction

Now we are going to fold our paper.  If you follow Make it and Love it, or Kojo Designs, they have used a similar folding technique in recent projects.  You will start by folding 4 of the 5 circles in half one way, and then in half the other way.  Your circle will be divided into equal quarters. You can use your bone folder to make your folds nice and crisp.


Push two sides in towards center and flatten


Now take two of the quarters of your circle and push them in towards the center of the circle.  Your new folds should meet up in the center.  Push your top quarter down on town and crease your new folds.  You should now have a wedge shaped piece of paper (when folded).  Now you could stop here, but you can continue on if you want your ribbon to look like mine.

Outer creases are bottom creases, middle crease is adjusted, and center is newly created.
This is a poor diagram to show the placement of the folds on the circle, but maybe it will help.

Now this is the portion that I don't really know how to explain.  You are going to adjust your folds and create an additional pleat so that your ribbon ends up looking like this.  Take the top side of your newly folded wedge piece of paper and adjust the edges so that they are slightly set in  from the creases on the bottom side of your wedge.  You will need to make new creases.  Now you will take the extra paper from your adjusted top pleat and make an additional pleat to sit on top.  This takes a bit of adjustment.  I wish that I had a better way to verbalize the process, but each ribbon was a bit of trial and error so I can't quite explain it properly.  Your wedge should maintain it's original size (which is a quarter circle).  When I unfolded one wedge it appeared to have 10 folding creases.  So maybe that will provide you with a bit of insight.

Front
Back-This is how your ribbon will look if you don't complete the last folding step.

You will repeat each of these steps on a total of four of your circles.  When you have four folded you will attach them in the center with a small piece of tape on front and back.

Now take your adhesive and glue your medallion to the center of the front of your medallion.

Take your two ribbon tails and secure them to the remaining 6" circle.  Mine overlapped the circle by about 1 1/2".

Apply adhesive to the paper circle and overlapped portion of the tails.  You will now attach your "bloom".  Press down your bloom and medallion so that they are securely attached.
1st, 2nd, and 3rd

You are done!  Now you can give away your beautiful paper ribbons at your family's fun run....if there is anyone else out there that does that.

If you are done and you didn't end up with a beautiful ribbon let me know.  I'd be happy to attempt to answer any questions.



Friday, June 25, 2010

Cardboard Creature Update

For those of you who are interested, I just posted templates for the cardboard creatures.  You can find the links at the bottom of the original Cardboard Creature post.  Enjoy.  Let me know how you like making them.

Thursday, June 24, 2010

Meet Our New Cardboard Friends


A couple of days ago I was staring at a couple of cardboard boxes that I needed to clear out of my house, and I had what I thought to be a great idea. It was probably inspired by the great book index cards that I featured on Monday, but either way, I am super pleased with our fun little project.

I decided to involve my 20 month old in the material preparation process. We broke down our cardboard box, ripped the sides apart, and began painting. Clark really loves to paint. I think that it is a great way to expose him to colors. We painted both sides of our pieces of cardboard. I painted the tops shades of the primary and secondary colors (one greens, one purples, one reds, ect.) The back of those pieces of cardboard I painted a different color. You could combine any two colors that you wanted, but this is how I paired my top and bottom colors: yellow/green, red/orange, blue/purple. Clark really enjoyed painting and getting dirty. I really enjoy it when I can involve him in my arts and crafts. It seems like most of the time I am asking him not to touch this, or do that, so when I can ask him to do specific tasks and participate I really like it.

After the pieces were painted and dried I sketched out some basic shapes for animal body parts and cut them out. Next I cut small slits in my shapes to allow the pieces to slide onto one another. If you decide to try this take care not to make your slits too large or they won't stay securely in place.


I ended up making an elephant, a lion, and a giraffe (can you guess which is my favorite?). I am really thinking that the mama elephant needs a little baby by her side. These little cardboard figures aren't very refined, but they were a lot of fun to make. I enjoyed putting some texture in the Lion's mane. If anyone is interested in making these just let me know. I would be more than happy to draw up some quick little templates for you. We have some painted cardboard remaining; I might have to come up with a few more little friends.

This is a craft quickie, and a great way to reuse, repurpose, upcycle (whatever you want to call it) your old cardboard boxes.

Comments, suggestions, and questions are always welcome.

UPDATE: Get your templates here: Lion, Elephant, or Giraffe.

Saturday, May 22, 2010

Quiet Book, What time is it?


I think that anyone that had a quiet book growing up probably had a clock page. This is to teach kids to tell time and of course recognize numbers. Each color or shape on the clock has it's own layer of fabric and lining. I stitched the numbers onto the face of the clock and then pinned them all to the page and finished the ends. This page I used cotton fabric so I made sure to use either a machine blanket stitch or zig zag stitch to finish my edges. For the hands on the clock I used some colored pieces of plastic that were from some packaging materials for our mouse. I pushed a hole through each of the pieces of plastic using an awl (a larger needle would work as well) and then attached the button and the hands to the book. Select a button that has a loop and not the two or four hole attachment pattern.

Quiet Book, Dog


I had really wanted to put a dog page in Clark's quiet book, but I never got around to it. I still have time though due to the fact that you can add and subtract pages with the ring/buttonhole system of binding the pages together.

The purpose of this page is simply to help children learn to work a buckle. The collar that I used was a cat collar. I found it at Michael's for $1. 00. I drew out the design of the dog, cut out coordinating spots, a tongue, nose, and a tag for his collar (I really like the doggy bone detail). I was nervous that my machine wouldn't handle sewing through the collar, but it wasn't a challenge at all. When positioning the collar I think that the thing to remember is to cut is slightly longer that you need it. I cut the collar, turned the first end in 1/2 inch and used a triple stitch to reinforce it. After you have attached one side you need to turn in the other end and pin it in place. Once it is pinned in place you can unbuckle the collar and have easy access to your raw edge. I also zig zagged the raw edges down to prevent fraying. For the eyes of the dog I used some simple (non googly) eyes that you can purchase in the doll/stuffed animal section of most craft stores. I have seen them in both Joann's and Michaels. Once they are attached you will need to clip the ends. I used some wire cutters and just clipped them right off. You will want to leave a very small nub so that the backing doesn't fall off, but make sure that they don't stick out enough to interfere with the backside of your page.

Quiet Book, Key to my Heart


I know that you all are probably hoping for something other than quiet book posts, I'll get there. I just have to get through the pages. Hopefully by Monday I'll have a different project to share. I am working on several projects.

Because of pure blogging laziness, this will be a one picture post. For Clark's quiet book I made a lock and key page that was a treasure chest. The only problem is that for the treasure I used several jeweled and metallic buttons. I just couldn't in good conscience give -D- a quiet book choking hazard. I think that this is another fun option. It is a heart that is locked. It can be opened and reveals a photo of a loved one. It says 'You have the key to my heart", cheesy I know, but oh so sweet.

In this particular case Danny's grandmother lives quite far away, she wanted him to have a picture of her with her name nearby so that he could remember her and what she looks like. I made the photo pouch out of a medium weight vinyl and stitched. It was the first time that I had sewn with vinyl, but I was quite pleased with the results. Even though the vinyl wouldn't fray, I chose to do a double-fold hem to provide stability at the pocket opening. The thing to remember when doing this is that you need to size your photo pocket so that it doesn't show when the heart is closed. You can also select the photo and measure it's size before you design your heart.

On either side of the photo pocket I stitched Danny's grandmother's name "Abuelita -----" (not pictured) so that he could not only recognize her face, but also her name.

It is a cute little page that is very personal and quite fun for little ones. My son loves opening up his treasure chest, and it seems like most little kids love keys.

Sorry about the washed out photo (blogger laziness once again).

Thursday, May 20, 2010

Quiet Book page, Crayon Caddy


You have probably seen all of the really neat crayon caddies and wallets out there. I think that they are great and very helpful in carrying your crayons to church or transporting them in the diaper bag. When I started out making my son's quiet book I really wanted to incorporate the idea. Adding a quiet book page that is a crayon caddy means that you have one less thing to stuff into your bag when getting it ready to go. You simply have to remember the quiet book, and you already have crayons and paper.

This page is quite simple to make. I used a soft patterned flannel for the caddy (this is the same fabric that I used on the inside of the cover). I used a double layer of flannel to add more stability to the case. I also edged it with some coordinating ribbon. Because I had planned on having slots for crayons, paper, and pens I had to determine how long and wide I wanted my slots to be. I needed more fabric to stabilize the notepad than the crayons. I knew that I only wanted to fabric to hit the crayons just above half way up the length of the crayon. I measured, marked, and stitched at the bottom. The crayons that I was using were thinner than crayola crayons or chunky crayons, but I wanted to make sure that the caddy could accommodate different types of crayons. Hopefully the quiet book outlasts the crayons, right. I measured how wide I wanted each of the crayon pockets to be and stitched in equal increments. On the other half of the page I made a pocket for the note pad and two slots for a pen or pencil. I think that it is pretty effective, and pretty cute.

Quiet Book page, Lacing a shoe


Oh the infamous shoe lacing page. This is a quiet book page that has been in books for years, and with good reason. I think that it is a great way to teach your toddler or child bothlacing and tying skills. I must admit that this was the page that I saved for last. I have just had major issue with so many of the shoe pages that I have seen. It is really difficult to find a good view of the shoe that still allows for proper lacing and tying of the shoe. I had intended on including this quiet book page in Clark's book, but in the end I changed it to a football lacing page.


Although I dreaded making this page, and I will admit that I am not thrilled with the result, it isn't the worst that I have seen. I tried to add little details that would distract from the awkward angle of the shoe. I added some personalized labels to the shoe , the tongue has the letter "D", and on the insole it says "Danny" (it was supposed to say Danny's kicks, but I ran out of room). I also really like the combination of colors. I think that the dark blue, the apple green, and the orange stitching look really nice together. I chose to use eyelets for ease of lacing. On Clark's football I used a small buttonhole stitch that also worked well, but for the shoe I prefer the eyelets. One of the problems that I had was finding shoe laces that were short enough for the lacing on the page. I think that I ended up getting 30" laces. The lace is a bit longer than I would like, but it may end up making the lace learning process easier for little hands.


Wednesday, May 19, 2010

Quiet book pages, Tic Tac Toe


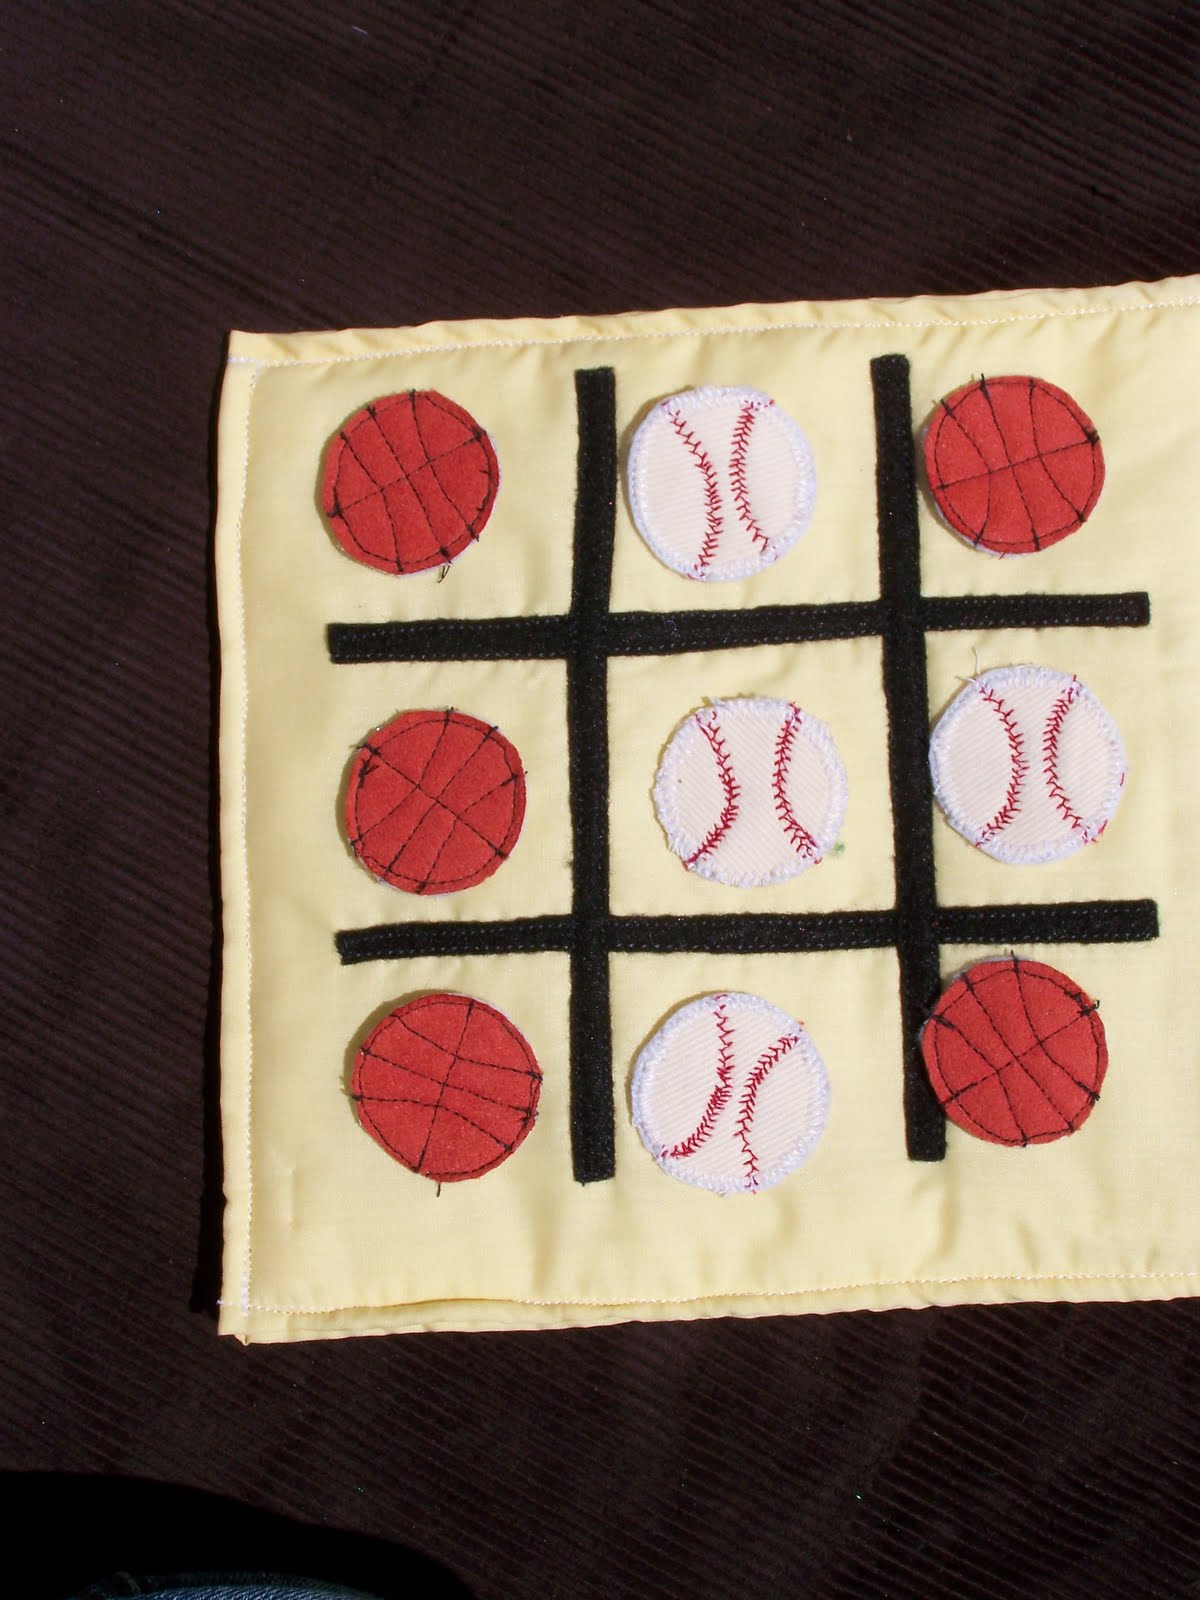
I think that it is nice to have a gender neutral pages in a quiet book, and by all means I understand that girls like and play sports as well, but I just think that it is nice to have a sports page for the little boys that have to spend most of their time buttoning on flowers. I have seen tic tac toe pages in other quiet books, but I think that this version is a lot of fun, I call it "tic tac toe-three balls in a row". In Clark's book this page consisted of footballs and basketballs. I really wasn't pleased with how the footballs turned out, but I think that these baseballs are a lot of fun. I traced the bottom of a spool to make the circles and then used the spool to mark the arcs in both the basketballs and the baseballs. The trickiest part about this page is stitching the baseballs. I adjusted a decorative stitch on my sewing machine so that it was the best proportion to my circle and then hoped for the best and started stitching. The baseballs are by no means perfect, but are homemade things supposed to be perfect?

The basketballs and baseballs attach with velcro. Snaps could be used, but I think that velcro is much easier for young children. Even if your toddler isn't able to play tic tac toe yet, they will have fun pulling off the balls and repositioning them.

In my son's book I used a decorative stitch for the tic tac toe board, but I chose to use felt for Danny's. The decorative stitches on my machine like to skip so felt seemed like a better option.
I think that it is a good idea to make a few spare pieces for your tic tac toe board. I have seen quiet books that include a pocket on the page, but I wanted to have my board as big as possible on the page. I figure that spare pieces can be kept in the pocket on the back of the cover.

Quiet Book Pages, Vegetable Garden

This is one of my favorite pages in the quiet book, it is also one of my son's favorite pages. He loves to pull the vegetables out of the ground. This is the second version of this page that I have made. In my son's book I didn't have quite as many details (the sign is absent, and the green leafs are a bit simpler), I think that this attempt was much more successful. It is a bit easier on the eye. In my son's book I chose not to use any felt. I don't know why, buy I was just really anti felt and wanted to use "real" fabric. Felt has made my life so much easier, and I really don't think that it looks bad at all. Now the thing that is hard to look at is my son's book with all of the finished edges. It is really hard to finish edges on leafs and small little corners. I love that you can just add some topstitching to felt and it looks finished. Felt....oh what a blessing. You will probably notice that I didn't use Felt for everything. The vegetables in the garden are actually made from fabric, but I just fabrics that won't fray.


I used my button hole stitch on my machine to make the slots for the vegetables to be pulled. It seems to work well. I made the holes just barely bigger than the carrots. They are actually a bit smaller than the beets (or whatever they are), this is nice because then the vegetables don't fall out of the book on their own. You have probably noticed that there is velcro stitched in the bottom right corner, this allows for repositioning of the vegetables. I am quite pleased with how the page turned out....if only the beets didn't look like strawberries.

Quiet Book Pages, Love Letters


As Promised Here are some pictures from Danny's Quiet book. I love these pages for the mailbox. Danny's grandmother thought that it would be fun to have a page where Danny could learn to make sentences like "I love Mami". I thought that the mailbox would be the perfect pocket for all of those love letters to mom.


One of the great things about quiet books or activity books is that you are able to keep your kids busy, but also allow them to learn new things and develop new skills. This particular page allows for development of sentence structuring skills, and also the development of motor skills as children open and close the mailbox, rotate the mailbox flag, and pull and place the velcro attached envelopes.


I think that it is so much fun to personalize the pages. This particular mailbox is personalized with a last name stitched on the mailbox, and with personalized envelopes. So now Danny can make sentences like: "I love Mami", "Daddy loves Danny", "I love Abuelita", ect.


Quiet books are fun to make because you are ultimately in control of how much detail you put in. I personally like a fair amount of detail, but I try not to go overboard. The stamps for example are there, but I didn't make a full scene or image on each stamp (which I considered doing). I think that the small block of color is sufficient for the project. I prefer stitching letters on the page with embroidery floss rather than using paint pens. I just think that it compliments the materials better. Quiet books also take a great deal of time and work. I want the book to last a long time, and I also want to be satisfied when I am looking at it. In my opinion there is nothing worse than staring at something you made and wishing that you had done things differently.

A few tips if you decide that you want to try this project:
  • Use the soft side of the velcro on the backs of the envelopes so that it doesn't stick to the inside of the mailbox and pull on the felt.
  • Use two layers of felt instead of one in the areas that will be handled most (flag, mailbox shell, mailbox flap, and also the envelopes).
  • Stitch details such as names or stamps onto 1 layer of felt and encase the strings and ends with the second layer of felt.