 |
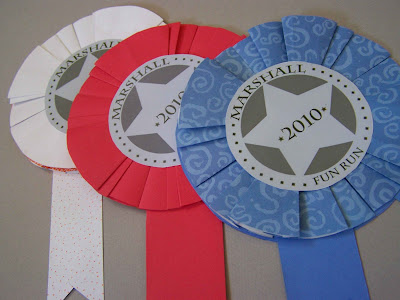
| Ribbons for the oldest runner (most likely my dad), and the first woman runner. |
Things are getting pretty busy around here. I am gearing up for girl's camp next week, I am attempting to turn out a quiet book in record time, and the next three days are going to be devoted to a family reunion. I am not quite sure how I am going to get things done. I had intended on posting about how to sew with knits today, but I think that I will save that for when I get back from girl's camp.
I mentioned the family reunion, well my parents are planning it this year, and my dad organized a family fun run as part of the festivities. My mom thought that ribbons were necessary. I was given the responsibility with coming up with some sort of image for an award and some simple ribbons. This is what I came up with.
I designed a simple medallion for the center of the ribbon using Photoshop, but you could do the same thing in most photo editing programs. Because this is a Marshall family reunion I designed the medallion to look a bit like a Marshal badge. I printed 6 off on a page and I was ready to go. I searched through my box of old scrapbooking supplies and found several sheets of colored scrapbooking paper. I used medium weight paper (not card stock) for this project.
Now lets get started.
To make one paper ribbon you will need:
2-3 sheets of medium weight scrapbooking paper
1 3 1/2" paper medallion printed as desired (birthday boy, princess, 1st place, last place, ect.)
2 paper tails for you ribbon (mine are 1 1/2" wide and about 6" long.
Glue stick or other adhesive
Tape
Bone folder *optional
Cut out five 6" circles, I could get 4 out of a 12x12" sheet, or two from an 8 1/2x11. Cut two tails from your remaining scraps of paper, Cut a notch out of each end of your tails.
 |
| Fold in Half |
 |
| Fold In Half Other Direction |
Now we are going to fold our paper. If you follow Make it and Love it, or Kojo Designs, they have used a similar folding technique in recent projects. You will start by folding 4 of the 5 circles in half one way, and then in half the other way. Your circle will be divided into equal quarters. You can use your bone folder to make your folds nice and crisp.
 |
| Push two sides in towards center and flatten |
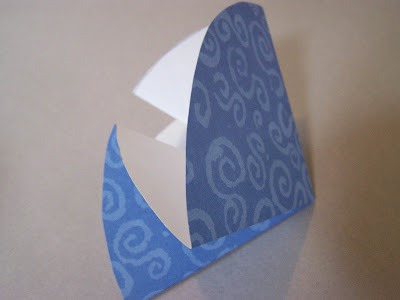
Now take two of the quarters of your circle and push them in towards the center of the circle. Your new folds should meet up in the center. Push your top quarter down on town and crease your new folds. You should now have a wedge shaped piece of paper (when folded). Now you could stop here, but you can continue on if you want your ribbon to look like mine.
Now this is the portion that I don't really know how to explain. You are going to adjust your folds and create an additional pleat so that your ribbon ends up looking like this. Take the top side of your newly folded wedge piece of paper and adjust the edges so that they are slightly set in from the creases on the bottom side of your wedge. You will need to make new creases. Now you will take the extra paper from your adjusted top pleat and make an additional pleat to sit on top. This takes a bit of adjustment. I wish that I had a better way to verbalize the process, but each ribbon was a bit of trial and error so I can't quite explain it properly. Your wedge should maintain it's original size (which is a quarter circle). When I unfolded one wedge it appeared to have 10 folding creases. So maybe that will provide you with a bit of insight.
 |
| Outer creases are bottom creases, middle crease is adjusted, and center is newly created. |
 |
| Front |
 |
| Back-This is how your ribbon will look if you don't complete the last folding step. |
You will repeat each of these steps on a total of four of your circles. When you have four folded you will attach them in the center with a small piece of tape on front and back.
Now take your adhesive and glue your medallion to the center of the front of your medallion.
Take your two ribbon tails and secure them to the remaining 6" circle. Mine overlapped the circle by about 1 1/2".
Apply adhesive to the paper circle and overlapped portion of the tails. You will now attach your "bloom". Press down your bloom and medallion so that they are securely attached.
 |
| 1st, 2nd, and 3rd |
You are done! Now you can give away your beautiful paper ribbons at your family's fun run....if there is anyone else out there that does that.
If you are done and you didn't end up with a beautiful ribbon let me know. I'd be happy to attempt to answer any questions.


4 comments:
Great instructions! Thanks for sharing!
Nice instructions, planning to make these for a contest! Do you have suggestions for how to safely and securely attach the ribbon onto the person's shirt? Safety pin? Tape?
I love that I just did a search for this and your site came up as one of the top links!!! nice work!
I don't get this part:Now take two of the quarters of your circle and push them in towards the center of the circle. Your new folds should meet up in the center. Push your top quarter down on town and crease your new folds. You should now have a wedge shaped piece of paper (when folded). Now you could stop here, but you can continue on if you want your ribbon to look like mine.
Someone please explain to me more detailed and if therea any reference on how to do it like the picture please show me.
Post a Comment