Search This Blog

Showing posts with label t-shirt embellishment. Show all posts

Wednesday, June 5, 2013

Chambray Shirt to Kids Shorts and Shirts Upcycle


Yesterday I mentioned that the old chambray shirt was incorporated into three additional articles of clothing.  I know you've been on pins and needles, so here they are.  First off, I made a little summer outfit for Miles.  He looks so adorable in it, just imagine him wearing it, because by the time I managed to snap some photos of him in it, it was covered in applesauce. 


My mom found the t-shirt at a garage sale for a quarter. The smart woman saw the potential, and just by adding a small pocket detail, we transformed the t-shirt. 


I cut a small triangle of fabric, that was 1/4" wider and taller than the pocket.  I folded the raw edges under 1/4" on both sides, and left the diagonal raw.  I pinned it in place, stitched around all sides, and added a couple of extra stitching rows on the diagonal for added detail. The raw edge will fray, and I'm looking forward to it.  It will only unravel 1/8", because I sewed that close to the r.e., but it will add a bit of texture to the shirt.

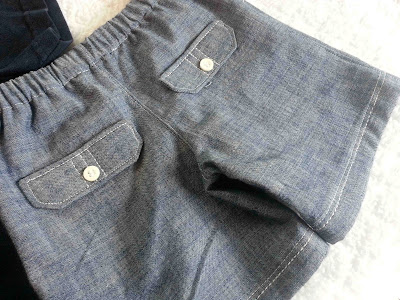
The three rows of stitching also repeat a design detail from the shorts.  You can see on the back pocket flap that there are three rows of stitching down the middle.  


Ah, now you can see it a bit better. (Pardon the over exposed phone photos.  My camera batteries are dead, so this is as good as it gets for now.)


I used a pair of Miles' existing shorts for the pattern.  They are pretty basic.  A faux fly, front pockets, and back faux flap pockets. They really didn't take much time at all, and given that I already had the buttons, the shirt material for the shorts, and the t-shirt from my mom, the entire outfit ended up costing about a quarter.  


The last article is a bit of a repeat.  I embellished on of Clark's t-shirts that I snatched up at Wal-mart at the end of last fall ($1 on sale), and added a contrast pocket.  This is the actual pocket from the chambray shirt.  I used my seam ripper, and carefully removed it.  Then, I added a bit of red stitching to the pocket yoke (?), cut the pocket down a bit, and turned under the raw edges.  Then I positioned the pocket, and used that red thread to secure it to the t-shirt.  I love this little shirt.  It's silly that something as simple as adding or embellishing a pocket can create so much interest to a plain t-shirt, but it does.


 Thanks for reading.


Friday, October 28, 2011

Top-Toberfest: A Shirt for Thunder by guest contributor Janine

 A Shirt For Thunder
Today I'm thrilled to have a guest contributor for Top-toberfest: Janine.  Janine is a work at home mom that loves to craft.  I'm so appreciative that she was willing to share her talents, and these great boys tops with us today.  She uses a variety of techniques, including: freezer paper stenciling, hand stitching, bleach, hand painting, and bubble wrap, to create some custom tops for her son Thunder.


My son’s name is Thunder Jason and I thought it would be neat to have fun with it and make him an original shirt. I find that boy’s clothing seems to be all the same and if you find something with words, pictures, etc it’s usually too over-the-top for me. I’m not a huge fan of  all the cartoony pictures and cheesy sayings.

I bought a plain, grey shirt from WalMart. First I washed it in case of shrinkage, then I sprayed some bleach on it. I would have used a bleach pen and done a more ’tatoo’ looking design, but I couldn’t find bleach pens anywhere in my town. After washing the bleach out and drying it I made a freezer paper stencil like this. I followed Cheri’s instructions and used red Tulip fabric paint as recommended by her, painting in the stencil with a small paintbrush. I made a large "T" lightning bolt and the small letters spell 'Thunder J.' When the paint dried I painted some bubble wrap and stamped it randomly on the shirt.


 And finally I did some embroidery. I made some tiny lightning bolts, ‘x’s on the wrist, collar, and bottom hemlines and embroidered “Made By Mama” on the shoulder.


   I’m SO happy with how it turned out! I‘ve also included pictures of 2 other shirts I made.


 The red shirt says, “You’ve been…Thunderstruck” and was made using the same freezer paper stencilling and bubble wrap technique.


   The blue one says, “THUNDERIFIC SO TERRIFIC!” and was made by hand painting with fabric paint and a paint brush. Hope you enjoy it as much as I do! Be careful, freezer paper stencilling is very addictive :)


Thanks so much Janine.  The tops turned out great, and I'm sure that your son loves them. I especially love the hand stitched details that you added, they really add something special.


  Want to share your custom tees or tops with us?  Link up all of your shirt related projects in our Top-toberfest link party. I'll be featuring some of my favorites from the party come November.

Thursday, October 20, 2011

Top-toberfest: Crocheted Lace Embellished Top


Source: modcloth.com via Tricia on Pinterest


I love all of the lace embellished tops that I've seen around lately.  Lace is so feminine, and dresses up any outfit.  I picked up a plain tank that was on clearance at Wal-mart, and purchased some crocheted lace at a little local gem of a fabric store.  The lace was only a dollar a yard! While I'm not one to sport a tank on its own, I love to layer them under cardigans or over a longer sleeved shirt.


Want to embellish your own tee or tank?  You can find the full tutorial below.

Monday, October 17, 2011

Top-Toberfest: Embellished T-shirt for Boys


Yep, that's right.  It's Top-toberfest time.  Hopefully some of you are as excited for it as I am.  I am really excited to share some of the tops that I've been working on, along with some amazing projects from some guest contributors.   We have several very talented ladies that were willing to help me out with the series, and share their talents with us.  I hope that as their guest posts come up you'll take the time to tell them how much you enjoy their work, after all, positive feedback is always encouraging.

For Day One of this year's Top-toberfest I thought that I'd share a little t-shirt revamp that I worked on for Clark.  I picked up a basic pocketed t-shirt at Children's Place for $1.99 on sale-Wahoo! Unfortunately it was short sleeved and plain, but fortunately we can change that.


When I was trying to decide what to do to dress it up, I had several different techniques running through my head...should I stencil it, use embroidery thread on it, distress it, bleach it, etc.  In the end I stuck to one basic process that gave it a whole new look.  With the help of some scrap knit fabric, some heat and bond iron on adhesive, and my sewing machine; I added some details to the pockets and the sleeves.