Search This Blog

Showing posts with label no sew. Show all posts

Wednesday, September 19, 2012

Tutorial: Low and No Sew Scallop Garlands


Scallop Garlands aren't anything new, and I won't pretend to be the first one to write up a tutorial for one, but hopefully this low/no sew tutorial will make the construction process quicker, and easier.

No Sew Scallop Garland


Materials: 
Bakers Twine (Length of desired garland)
5 inch circles, edges pinked, and pressed in half
Fusible Hem Tape
Iron and ironing board


My garland uses sixteen five inch circles, spaced roughly 1 inch apart, and the total length is approximately six feet.  


I used my accuquilt Go! Baby fabric cutter to cut out the circles-super quick and easy.  Once my circles were cut out, they were pressed in half, and then pinked around the edges (while folded in half).

To assemble the garland all you have to do is open up your scallops, cut a piece of hem tape that is slightly shorter than the length of your scallop, and place it right up against the fold of the circle.  Place your bakers twine on top of the hem tape.  The adhesive on the hem tape will keep the twine in place, and secure the two layers of fabric. Close the scallop. Press.  Repeat. Like I mentioned, my scallops are roughly one inch apart.


Add done.


A super easy no sew scallop garland.  No bias tape, stitching, clipping, or turning required.

Low Sew Scallop Garland


The Low Sew version is constructed in much the same way.  Cut your five inch circles, and press in half.

Pink the edges.  Doing so will eliminate fraying at the edges of the scallops.  I used a pinking blade on my rotary cutter.  It makes quick work of it.


Sandwich your bakers twine inside your pressed scallops.


 Pin in place.


Sew around each scallop, starting at the folded edge, and stitching 1/4" away from the pinked edge.  Backstitch to secure the flags to the bakers twine.


 Repeat with all of your flags.  Press (I obviously hadn't done that here).  Sewing really doesn't take any longer than the no sew version.  It's just a preference.

Enjoy. Thanks for reading!

Monday, May 14, 2012

DIY: Mother's Day Felt Flower Magnets


 I have the best mom for me, and a wonderful mother-in-law. They're quite fantastic.  I always feel a bit overwhelmed at Mother's day, because there really isn't a gift that you can give a mother, that really shows the appreciation that I have for all that they do for me and my family.  So rather than stressing myself out trying to decide what to get them, I let Clark do it for me.  What grandmother doesn't love a gift that their grandchildren picked out? 


This year when I asked Clark what he wanted to give to his Nana and Grandma, he said that they needed some pretty magnets.  Pretty magnets-great idea.  Pretty magnets to hang up all of the adorable photos of their grandkids.

So we of course decided to go to the standard mother's day theme of flowers for our "pretty magnets".

Monday, February 6, 2012

Jersey Necklush Scarf...From a Knit Dress


You've seen the t-shirt scarfs, in fact you've probably seen my tutorial here. Well here is my new ombre  Valentine's Day version.  A while back I picked up an XL women's sundress for $1 at Wal-mart.  I always feel guilty buying things like that, but all of that material for $1...it was a good buy.


I had initially intended to turn it into a girl's skirt or dress, but come on, I don't have a little girl.  So instead I made myself another scarf. Because of the shape of the dress, each color was slightly smaller than the shade below it, making it perfect for the scarf.  Each strand gradually gets smaller as you work your way up.


Very festive right?  I figure that if I get sick of wearing it I can always turn it into a chunky braided bracelet, or maybe one of Ashley's five strand braided headbands.


Thursday, August 19, 2010

DIY Faux Leather & Ribbon Belt-Part 3


Alright, this is the third and final chapter of the DIY Faux Leather Belts, I promise.  I am not going to go through and do a thorough tutorial, because frankly, I think that most of it is pretty self explanatory.  If you have any questions just let me know.


As I was working with this material I remembered that I had a leather hold punch set.  I had purchased it for book binding, and had stashed it away.  I pulled it out and started imagining what I could do with it.  Initially I was thinking that it would be rather handy to add belt holes (which it is), but then I came up with a couple of additional uses. 
Notice the cutting mat, it is a must.

 Now there are a number of different types of leather punches.  Mine happens to be a more basic model.  It has interchangeable heads for punches of different sizes.  You simply select the size you'd like, place it on top of your material, and use a hammer to cut through the material.  Disclaimer: when using my leather punch I always have to have it on a hard surface (like the kitchen floor), and I have to have a protective layer (such as a cutting mat or cutting board).  I usually have to give it about 7 or 8 good whacks with the hammer and a couple of twists and the punch is made. 


One idea was to make a thin "leather" belt with ribbon laced through out it.  I cut out a piece from my red material. I cut it so that the ends almost met around my waist, rounded the ends of the material, and began punching holes.  I punched one hole on either end of the belt about 1/2" in.  I then made a series of punches along the belt. I left 2" between each set of holes that were 1/2" apart.  The sets of holes were where the ribbon was exposed on the outside of the belt.  I added a bit of fray check to the end of my ribbons so that they wouldn't fray, and I was done.  I left about 10" of ribbon on either end of the belt for tying. If you like the look of this belt, but don't have a leather punch available, you could always use an x-acto knife or pair of sharp scissors to cut slits in your material.  


The other belt that I made with the punch set is a wider and slightly more decorative belt.  This belt I intended to have some overlap (unlike the red belt).  I cut it about 4" wide and long enough to wrap around my waist with about 5" of overlap.  I wanted to make a decorative pattern at the end of the belt similar to what you might find on a pair of wingtip shoes.
Placement marks

 I marked my pattern onto the end of the belt, and using a variety of different sized punches made the holes.

 I also added a simple punched pattern on the loop of the belt and around the edges of the belt itself.
Punches along edges of belt

  I love how you can catch a peek-a-boo of color when the belt is layered over a top.  I made belt holes on both the top and bottom overlapped material.  That way I could lace ribbon through the holes and tie it in a bow or a knot.  I positioned the holes close enough together that I could also use a standard sized pin or brooch to fasten the belt. 

I'm still working on my bow tying skills, but I am sure it will come with time.  These are quick and easy belts to make, and they don't require any sewing.  I used satin ribbon for the ties, but you could use anything that you have on hand. 

Okay, I promise that I won't pop in with anymore belt posts for awhile, but you might see a bit more faux leather in the future-I have to use up the scraps.

Looking for a leather punch?  Here are a number of available leather punches.

Check out where I'm partying today-I love a good link party.


Friday, July 23, 2010

How to Make Paper Award Ribbons


Ribbons for the oldest runner (most likely my dad), and the first woman runner.


Things are getting pretty busy around here.  I am gearing up for girl's camp next week, I am attempting to turn out a quiet book in record time, and the next three days are going to be devoted to a family reunion.  I am not quite sure how I am going to get things done.  I had intended on posting about how to sew with knits today, but I think that I will save that for when I get back from girl's camp.

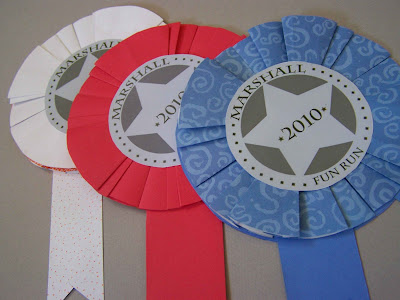
I mentioned the family reunion, well my parents are planning it this year, and my dad organized a family fun run as part of the festivities.  My mom thought that ribbons were necessary.  I was given the responsibility with coming up with some sort of image for an award and some simple ribbons.  This is what I came up with.

I designed a simple medallion for the center of the ribbon using Photoshop, but you could do the same thing in most photo editing programs.  Because this is a Marshall family reunion I designed the medallion to look a bit like a Marshal badge.  I printed 6 off on a page and I was ready to go.  I searched through my box of old scrapbooking supplies and found several sheets of colored scrapbooking paper.  I used medium weight paper (not card stock) for this project.

Now lets get started.

To make one paper ribbon you will need:

2-3 sheets of medium weight scrapbooking paper
1 3 1/2" paper medallion printed as desired (birthday boy, princess, 1st place, last place, ect.)
2 paper tails for you ribbon (mine are 1 1/2" wide and about 6" long.
Glue stick or other adhesive
Tape
Bone folder *optional

Cut out  five 6" circles, I could get 4 out of a 12x12" sheet, or two from an 8 1/2x11.  Cut two tails from your remaining scraps of paper,  Cut a notch out of each end of your tails.

Fold in Half
Fold In Half Other Direction

Now we are going to fold our paper.  If you follow Make it and Love it, or Kojo Designs, they have used a similar folding technique in recent projects.  You will start by folding 4 of the 5 circles in half one way, and then in half the other way.  Your circle will be divided into equal quarters. You can use your bone folder to make your folds nice and crisp.


Push two sides in towards center and flatten


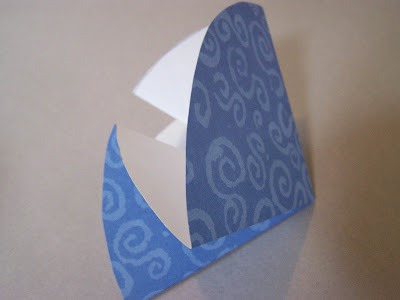
Now take two of the quarters of your circle and push them in towards the center of the circle.  Your new folds should meet up in the center.  Push your top quarter down on town and crease your new folds.  You should now have a wedge shaped piece of paper (when folded).  Now you could stop here, but you can continue on if you want your ribbon to look like mine.

Outer creases are bottom creases, middle crease is adjusted, and center is newly created.
This is a poor diagram to show the placement of the folds on the circle, but maybe it will help.

Now this is the portion that I don't really know how to explain.  You are going to adjust your folds and create an additional pleat so that your ribbon ends up looking like this.  Take the top side of your newly folded wedge piece of paper and adjust the edges so that they are slightly set in  from the creases on the bottom side of your wedge.  You will need to make new creases.  Now you will take the extra paper from your adjusted top pleat and make an additional pleat to sit on top.  This takes a bit of adjustment.  I wish that I had a better way to verbalize the process, but each ribbon was a bit of trial and error so I can't quite explain it properly.  Your wedge should maintain it's original size (which is a quarter circle).  When I unfolded one wedge it appeared to have 10 folding creases.  So maybe that will provide you with a bit of insight.

Front
Back-This is how your ribbon will look if you don't complete the last folding step.

You will repeat each of these steps on a total of four of your circles.  When you have four folded you will attach them in the center with a small piece of tape on front and back.

Now take your adhesive and glue your medallion to the center of the front of your medallion.

Take your two ribbon tails and secure them to the remaining 6" circle.  Mine overlapped the circle by about 1 1/2".

Apply adhesive to the paper circle and overlapped portion of the tails.  You will now attach your "bloom".  Press down your bloom and medallion so that they are securely attached.
1st, 2nd, and 3rd

You are done!  Now you can give away your beautiful paper ribbons at your family's fun run....if there is anyone else out there that does that.

If you are done and you didn't end up with a beautiful ribbon let me know.  I'd be happy to attempt to answer any questions.


Friday, July 9, 2010

Headbands, That Last Little Something Special


I mentioned in my post on Tuesday that I was hoping to make a headband to go with the Itty Bitty Baby Dress that I had made, well yesterday I finally got around to it.  Now I'd never made an infant headband from stretchy lace before so this was a bit of an experiment.  I found some stretch lace at Joann's along with some crystal-like beads, I added some felt petals, and ended up with this.  I think that it is pretty darling.  I only wish that the lace was cream instead of white, but it was the only thing that I could find.  If anyone has any suggestions on the best material to use when making infant headbands I would appreciate it.  Now most of the felt headbands that you'll find are made from wool felt, but I didn't have any on hand, and I didn't think that this eco-fi felt looked half bad.  With the acrylic felt I think that color choice is essential.


Earlier this week I also made a couple of headbands to add that last little something to some of my favorite outfits.  Now I love all of the felt headbands out there for big girls, but I don't know if I can pull them off.  These are a bit larger than I am used to wearing, but I think that I like them.  I simply cut out my shapes and used my hot glue gun to adhere them.  I attached them by making small loops for the headband to slide into.  This way I can easily remove the headband if I want to switch it out with another piece.  This is the same technique that I used on my rosette headband.  I'd have taken pictures of me modeling the headbands, but I need to improve my self portrait skills.

This is all sort of an experiment, and I am by no means an expert, but let me know if you have any questions or suggestions.