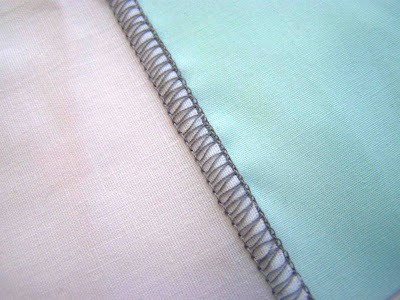
Flatlock stitching is a technique that I've wanted to figure out on my serger for awhile now. A flatlock seam can be decorative when serged on the fold of a fabric, or used to join two fabrics together, while creating a finished flat seam.
The set up of the machine is pretty simple. It is a three thread stitch, with the needle in either the left or right position. The multi-purpose guide foot is used, and can be extremely helpful when stitching along a folded fabric.
Tension Settings: (Brother 1034 D)
Left Needle: 1.0 (wide stitch)
Right Needle: 1.0 (narrow stitch)
Upper Looper: 4.5
Lower Looper: 7.0-8.0
Differential: 0 (far left)
Stitch Length: 3.0-4.0
Knife: 3.0-4.0
Multi-purpose guide foot attached. The white plastic piece on the right of the foot is the guide. The metal wheel on the left adjusts the position of the guide.
If you are flatlock stitching on the fold of a garment, you will press the fold. Then align the fold of the fabric with the guide foot.
I found that my stitches were the best if the guide sat in the middle of the stitching.
Because the stitching is unbalanced, when the fabric is pulled open, the stitching pulls flat on the surface of the fabric.
 |
| Bunchy fabric. |
Initially, I had my guide foot wider, and my fabric always bunched up between the stitching when pulled open, when I moved the guide closer to the left needle, the fabric laid nicer.
The wrong side of the flatlock stitch is decorative in and of itself. It creates ladder pattern, very similar to the blind hem stitch. Either side of the stitching can be shown on the garment.
Flatlock stitching can be done to join two pieces of fabric.
Serge just as you would if the material were on the fold. When the seam is pulled open, the top piece of material will fold over toward the edge of the flatlocked stitch.
I've yet to try the technique out on an actual project, but can't wait to do so.
Have you used this technique on any projects? If so, what were they?
I've seen the stitching on swimsuits, raglan t-shirts, and kids clothing. I love the look of it.
Just a little reminder that you can receive 10% off your orders from the P&G eStore this month, with free shipping on orders over $25. There are several olympic deals going on still, so be sure to stop by and snatch your favorite products from the comfort of your home office.


7 comments:
I flatlocked seams on a raglan t-shirt - highly disappointing. It looked cute but despite weaving in my ends, the stitching unraveled during my son's first wear. I don't think it is as stable a stitch as a 4 thread overlock.
Great tutorial, Tricia! This is perfect for decorative stitching! I've been wanting to try this on my new serger-- I think we have the same one, so i"m that much ahead thanks to you!
I am confused. The photo shows the right needle setting at zero, but your description says 1.0.
chiicka.dee In the example I was creating the wide three thread flatlock seam, so my needle was on the left side, if you had wanted a narrower seam, your needle would be in the right position, set to 1.0, and the left would be at 0. It just depends how wide you want your seam, and where your needle is positioned.
Thank you so much for this, I have the same serger model and I've struggled with perfect flatlock stitches. My sample using the knife is going to go through some heavy duty cycles to test it's overall integrity. Its such a blessing to have stumbled upon your post! Btw, go Idaho!
Wow, this post is incredibly helpful! It's clear that a lot of time and effort went into creating such valuable content.steel machining
Nice articles and your information valuable and good articles thank for the sharing information metal wheel guides
Post a Comment