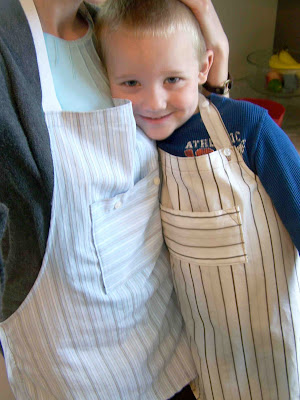
Since we've celebrated Father's Day, we can now go through all of the worn dress shirts that have been replaced, and turn them into something new. Dresses are great, a new top for yourself, an outfit for your little guy. But if the dress shirts that you have on hand are stained, a bit thread bare, you can turn then into something useful...like an apron.
Clark loves to help me cook, and I usually love to have him help me. It's a really good thing for us to do together, it keeps him entertained, and I feel like I'm teaching him useful things. Neither of us are really tidy cooks, so aprons are a nice thing to have on hand. We grabbed a couple of my husbands old button up shirts, cut them up, and made some nice cooking aprons for ourselves.
Read More. . .
Materials:
Dress shirt
2 yards of ribbon
2 D-rings-or- a button
For a S/M Women's Apron- adjust widths for larger sizes
1-Cut the sleeves off of the shirt.
2-Cut the back of the shirt off below the yolk.
3-Fold the shirt in half
4-Measure 6 1/4" out from the center fold (at the top of the shirt).
5-Measure 14 1/2" away from the fold (under the arm).
6-Cut from your top measurement down and under the curve of the arm scythe.
7-Cut the side of the apron straight from the newly cut curve, down to the hem of the shirt, at the 14 1/2" mark. Your piece should look similar to the one above.
8-Cut two pieces of 16" long ribbon, one 5" long piece, and one 20" piece.
9-Cut a pocket out of the remaining shirt material 8"x6 1/2". I cut mine from the front button placket. I used the finished edge as the open pocket edge.
If you have a serger you can serge the raw edges of the apron. This will make it easier to turn the fabric under. If not, don't worry, it's not necessary.
Starting with the curved edges of the apron, turn the right side of the fabric under 1/4". Press.
Turn the newly pressed edge under an additional 1/4". Press again.
Stitch in place.
Repeat this process on the straight side seams. Next, do the same for the top edge of the apron, but turn it under 1 inch instead of 1/4 inch.
Turn the raw edges of the pocket under 1/4 inch and press. Pin the pocket in desired place (mine sits 5" down from the top edge). Stitch 1/8" away from two side and bottom edges, leaving the top side open.
You can add a little triangle stitching to the upper corners of the pocket to prevent drooping, and add support.
Next, take your five inch piece of ribbon, press raw edges under 1/4", and press the ribbon in half. Slide your D-rings into the center of the ribbon.
Position the ribbon under one side of the top edge of the apron. Stitch the ribbon in place. I used a simple box shaped stitch to secure the ribbon.
On the remaining pieces of ribbon, fold the raw edges of the ribbon under twice, and stitch to secure, on both ends. Now position your longest ribbon, under the top edge, opposite the d-rings, stitch in place as you did the d-rings. Attach the two remaining ribbons to apron sides, right at the corner.
That's it. You're done. Just a few simple techniques to make an easy peasy (and inexpensive) apron.
Clark loves the pockets on the apron. He loaded it up with cinnamon, measuring cups, and mixing spoons.
Here's a look at the back.
Child Sized Apron Measurements:
Upper Edge 5 1/2 inch from fold
Side: 13 1/2" from fold to side (under arm).
22 inches long (from top to bottom) Straight side edge is 13 inches long.
*Make children's apron measurements from the bottom of the shirt's hem up.


11 comments:
What a great idea! Clark looks so happy! I should let Ansley cook more (or at all) hahahaha.
That is so cute! I have just had a go at my first mens shirt upcycle!
I have made up a tutorial and have lots of silly pictures of me trying to model it. It would be great if you could check it out!
http://craftygeogopher.blogspot.co.uk/2012/06/singing-in-rain_18.html
Tricia, this is fantastic! You are amazing.
Thank you ... the apron looks very professional and the tute is great. We are getting a community sewing group together .... some sewers trying to empower others.... so Ive linked your tute to our FB page!
Thank you for posting the great content…I was looking for something like this…I found it quiet interesting, hopefully you will keep posting such blogs….Keep sharing
Made to Measure Dress Shirts
Very informative tutorial, thanks for sharing.
Private label apparel Los Angeles
Pattern maker
Apparel design
Clothing manufacturers Los Angeles
Apparel manufacturer
Thanks for sharing such a wonderful tutorial. Actually I was looking for such steps from a long time. Giving shirt such a such, different look so easily is remarkable. Aprons for Men are also as important as Aprons for Women.
Keep posting such informative blogs.
I have two shirts with unrepairable tears, one solid blue and one checked. So I'm using this wonderful tutorial to make two aprons for my granddaughters (the shirts are their dad's). I'm re-using the pockets from the shirts, on the opposite apron! Thank you!
thanks
Thank you so much for the tutorial and the professional apron appearance.
Also available are bowling shirts in a variety of styles and colors.
Thank you for this great contribution, I find it very interesting and well thought out and put together. I hope to read your work in the future. real leather jacket
Post a Comment