

Button, button who has the button? Well, I have lots of buttons, and I love them! But one thing that I don't love about buttons, is attaching them by hand. I'm so happy that I have a sewing machine that can do most of the work for me.

Today I'm going to show you how to attach your pretty little buttons with your sewing machine.

We'll discuss the basic button attachment, four hole attachment, small buttons, and creating buttons with a shank. I know, thrilling right? It might not knock your socks off, but it might just help you finish up those projects that just need to have buttons attached. Let's get started.

The basic supplies you'll need are your thread, buttons, and button foot (it might be in your sewing machine kit, without you even knowing it).

The first thing that you'll want to do is drop your sewing machine's feed dogs. My feed dog controls are on the back side of my machine. When the switch is moved to the left, the feed dogs drop.
 |
| Dropped Feed Dogs |
 |
| Select the button attachment stitch on the machine. See machine manual for stitch number or settings. |
 |
| Attach the button presser foot. (Shown with shank lever pushed forward) |
The button-sewing foot has space between the metal guides and the plastic base, for the button to be positioned. The button holes should be positioned on either side of the small center metal stem. There is a clear shank lever on the back of the button-sewing foot.

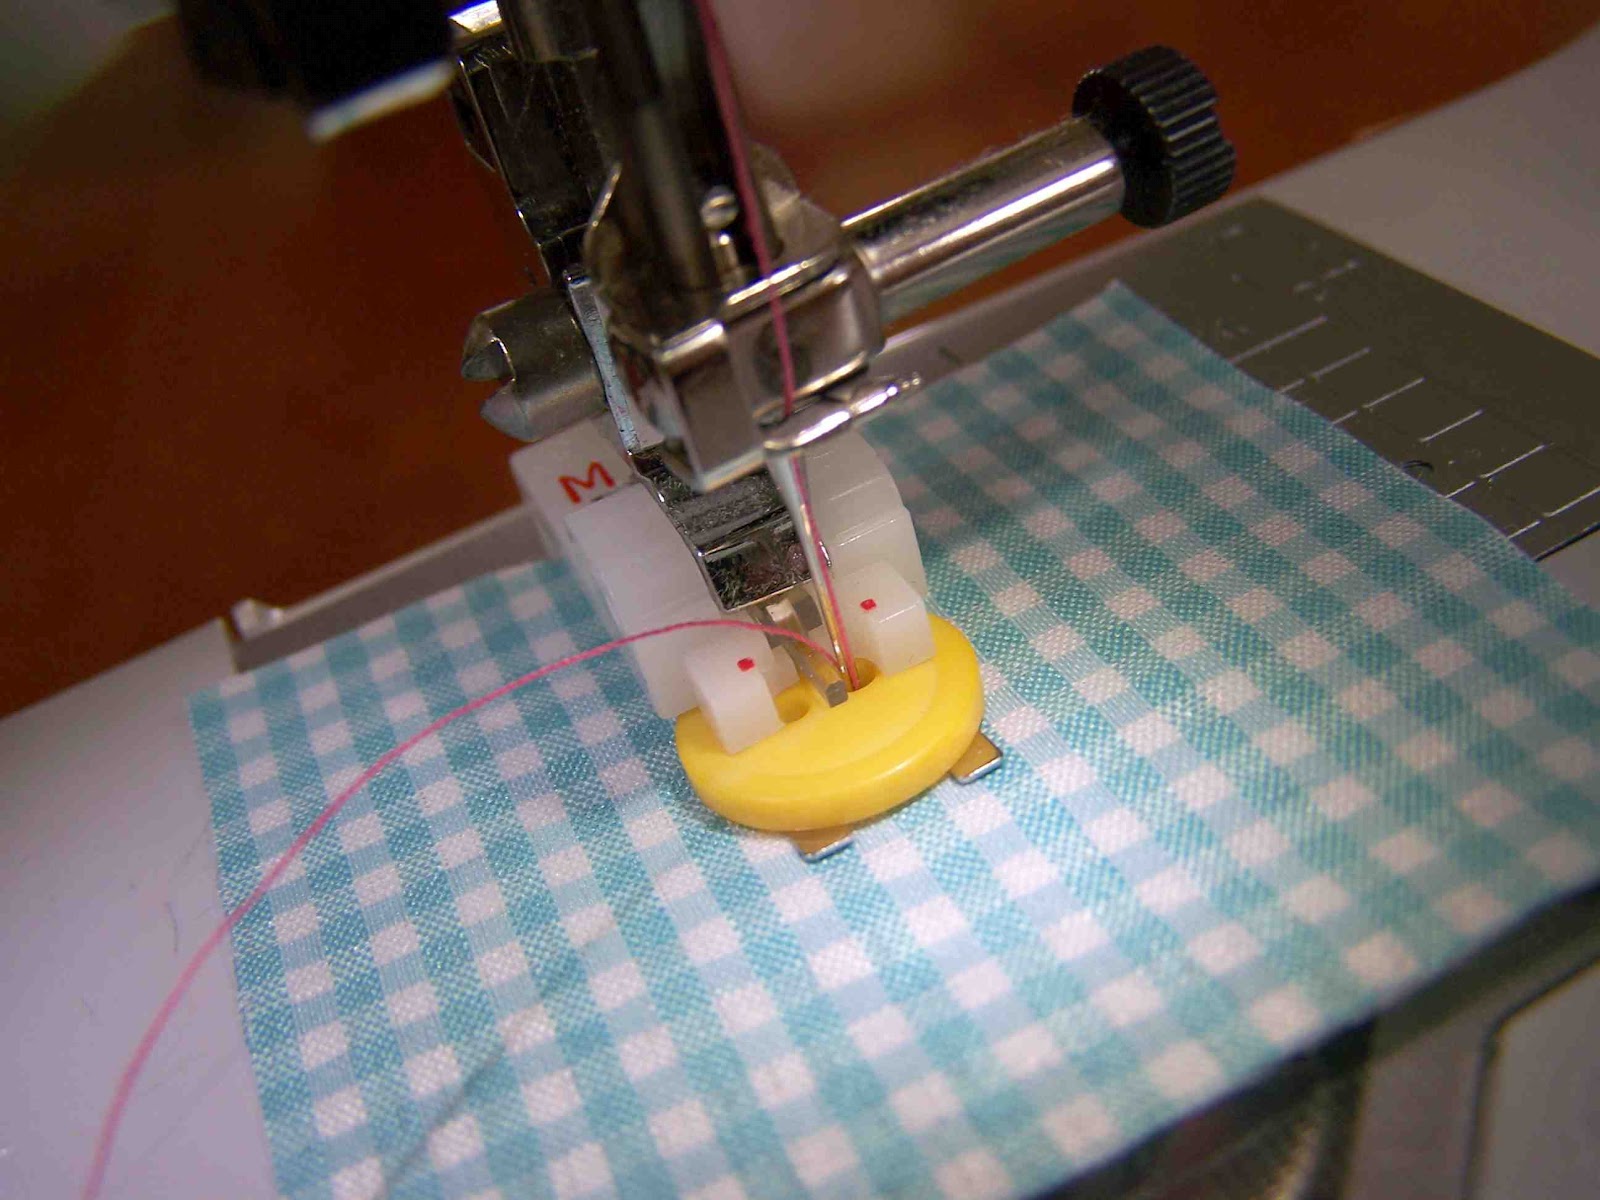 |
| For standard button attachment, the shank lever would be pushed back. |
With button-sewing presser foot attached, position button between the metal guides, and the plastic base. Turn the balance wheel, lowering the needle, and checking to make sure that the stitch width is appropriate for the button holes. Large or small buttons may need adjustment.

Once you are confident that the stitch width is accurate, begin sewing. My machine has a set number of stitches that it sews for buttons. It will reinforce the stitch and stop sewing when the stitch is complete. You can repeat the stitch sequence a second time to reinforce the button stitching (I usually do this). Leave the threads long after stitching is complete.

Thread long top threads to the underside of the garment using a needle. Tie the upper and lower threads together and trim.

Finished top view. Nice and clean.

Nice and tidy underside of the button.
The Four Hole Button

Sewing a four hole button is much the same as sewing a two hole button. The only thing that you need to remember, is to sew the set of button holes that is closest to you first. Position the button in the button setting foot, with the front (nearest to you), positioned beneath the needle. Sew a complete stitch cycle, remove and leave threads long. Reposition the button in the presser foot, with the needle aligned with the back set of button holes. Complete your second stitch cycle, and once again leave threads long.

Thread your tails to the underside of the fabric, and secure as with the standard two hole button.
Large or Small Button Holes

Not all buttons are the standard size, and sometimes you will need to adjust the stitch width so that the needle is properly positioned in the button holes.

Your sewing machine should have a standard setting, mine was 3.5. I find that 3.5 can accommodate most of my buttons, but occasionally a bit of adjustment is needed. Decrease the stitch width for smaller buttons (that little brown guy only needed to be lowered to 3.0), or increase the stitch width for a wider button (4.0 for the wider one).
Creating A Shank For A Standard Button

These are shank buttons...

...they have a little knob for button attachment, which also provides a bit of room between the button and the material. These can be helpful when your material is thick or heavy, the fabric will lay nicer if there is a bit more room between the button and the garment.
While you can't attach a shank button with a standard sewing machine, it is possible to attach a shank to a standard button, by modifying the button attachment process just a bit.

With the shank lever pushed forward begin your stitch cycle. The little plastic divider between the button holes creates a looser stitch when the button is removed from the presser foot. Leave the threads long after stitching.


After the thread is wound, tie the threads upper threads together, and trim the excess. Tie together the beginning and ending bobbin threads on the underside of the material.
That's it! Buttons attached.

By the way, I love square buttons. I think I'll start a collection.
4 comments:
Very cool. I might have to invest in some feet. I'm the slowest at hand sewing. :)
Thanks for sharing this. I like to sew buttons on with my machine, but haven't ever left the long threads. If you don't finish it off by hand, the buttons can unravel very easily. I will have to try this the next time I sew a button on with my machine.
You don't need a separate stitch and/or foot. You just need to do the following: 1) disengage the feed-dog under the needleplate (check your manual); 2) set your zig-zag width to be the distance between the two holes in the button (tricky part); 3) if you want a thread-shank (for thick-ish fabric) place a sturdy needle over the button, between the two holes; 4) stitch carefully (first few stitches are the trickiest). I did this for 35+ years with a standard 1960's model Singer that only had straight and zig-zag stitches, and no extra feet/settings, etc.
I love this idea! I haven't tried it but definitely will. I have a huge button collection and this would save so much time when making things with them. Thanks for all your tutorials.
Post a Comment