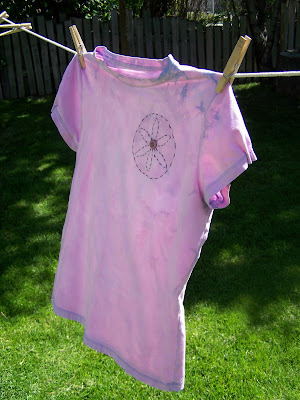
I was slightly disappointed with the results from my first attempt at bleaching my t-shirt. The thing that was really pleasing to me was the shade of pink that my blue t-shirt turned when it was bleached (a lovely thistle color). I also liked the image transfer...but I was a bit disappointed with how subtle it was. I made some rookie mistakes with this project. 1-I didn't properly adhere a piece of freezer paper to the inside of the shirt...this allowed the bleach to bleed through the fabric onto the back, and back up into the image area from behind. 2-I used a cleaning spray bottle that didn't have a fine mist. A perfume spray bottle or old hairspray bottle probably would have worked better. The cleaning bottle was hard to control, I couldn't bleach small areas as well as I'd liked to have been able to. Oh well, live and learn.
So my attempt at transferring my image didn't turn out as well as I'd hoped. I did like the color as I and the pattern of the transfer, so I decided that the piece could still be salvaged. I picked up my bleach bottle again, and began spraying the majority of the fabric, being careful not to interfere with the pattern previously transferred. I didn't like the area around the transfer, it wasn't as subtle of a transition from bleached to unbleached fabric (it kind of looked like a bucket of bleach was splashed on my shirt). So my second attempt with the bleach bottle went much better. I was able to alter the color of the majority of the fabric, just leaving happy little blue spots that peek-a-booed through my new "thistle" color. (Does anyone remember Hypercolor T-shirts from the late 80's early 90's (you would breath on them and they'd change colors), well I never had one, but now I feel like the hippest girl on the block. )
I'd resolved the color issue with the T-shirt and now it was on to making the image "pop". You can see in the early photos that the transfer did work, but it was rather subtle (2 shades of thistle instead of thistle and blue). So I picked up my handy embroidery thread and began doing some hand stitching around my image. I didn't stitch around all of the little circles in the design, but I did do the flower. My T-shirt is stretch so I allowed my thread to pucker the fabric a bit (I just liked the look of it). I then attached a simple coordinating button in the center of the flower for added interest. Then I used some lightweight fusible interfacing to secure the threads and prevent them from pulling when the shirt is being worn.
I'll be honest, for my first attempt I used an old T that I wasn't crazy about, it usually serves as a pajama top. So the fit isn't perfect. My new flower image, paired with the new thistle hue, filled me with a desire to "girlify" the T-shirt even more. I gathered the sleeves by using some more embroidery thread. I just gathered the top of the sleeve (probably the top 1/3, I did want it to be comfortable and still fit over my arms).
The fit of the T-shirt isn't perfect, but I am much more pleased with the alterations. I might still wear it to bed, but I will probably wear it out to do yard work, maybe I'll even wear it camping this weekend.


No comments:
Post a Comment