Top-toberfest in winding up, with only a few posts left I'm a little bit sad. But today I have a fun project for you. I call it the Granny Hoodie, it features delicate lace trim, and a little vintage applique that I inherited from my grandmother.
There's nothing quite as cozy as a hoodie on a cold day, and this sweatshirt fleece is so soft. I LOVE it.
A better look at the lace trim and the applique. I was really tempted to add elbow patches as well, but in the end left them out.
Since I draft most of my own patterns, I sew as I go, plans change, and things aren't always documented as well as I'd like. This isn't going to be the most detailed tutorial, but hopefully it will give you a good enough idea to construct your own.

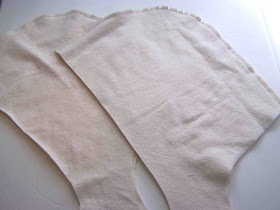
I drafted the pattern for the hoodie using an existing sweatshirt. By tucking in the sleeves, and folding the sweatshirt down the middle, it's pretty easy to draft front and back pieces.
To draft the sleeves I followed the curves of the sleeves and the arm scythe. Seam allowances were added where they were needed.
On the front bodice piece I needed to create a notch for the hood pieces. To do so I determined how wide I wanted my hood tabs/tails to be, and divided it in half, as my pattern is cut on the fold. Seam allowances were then added to my bodice pattern piece before cutting out the notch.
For the hood pattern piece, I traced my basic hood shape, and then added the needed material to connect at the notch. Tails should be 2 times the width of the bodice notch pieces, as they overlap, and are not cut on the fold.
I also drafted a small front pocket.
Materials:
Sweatshirt fleece-I'm not sure how much material I used. 1.5-2 yards
Ribbed knit for arm cuffs and waistband
Lace trim- 2 yards?
Coordinating thread
sewing supplies
Cut one front bodice piece
Once Back bodice piece
Two Hood pieces
Two Hood pieces for lining
Ribbed knit for the cuffs
Ribbed Knit for the waistband
Begin by sewing your hood pieces along the curved back edge. Notch the curves to allow for turning. Press the seam open. Turn hood and lining pieces right sides out.
Place the hood and lining pieces right sides together. Pin at center seams.
Sandwich the lace trim between the hood and lining pieces, raw edges matched up. Stitch along the outside edge, securing trim as you go.
Clip the front bodice notch at 45 degree angles, in the notch corners. Do not clip past seam allowance. Overlap hood tails, and pin raw edges to the bottom raw edge of the front bodice notch. Stitch in place.
Hood attached.
Position pocket on sweatshirt, and stitch in place.
Fold sleeves in half along fold, sew side seams.
Turn sweatshirt inside out. With sleeves right side out, insert them into arm scythes. Match up side seam of sweatshirt with bottom seam of sleeve. Pin. Starting at the seams, stitch around the arm/sleeve.
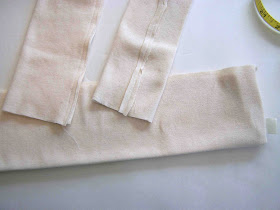
Add waistband and arm cuffs. Cut cuffs and waistband 2 times the desired width, plus 2x seam allowance. Cut them 3/4 the length of the bottom edge of the sleeve or sweatshirt, plus 2x seam allowance. Fold the ribbed knit in half, to form a tube. Stitch. Press seam open, fold in half to double up, press.
Insert cuffs over sleeve edge. Line up raw edges.
Stitch the armband to the sleeve. Press seam up.
Repeat this process for the waistband. Ribbed knit will be stretched as you attach it to the sweatshirt, doing so will allow you to make up for the discrepancy in size, and pull in the sweatshirt at the bottom. To make sure that the ribbed knit is evenly distributed, divide both the sweatshirt and the waistband into quarters, and pin.
Attach an applique if desired, mine is attached by hand.
All done.
Nice and Cozy.


How fun! I never would have thought of adding lace to a hoodie. =) I really like how you did the tail ends of the hood. It's a fun detail, and it also would make the hoodie easy to get on and off without fastenings.
ReplyDeleteI love this! I really like how you drafted the collar. I saw a hoodie kind of like this at Banana Republic with the same placket. They didn't have the color I wanted. Maybe I should just make one! Where did you get your fabric? I love that you sew so many knits because they are super easy to work with (once you get used to it). Where do you like to shop for knits?
ReplyDeleteThis is so cute! Thank you for sharing your how to.
ReplyDeleteSweatshirts can be so unfeminine, but this one is so feminine!
Such a lovely sweatshirt!!!! Beautifully made. :)
ReplyDeleteThis is so beautiful! It looks incredibly comfy and feminine; love it!
ReplyDeleteI love this, thanks for sharing!
ReplyDeleterUNNING TO GET THAT PIECE OF HEAVY KNIT AND MAKING THIS toDAY!
ReplyDeleteIf you want best quality hoodies is reasonable price then check out Circle Clothing for best hoodies.
ReplyDeleteSelamlar! Bu makale hakkında çok yararlı tavsiyeler! En büyük değişiklikleri yapan küçük değişikliklerdir. Paylaşım için çok teşekkürler!
ReplyDeleteStay warm and stylish with custom quarter and half-zip hoodies, perfect for any occasion.
ReplyDeleteDesigned for performance and comfort, women’s workwear hoodies and jumpers are the perfect layering option for any work setting.
ReplyDeleteTruly appreciate your support—it means a lot and keeps me inspired! Geng Face Hoodie
ReplyDelete