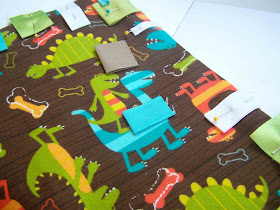
It seems like when Clark was a few months old he developed a fascination with tags. He love the tags on clothing, tags on toys, tags on his blankets, etc. Before having him, I never quite understood the need for a cuddle square or lovey, but after dealing with his tag fetish, I realized that it was a wise parent that thought of making a tagged cuddle square. It satisfies the need that some little tactile learners have to pull on tags, and hold their blankets close.
I decided to use some of the scrap fabric and material that I have sitting in my stash to make a cuddle square for Baby #2. It is a really quick and easy project that even the beginning sewist can tackle.
You'll find the full tutorial below.
What you'll need:
 28 (2 1/2"-3") pieces of ribbon. A variety of ribbon scraps in coordinating colors. I had 7 different kinds of ribbon in varying widths. A variety of textures is also nice.
 Standard sewing supplies
The first thing that you'll want to do is press your ribbon in half.
Once your ribbon is pressed you will lay it out on the right side of your flannel. You can vary the length of the tags by having some ribbons overlap the raw edge. I had seven ribbon tags per side. The raw edges of the ribbon should face the same direction as the raw edges of the material.
Pin the ribbons in place, leaving a 6" gap on one side. This gap will be used for turning the cuddle square right sides out later on. The tags will be attached later.
When you have figured out an arrangement that you like you will want to stitch all of your ribbons in place using a 1/4" seam allowance.
Place the right sides of your minky and flannel together. Pin in place. Stitch around the perimeter of your cuddle square leaving your six to eight inch opening where the ribbons have been left off.
Clip corners close to stitching line, and trim seams.
Congratulations you're finished!
It's a simple little project, but it's fun to make, and will help use up those left over fabric and ribbon scraps. It would also make a nice addition to a baby gift for a shower. I've seen a lot of adorable cuddle squares that have looped or knotted the ribbons for variety. Do as you please, I just kept mine simple.
Thanks for reading.


I love these taggy blankets. I sometimes sew inside the soft exterior, some plastic so it's nice and crinkly for the bubba to play with. Love your fabric choices!
ReplyDeleteI love that dino print, so cute.
ReplyDeleteLove the fabrics!!
ReplyDeleteI love your color choices! This is one toy that my son never had that I have on my list to make for #2. Poor kid... he gets nothing and #2 gets everything because now I know what I want and have the time to make it, strangely enough :)
ReplyDeleteJust made one of these for the first time! I was always scared to work with minky but I used a walking foot and it turned out perfect!! Thanks for your instructions!!
ReplyDeleteInstrutions are well done.Easy to fallow.
ReplyDeleteLove the tutorial, just a quick question... Do you sew the tags in place with a 1/4" seam and THEN sew the two pieces together also with a 1/4" seam? Also, in the last step, do you sew 1/4" seam all the way around the premiter after closing the gap with a 1/4" seam?
ReplyDelete