Search This Blog

Monday, January 30, 2012

Sweet Pea Leggings: Tutorial and Pattern


Today I'm sharing the bottom half of my Sweet Pea outfit.  I shared the dress yesterday. The dress is 6-12 months, but the leggings are a bit more size specific.  This pattern is 6-9 months. Length could easily be added at the bottom hem

If you are trying to squeeze in some chubby little thighs, you'll want to make sure that your knit fabric has a good stretch to it.  Joann's has a rayon/spandex blend knit that has great vertical and horizontal stretch.  

 Materials:

Sweet Pea Legging Pattern
Knit fabric
17 1/2" elastic 3/4" wide
(2) 1 1/2" pieces of elastic 1/4" wide
12" ribbon 3/8" wide
sewing machine
coordinating thread
serger (optional)
safety pin
fray check or fray block
ruler
washable/removable fabric marking pencil, chalk, or marker

Print off Sweet Pea Legging Pattern, cut around rectangular border.  Match up pattern lines, and tape together.  Cut around legging pattern piece.  Cut two legging patterns on fold-the direction of greatest stretch should run perpendicular to the length of the legging. If you don't have a serger available, you may want to add an extra inch of fabric to the bottom of the leg hem for hemming, another option is to use an old t-shirt and use the existing hem of the shirt as the legging hem.

Sweet Pea Dress Pattern and Tutorial


Reduce, Reuse, Refashion: Sweet Pea Dress 
from T-shirts.


So today I'm sharing a pattern and tutorial for this little refashioning project I just finished.  It is a really simple design, sews up in a flash.  I was able to use up two shirts that I had sitting in my "to be refashioned" pile.  

This particular dress was made for my niece that is about 26" tall, and close to 18 lbs.  I'd say it's probably a 6-9 month size as far as most clothing sizing goes, but I think that the top could work anywhere from 3-6 to 12 months. It has a tie at the top that draws in the neckline; it could easily be adjusted to grow with your baby.

Keep reading for the full tutorial, and link to the free pdf pattern.

Friday, January 27, 2012

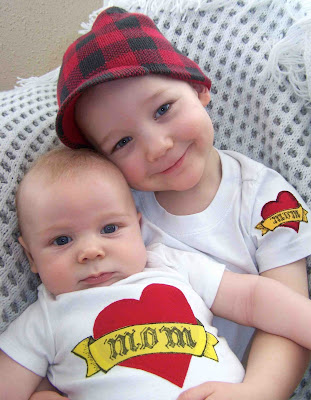
For Valentine's Day...and Mother's Day: Mom Heart Tattoo Applique


 I must admit, Valentine's day is a hard holiday for outfitting boys.  You don't want to dress them in ruffles, lace, and huge amounts of pink. However, I think that I came up with a fun and appropriate approach to the holiday.


How about a Mom Heart Tattoo Applique.  Because these two little guys are so rough and tough....alright, not so much, but they sure are lovable. When Clark and I started our photo shoot I asked him to act tough, all I got were smiles and kisses (maybe he was remembering our Christmas shirt shoot).  


Right now I'm really enjoying the fact that I am the girl that is in the center of their lives, I dread the day that Clark runs off chasing girls, and forgets all about his dear old mom. I'm marking my territory.  I'm reminding them now, while their young, that mine is a heart that they don't want to break.


If you are interested in this particular applique template and tutorial, I have a pdf file available for purchase.  The file includes three different sized templates.   I've also written up a photo tutorial to explain the process that I used to create my appliques.  The pdf template will be emailed to the buyer, and you can be printed at home. 


Check out the guns! 
While I'd love to share all of my projects with you for free, I feel like I need to make my time more profitable.  We're hoping to get my husband  into grad school later this year, and we're trying to save our pretty little pennies.  Don't worry though,  I have several more projects and tutorials that I'm working on.  Hopefully I'll have them to you early next week.

 A whole lotta love here.
 Thanks so much for reading!

Thursday, January 26, 2012

Fleece Scarflette Tutorial


We have had a relatively mild winter so far, and I've been very happy that I haven't had to bundle up quite as much as usual.  This week, we did receive enough accumulation to send Clark out to make snow angels, and push his dump truck through the snow.  I typically don't love spending long periods of time in the winter weather, but after spending a few days cooped up at the sewing machine, I had to get out.  I was reminded of how much I enjoy my fleece scarflette that I made last year. It provides you with the coverage you need, and stays in place as you walk/run/etc.

I decided that I'd re-post my original tutorial for those of you who may have missed it.  It's a great remnant project, and is a quick beginners project.


One of the problems with a pull over neck warmer, is that fleece often creates quite a bit of static electricity.  Static and hair styles often don't mix.  To avoid pulling the fleece straight over the head, and having every hair on your head standing on end, I added a simple button closure.


There are many possibilities when it comes to making and embellishing these fleece scarflettes.  One other difference between these neck warmers, and the pull over neck warmers, is that these are not quite as tall.  They aren't designed to be pulled over your mouth or chin.
All of the above scarflettes are made with slightly different techniques, so I'm going to show you how to make the one above, and I'll provide a few instructions for making the different variations.


Wednesday, January 25, 2012

Cardboard RocketShip with Template


I've got a fun little project to share today.  This is a cardboard rocket ship that Clark and I made out of some cardboard that we've had stored. 

Crafting with kids can sometimes be frustrating.  I like to keep the crafts simple and quick. We turned this little rocket ship into a birthday card for Clark's Papa.  On the back we wrote: "Hope your birthday's a blast".  This is could a really fun homemade valentine as well.  


We gathered up our colorful cardboard, though I really wish we'd used some old cereal or kleenex boxes.  This cardboard was a bit too thick for the project.  You want it to be thin enough to cut through (especially for little hands), and rigid enough to keep it's shape.  You can find my printable rocket ship template here. The basic instructions are included on the template.

We added a small picture of clark to personalize the rocket a bit, but you could decorate with stickers, markers, glitter, etc.

Now have fun crafting with your kids/grandkids.

Tuesday, January 24, 2012

Long Lost Project: Leather Coil Headband


Here's a long lost project for you.  I've been intending on making myself a leather headband with multiple strips, since I made my leather coil cuffs, but I never got around to (which is ridiculous because it took no time at all). I recently snatched up a piece of bronze colored foil leather, it was perfect for the project.


I cut a 3/4" x 14"  strip. I left about an inch and a half of solid leather on each end, and  cut two slits in my leather (1/4" apart) using my rotary cutter.

I then used this tutorial, and some elastic, to turn it into a little headband.


The cuts in the leather allow you to separate the individual "coils", for a fun look.


I had enough leather left over for a slightly different coil cuff.  I cut three of my strips to 1/8" wide, and two to 1/4".

Monday, January 23, 2012

Problems Leaving Comments On Blog?

So my sister recently told me that she was having trouble leaving comments on my blog.  I thought that it was a bit strange because I was still receiving comments, but thought that I'd do a little research.  It turns out that for some reason, on some blogs, some people can't comment.  To remedy the problem I switched my comment settings from being embedded in the post to opening in a pop up window.  This seems to have fixed the problem.

I just thought that I'd share, because maybe you've had similar problems with your blog.

Sunday, January 22, 2012

Super Hero Capes


Last week most of my available sewing time was dedicated to sewing sewing six reversible super hero capes for a family member.  


I was sewing them for six of her grandsons, three of which happen to be from the same family.  I wanted each of the brothers to have a unique cape...so that there wasn't any confusion.  Unfortunately, there really aren't very many caped super heroes:  Batman, Superman, Robin (sidekick), and a few lesser known heroes.

 I chose to make a Batman cape, red Superman cape, and a blue Superman cape.  Each of the capes has an un-caped super hero logo on the back: Green Lantern, Spiderman, and Captain America. The brothers can now play different superheroes at the same time.


In the past I've used ribbon for a tie closure at the neck, but after having to stop dinner to tie on a super hero cape, I knew that there had to be a better way.  I figured that a few inches of elastic would do the trick. The elastic stretches over their little noggins, and keeps the cape in position. Can I just say that I'm happy to have this project wrapped up, I have a lot of projects that I'm eager to work on.

Happy sewing!

You can find my Super Hero PDF Sewing Pattern in my shop!

Thursday, January 19, 2012

Tutorial: Shirred Scarf


I had some requests for  a more detailed explanation for the shirred scarf, so hopefully this will help.

Materials:
1/2 yard of material (you'll only use 14")
coordinating thread
elastic thread
sewing machine
serger, or rolled hem presser foot.

Wednesday, January 18, 2012

Sewing Tips and Tricks Round Up

Here are a few clever tips and tricks that I've rounded up on pinterest. What are your favorite sewing tips?


Add tape to the bottom of your presser foot to sew vinyl easily.


Printable bias tape maker.


Keep spools and bobbin thread together with golf tees.


Store ribbon in oatmeal canister.


Add seam allowance to your own patterns.


Make the perfect hem.

Monday, January 16, 2012

Infinity Circle Scarf Tutorial


I thought that I'd share a tutorial for a simple infinity, or circle scarf.  I know you've probably seen a number of different tutorials for this type of scarf, but they are really easy to make, and very versatile.


You will need one yard of light weight (apparel) fabric.  This particular material doesn't have any stretch to it, and is some sort of polyester blend.  I bought it at a discount fabric store, and unfortunately they never give you much information about the material. Voile would be a great choice for this type of project.

You will cut your yard of material into two eighteen inch strips.  My original piece of fabric was 36"x 42", so once cut, I was left with two 18"x 42" strips.

...keep reading...

Thursday, January 12, 2012

Vintage Patterns, and what to do with them?


When ever I make it to a thrift store I try to check and see if they have any sewing patterns.  Usually I find a large selection of early nineties home decor patterns, or patterns for stuffed rabbits and pigs wearing dresses.  

I have had a couple of successful trips to the thrift store, and one being just a couple of days ago.  The store was well stocked with vintage clothing patterns.  I would have loved to buy them all, but I held myself to only picking up my favorites. I just imagine that some old lady died, and her children were thrilled to finally throw out the huge collection of patterns that she'd collected through the years. (I'm pretty sure that my children will have to go through the same thing).


I love vintage patterns, but mostly for the illustrations.  I don't know what has happened through the years, but it seems that most pattern companies lean toward photographs (I'm sure it is much cheaper), but the fashion illustrations always look so much better than the finished product.  In my mind it is in their best interest to keep fashion illustrators in business, and bring back a dying art.

Honestly, I will probably frame these and hang them on my wall before I get around to making them...although I am really in love with that yellow and black dress.


Many of these patterns aren't my size, but I couldn't resist snatching them up.  I wish that I were more experienced with grading patterns. It seems that it is difficult to get a correct fit with vintage patterns, the fit and sizing of dresses (not to mention the redesign of undergarments) have really changed through the years.


I love that middle dress.


I also picked up a few stretch and sew patterns.  These are multiple sizes so I should be able to get a correct fit.

Are you like me?  Do you collect patterns that you know you'll probably never get around to making?

Wednesday, January 11, 2012

A Pencil Skirt, and My New Favorite Fabric


As I was sewing up blessing outfits and bow ties for Christmas, I started to wish that I had something new to wear to church.  After all, we all deserve to dress up a bit, don't we?


I have a simple black stretch pencil skirt that I've had for a few years now.  I love the way it fits, an I wear it all too often. I decided that I'd like to recreate the skirt in a different fabric, and make it just a little bit longer.


I was thrilled when I found a similar suiting fabric at Joann's...Bengaline.  Have you heard of Bengaline?  Have you sewn with it?  I hadn't, but I fell in love with it.  It is a suiting fabric that has micro ribs running perpendicular to the selvage edge (at least this particular fabric did).  The small ribs give the fabric a nice vertical stretch.  I needed a horizontal stretch, so I simply positioned my pattern pieces with the stretch running horizontally.

The fabric is great for skirts.  It lays well, only wrinkles slightly, and it doesn't cling like most knits do.  It was also really easy to work with.  I didn't have any issues cutting out the pattern pieces, or sewing it up.  If you are afraid of stretch fabrics, this is a great starting point. The fact that the fabric had so much stretch eliminated any need for a zipper-Wahoo! I believe that I probably could have eliminated the slit in the back as well.


As far as the skirt goes, I added about an inch and a half to the hem of the skirt, and brought up the waistband.  The waistband is long enough that I can wear it up on the waist, or fold it down and wear the skirt lower on my hips.  I have a feeling that this skirt will make a great early maternity skirt (don't worry...I'm not expecting again-just planning ahead).

Just an FYI- I bought 1.25 yards of fabric, but probably only used about a yard.  The fabric is 58" wide, so you have quite a bit of material to work with.  Also, if you want to make your own pencil skirt, but don't have a pattern or existing skirt to use as a guide, check out the tutorial on Cotton and Curls.

Tuesday, January 10, 2012

Memories, a Winner, and a Freebie

I know that I've shared some pictures from Miles' Blessing Day, but I wanted to share this small album that I just created.  I've done a really lousy job of documenting our families adventures, and special days.  I used some quick pages and the My Memories Suite to create this blessing day album.  The My Memories suite offers some really fun features to make your albums even more special.  You can add music, videos, links, and even narration.  I plan on having all of our family members recording short audio clips of their memories and feelings of the blessing day. It seems that memories can fade far too quickly, and I really want to preserve them while their fresh.


Also Lyndsay is the winner of the My Memories Suite giveaway.


Lyndsay said...
I like Frosted, but it was hard to just pick one! I also love their free calendar blank pages - awesome, I've been searching for something like that!!

Lyndsay, I'll be in contact soon. 

If you didn't win, and you're feeling a little bit down, don't be.  My Memories is still offering $10 off their digital scrapbooking software to all of my readers.  Just be sure to use the promo code: STMMMS16259 at checkout.

My Memories is also offering the quick pages that I used to create this album for free.  You can follow this link to download the png files, which you can insert as you would a photo, in any software program. Booyah! Simply layer the photos behind the free templates, add some journaling, and your done. 

Enjoy the freebie!  I'll be back later this week with some projects that I've been working on.


Monday, January 9, 2012

Feature: Magic Braided Leather Cuff (and Headband)

Over the past couple of weeks I've been trying to figure out how I could make a braided leather bracelet.  I'd been running it through my mind, when I came across Melissa's (I Still Love You) year end wrap up post, and found her Magic Braided Leather tutorial. Don't you love it when that happens...an answer to my crafting questions.


I had to try out the technique the night I found the tutorial.  The great thing about this technique is that you don't have an open end of the bracelet.  You create slits in the material, and in working in multiples of six, can magically braid it.  It really does feel like magic.


I also tried out the technique on a headband.  

I used this tutorial to turn my leather band into a headband (so comfy).

Unfortunately this leather makes me look like I have a horrible case of dandruff.  

I'm so excited about this technique.  Check out the full tutorial on I Still Love You.  

Thursday, January 5, 2012

Free Printable: 2012 YW Theme: Arise and Shine Forth


My family and I are really involved with out church group.  Both my husband and I spend a good chunk of our free time volunteering to help our local congregation out. I work with the young women in our youth group. Each year all of the youth of the world wide congregation focus on a theme, which is scripturally based.  This year our theme is "Arise and shine forth...".  I decided to make up some printable cards for the young women that I work with.  They are small, about 4 1/4" x 5 1/4", but the perfect size to store in their scriptures.  I used the My Memories Suite software to create the printable.  I really loved how easy it was to create a simple printable using this software.  Don't forget to enter the My Memories Software Giveaway that I'm hosting, you have just a few more days to enter.  You can find the post here.

If you are interested in a digital file for the 2012 Youth Theme, you can find it here.  The file is for an 8.5x11 sheet, with four images per sheet. The file is for non-commercial use only.  Print off as many as you'd like, share them with your friends, but please respect that it is for non-commercial use only.


Wednesday, January 4, 2012

Selfish Sewing: Shirred Scarf

You can see the bobbin side of the shirring in this shot.
In an effort to expand my wardrobe, and bust my fabric stash, I've been sewing a bit more for myself lately, and may I just say that it feels great. I've made a couple of scarves lately, and I love how quick and easy they are to make.  I also love that one size fits all. If you are trying to think of something to give a new mama, a scarf is a perfect option.


This particular scarf is a shirred scarf.  It was made by using two widths of material that were sewn together to form a long strip (I believe that I cut my material to be 9 inches wide).  I used a narrow rolled hem to finish off the edges, and I then shirred two rows using elastic thread. My shirred rows are roughly 3 inches from each edge.

You can find my tutorial for this scarf here.


One thing that I'd really like to do this year is use up the fabric that I've collected over the past couple of years.  I've picked up fabric on sale, but unfortunately it seems that I've collected it quicker than I've been able to use it up.  This particular fabric I've only had since June, but still that is 6 months. I'd like to use the fabric I have before I decide that I no longer like it.  

So, what are your favorite stash busting projects, and how long do you hold onto fabric before passing it on?  I'm thinking that eventually I'll have to have a fabric stash swap with some local sewists.