Search This Blog

Friday, June 29, 2012

Miles: 9 Months Old


 How is it that my lil' baby is now nine months old?  It's really hard for me to believe.  I know that one day he'll be thirty (Anne), and I'll be asking myself the same question.


He's changed so much in the last couple months.  He went from not even rolling at four months to full fledge crawling by six and a half.  As soon as he had that down he was pulling himself up on the furniture, and cruising along the side of it. 


Now he thinks that he can stand by himself, and is getting ready for walking.  He's a bit more cautious then Clark was when it comes to standing and walking.  If he doesn't feel sure on his feet, he has no problem dropping down to get where he want to go.

Mobility really brought out his personality as well.  I used to think that he'd be my laid back child....I think that I was wrong.  He's a busy boys these days.  He also loves rough housing and wrestling.  He loves tickling toes, and is a real joy.


 He's also become much more expressive.  He can hardly stand it when a door closes, or I leave the room.  He'll scream, and cry. He has a couple of words (sounds that he's using), mostly mummmmummumm (mom), and Dja (dad). Miles also loves repeating sounds, Clark will scream, or roar, and Miles will echo it.  It's really quite impressive.

His face has become more expressive as well.  This silly little curled up nose, he makes this expression all of the time. It's not the most attractive expression, but it's his.


This little guy also has two teeth.  They haven't been very much fun for him.  Teething paired with mobility, have made sleep difficult (for us all).  I can't lay him down for a nap anymore.  He just cries, and cries, and cries...all standing up.  He's a stubborn little boy, and doesn't give in easily.  Any suggestions on how to help them fall asleep once they start pulling themselves up in their crib?  I'm all ears.

Fortunately we've found something that cheers him up when he's sad...his brother.  All that Clark has to do is sing Twinkle Twinkle Little Star, and Miles perks right up.

We sure do love this guy...even when he's sad.

Thursday, June 28, 2012

Tutorial With Pattern: Chevron Pintucked Sundress


I've been in a bit of a creative funk lately.  I just haven't had the energy or much of a desire to sew, partly due to a project that was more trouble than it ever should have been.


When I get in a rut like that, the best thing to do is make something that isn't on my to-do list at all.  Something that doesn't have a deadline, and is just for me.  Since I don't have any girls of my own, dresses are especially fun to make, and this little pin-tucked sundress has recharged my lil' sewing battery.

If you missed my pintuck tutorial earlier this week, and you're not familiar with the technique, you'll want to check it out before getting started.

Materials:
1 package Double Fold Bias Tape-any width will work
3/4 yard main fabric
10 inches of secondary fabric (for underskirt) 

Sunday, June 24, 2012

Vintage Fabric


About a week ago I had two family gatherings scheduled for the same day.  I was seeing relatives (on both sides), that I don't see very often.  I'd had a large piece of material that I was given, and had been holding onto it for my aunt.  The fabric wasn't quite my style, but I was pretty sure that she'd love it.  When I went to the first family gathering I gifted it to her, and as it turned out, she'd used that same material decorating her kitchen. I was pretty pleased.  I'd gotten rid of a few yards of material that I didn't want taking up valuable space in our small home.  

Love the black and white gingham!

Later that day, I moved onto the second family gathering.  We were at my husband's grandparent's home, and she invited me to look through some sewing patterns that her mom had before she died.  I gladly accepted the invitation, but had no idea that I'd end up hauling home about 5 times as much material as I'd given away.  Not only did I acquire vintage fabric, but also some towels, a sheet, and a few patterns. So my effort to de-stash was counter productive, and I now have even more material to find a home for.  

Oh well.  There are a few prints in the newly acquired fabric stash that I really love. Hopefully I can make something fantastic out of them, and clear them out of the house. Any project ideas?  Some of the material is so different from what I've worked with, that I really have no idea what to make.

Wednesday, June 20, 2012

Fourth of July Felt Wreath


I don't really consider myself crafty.  I love to sew,  I love to paint, but my house is rarely dolled up for the holidays, and I don't usually make nick-nacky things for my home.  However, I had a bit of recent motivation.  There are several women that I attend church with, and they recently decided to start a craft group.  Basically, once a month we get together and make a predetermined craft.  The hostess will have presented three separate craft ideas, and then the participants vote on their favorite project, and make it the following month. The hostess picks up the supplies, and provides instruction for the craft.  The role of hostess rotates, and we all get together to have a good time, get out of the house, and do something creative.  Not only that, but it allows us to socialize.  I can be a bit of a recluse, and often get caught up in my to-do list, so the socialization aspect is great.  

Anyway, this Independence Day Wreath was our project from last month.  You've probably seen a multitude of similar wreaths floating around pinterest.  The wreath was simple to put together, and Clark even got to help.  The ruffles texture is created by little felt squares that are folded and then pinned into the foam base.   You can find the original tutorial here. 

I have a confession to make.  This is the only wreath that I own.  Shocking, and sad.  I should probably be banned from the craft blog community.  One has to start somewhere though.  Baby steps.

Tuesday, June 19, 2012

Summer Parks Tour


School is out, sprinklers are sprinkling, ice cream trucks are parading up and down the streets, and it is summer.  I always loved summer as a child.  I enjoy it now, but am less enthusiastic about the yard work, and don't seem to tolerate the heat like I used to.  

I have fond childhood memories of summer.  I loved walking to the candy store with my brothers and sister, flagging down the Frito Lay man for overdue chips, sleeping on the trampoline, dodging the june bugs, playing softball and soccer, and of course running through the sprinklers.  

I love sewing.  I do it all year long.  I don't however, want my boys' memories of summer to involve watching mom sit at the sewing machine.  I hope that I can help them form fond memories that they can share with their children.  

My kids are still young, but Clark is old enough that he remembers what happened last year, and he's certain to remember quite a bit from this summer.  So, in an effort to make our day to day routine a bit more interesting, I'm trying to make a plan.  My husband's work schedule is different every day, week, and month. He rarely has two days off in a row, so unfortunately many of our regular camp outs and reunions aren't going to happen this summer.  So our plans, are going to be local, and achievable in a day.


I've started writing up a summer bucket list, little things that we can do each day.  I've also compiled a list of all of the local parks in our city.  I'm hoping that we can tour all of our local parks, and explore our own backyard. I printed out a little summer passport. You can find the printable passport here, courtesy of Heather Carson.  We are stamping the passport as we visit new parks.  It's just a little something that we can do to encourage exploration.


Heather provides little shapes that you can stick to your passport, but we are just using Clark's McQueen stamps.  


I've also decided that we are going to visit all (or maybe just the best) ice cream shops in our town.  Ice cream and summer time go hand in hand right?  Anyway, we are hoping to hit a different ice cream shop every week or two.  We're recording our ice cream sampling adventures in the passport as well.

It's not much of a plan, but I really think that it will get us out of the rut that we've been in.  We also signed Clark up for the summer reading program at our local library.  I've been pretty impressed with the incentives that they give the kids: ice cream coupons, passes to local play centers, etc.  It is also encouraging us to read books from different sections than we normally do.

So, what are your favorite things to do with your kids in the summer time?  What do you do in your home town?  I'd love some more suggestions for our bucket list.


Sunday, June 17, 2012

Tutorial: Men's Shirt to Apron Refashion


Since we've celebrated Father's Day, we can now go through all of the worn dress shirts that have been replaced, and turn them into something new.  Dresses are great, a new top for yourself, an outfit for your little guy.  But if the dress shirts that you have on hand are stained, a bit thread bare, you can turn then into something useful...like an apron.


Clark loves to help me cook, and I usually love to have him help me.  It's a really good thing for us to do together, it keeps him entertained, and I feel like I'm teaching him useful things. Neither of us are really tidy cooks, so aprons are a nice thing to have on hand. We grabbed a couple of my husbands old button up shirts, cut them up, and made some nice cooking aprons for ourselves.


Read More. . .

Thursday, June 14, 2012

Leather Cord Bangles and Leather Bracelets


I've recently fell in love, once again, with etsy.  I took a break from scouring the shops, because it is always so tempting to buy, but I've found that my new favorite area to shop is the supplies section.

I found a great supplier that sells all of the materials needed to make these leather cord bangles.


These bangles are super simple to make.  Cut, glue, and slide in the cord.  Easy as that. 


I made up all of these little sets of five, and sadly I'm not keeping any of them.  Off to my bazaar booth they go.

I think that I might have to make some more so that I can keep some for myself.


I also made up some new leather bracelets for my bazaar.  These have a button stud closure.  I did keep one of these for myself, and I really love it.


What have you been making lately?  

Tuesday, June 12, 2012

Father's Day Printable Round Up


How about a Father's Day printable Round-Up.  Timely right?  You still have a couple of more days to pretend that you were totally prepared for the holiday.


Monday, June 11, 2012

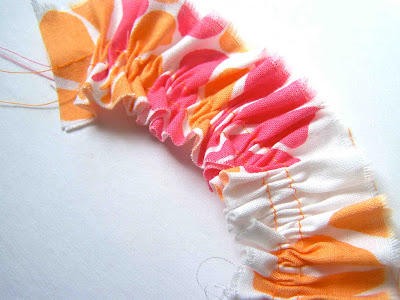
Technique Tuesday: Gathering Fabric With a Sewing Machine or Serger


Gathers and ruffles are often used in feminine garments.  Waistlines, cuffs, necklines, yokes, and sleeve caps, often feature gathered material. Gathering material really is a simple technique, but to a beginning sew-er it can seem a bit daunting.  We're going to go over the basics of creating gathers or ruffles with both a basic sewing machine, with a ruffler foot, and an overcast serger.

 Read More...

Tutorial: Hooded Towel


Today I'm sharing a tutorial for a project that has been around forever.  I know that there are many many tutorials out there for hooded towels, but I can't help but share one more.  Hooded towels are really popular in our home.  I made Clark his first hooded towel right after I started this blog, and he wants to use it every bath time.  They're perfect for the beach, the pool, and the bath. The hood keeps them nice and warm. 

Miles not so recently outgrew his infant hooded towel, and I finally got around to making him his own big boy hooded towel.  This one should last him for several years, or until he wears it out.  Hooded towels are super simple to make, here's how I do it....

Read More...

Thursday, June 7, 2012

Free Printables: Congratulations Cards


Things have been busy around here.  Warmer weather always seems to be accompanied with a multitude of tasks and activities.  Rather than slowing down, it seems like the list of things to do and accomplish just grows longer. I'm sure that you're feeling pretty overwhelmed as well.

I've been working on quite a few projects for family members, most of them design or marketing related, so I haven't had the time to sew that I'd like.  One particular day I was feeling really overwhelmed with work, housekeeping, and parenting.  Miles went down for a nap.  Rather than pulling out my sewing machine, Clark and I pulled out the paints.  We both sat down with nothing in particular in mind.  My piece of paper ended up being covered in patterns rather than pictures.  I love patterns.


There was one particular pattern that I was rather fond of.  I decided that it needed to be turned into something useful.  Since I can't print my own fabric, I decided to turn it into a useful little card.  I scanned the pattern into Photoshop, and made some congratulations  cards.  I've already filled both cards out, and delivered one of them.  The other will be sent out along with a baby outfit.  
Free Printable Congratulation Cards
I'm sharing the free printables with you.  Feel free to use the files for personal use, please do not distribute the file.

Files contain two cards per 8.5x11 inch sheet. I recommend printing on cardstock or matte photo paper.


Tuesday, June 5, 2012

Technique Tuesday: Sew a Curved Line


Sewing a straight line can be intimidating enough, but for a beginner sew-er, sewing a curved line can be pretty overwhelming, but unnecessarily so. Curved seams are found everywhere, from the crotch of a pair of pants, to a bow tie, neckline, etc. Knowing how to approach a curved seam will help you gain confidence to approach new sewing projects.

Sewing a curved line is really not much more difficult than sewing a straight line, especially if you know a few tricks. 

 
First off, much like sewing a straight line, it is really important to keep your raw edge aligned with the markers on your presser foot or strike plate.  Keeping an eye on the raw edge, rather than the needle, will help you stay on course.

Another thing to be aware of is how to steer your fabric.  Steering a car becomes second nature if you've done it enough times, and sewing a curved seam is much the same way.  Your left hand is going to be your driving hand, if will direct the fabric for you, and help you stay on course.  I generally have my fingers positioned in the center of the curve, and my fingers are slightly arched (think playing the piano).  Your finger tips will act as an axis for the curve to turn on.  If you are sewing a really tight curve, you will want to keep the center of the circle or curve almost stationary, and let the circle/seam turn around your axis point.


With a really tight curve, things can become a bit trickier, it can be difficult to follow the curve of the pattern piece, and keep the fabric properly positioned.  An important thing to remember when sewing is that you can always stop.  You don't need to power through each seam without taking a breath or a break.  When sewing really small circles or tight curves, you'll need to slow down, stop, slightly lift up the presser foot (with the needle in the down position), and reposition the fabric with the markings.  The more curves you sew, the more aware you'll become of when it is necessary to do this.

There have been projects that I've worked on where I've had to stop and lift the presser foot every one to two stitches.  It is a bit tedious, but doable.


Shortening the stitch length can also be helpful when sewing tight curves.  More stitches per inch, means that you have more opportunity to follow the curve. If your having a difficult time getting your fabric to move freely under the presser foot, you may need to adjust your presser foot dial as well.

So, with those few bits of information, it's really helpful to practice. Begin practicing with a really gentle curve, and then try to tackle some tighter turns.


A great way to become familiar with sewing curves is to practice on paper.  Draw a wavy, or gentle curve on a piece of paper, remove the thread from your machine,  pop in an old dull needle, and start sewing.  You'll pierce the paper, and be able to practice following a curve.  I've provided a practice sheet with some tighter curves, once you've tackled the gentle curves.


Practice Sheet


 Just use the outline of the shape as your raw edge of the material, and line it up with your seam allowance markers.  Paper doesn't behave like fabric under a sewing machine, but it's a great starting point.  When you're comfortable with paper, starched fabric is a great stepping stone to your next sewing project.  The more stable the fabric is, the easier it is going to be to control.


A little bit more about curved seams...Often when you are sewing a curved seam, it will be a seam that will either be pressed open, or turned right sides out.  In order to get a nice crisp curve, clipping and notching the fabric is necessary.

When you clip or notch the seam allowance, you are allowing the fabric within the s.a. to move with the curve of the seam, by either stretching, or shrinking to a different sized shape. Clipping a seam allowance (straight cut to the seam allowance), will allow a seam allowance to stretch when it is turned right side out.  Any concave curve will need to be clipped (see the upper left side of the shape).  When a curve is convex (right side), you will need to notch out small pieces of the seam allowance, to allow the seam material to fit in a smaller space when turned.  The tighter the curve, the more v shaped notches are going to be made.  

When notching or clipping, you want to take care not to clip through the stitching line, otherwise you'll have to sew your whole seam again.  If you are nervous about cutting through the seam allowance, you can start by clipping and notching one layer of your seam allowance at a time; with the tip of the scissors up against the seam, there's no way you're going to cut through the seam.  It will take you more time, but you'll avoid having to start over again.

Hope that helps.  Do any of you have any other suggestions or tips for sewing curves?  I'd love to hear.

Monday, June 4, 2012

Make It Work: Taking In A Hat


My little family decided to take a quick little last minute trip last week.  We weren't very prepared for our summer outing, and I didn't have any hats for the boys.  We stopped at Wal-mart to see if we could find anything, and the selection was very limited, especially in the baby hat department. Clark and I found this little drivers hat, and it was by far the cutest hat they had.  Unfortunately, it was too big for Miles.  I knew that it would be, but I also knew that it would be easy to adjust.


 The hat had about an inch and a half extra room.  So I cut a piece of elastic that was 1.5" long.


Luckily, the hat band wasn't tacked down to the lining.  I opened up the band, and pinned the center of the elastic to the back center seam of the hat.  I then measured 1.5" away from the center seam in either direction, and marked those points with a pin.

Read More